
Our Web Chat widget allows you to offer a live chat experience on your website. This additional channel makes it easy for your Agents to communicate with all of your end-users, whether they visit your website or your mobile app. It just takes one line of code on your website to get you started using it today!

You can customize your Web Chat experience by:
- Configure and customize the color scheme and dialogue to match your organization’s tone and branding
- Pulling in rich end-user data to tag and route new Issues to the right Agents
- Setting up Bots to automatically provide help and gather valuable information from users to help your Agents resolve Issues faster
Implementation of Web Chat requires collaboration between your web development and support teams. For this reason, we have divided the first part of a guide into two parts for each team.
When setting up Web Chat, we strongly recommend implementing User Identity Verification to protect the data of your users using the Web Chat widget. To learn how, see What is User Identity Verification, and how do I set it up?
For a list of which web and mobile browsers currently supported for Web Chat, see What browsers does Helpshift officially support for the Dashboard & Web Chat?
For complete steps to set up Web Chat, review each section below.
1. Add the Web Chat platform in the Dashboard
2. For Developers: Implement Web Chat
3. For Support Admins: Configure the User Experience
4. Set Up Your Web Chat Bots
5. Set Up Business Hours
6. Integrate Web Chat Into Your Workflow
For more detailed steps and best practices, please see our Knowledge Base.
1. Add the Web Chat platform in the Dashboard
Before you can integrate Web Chat, you need to add the new platform for your app via the app settings page in the Helpshift Dashboard. To complete this step, proceed as follows:
- Navigate to Settings > App settings > select your app.

- Under the list of supported platforms, click the ‘add platform’ button.
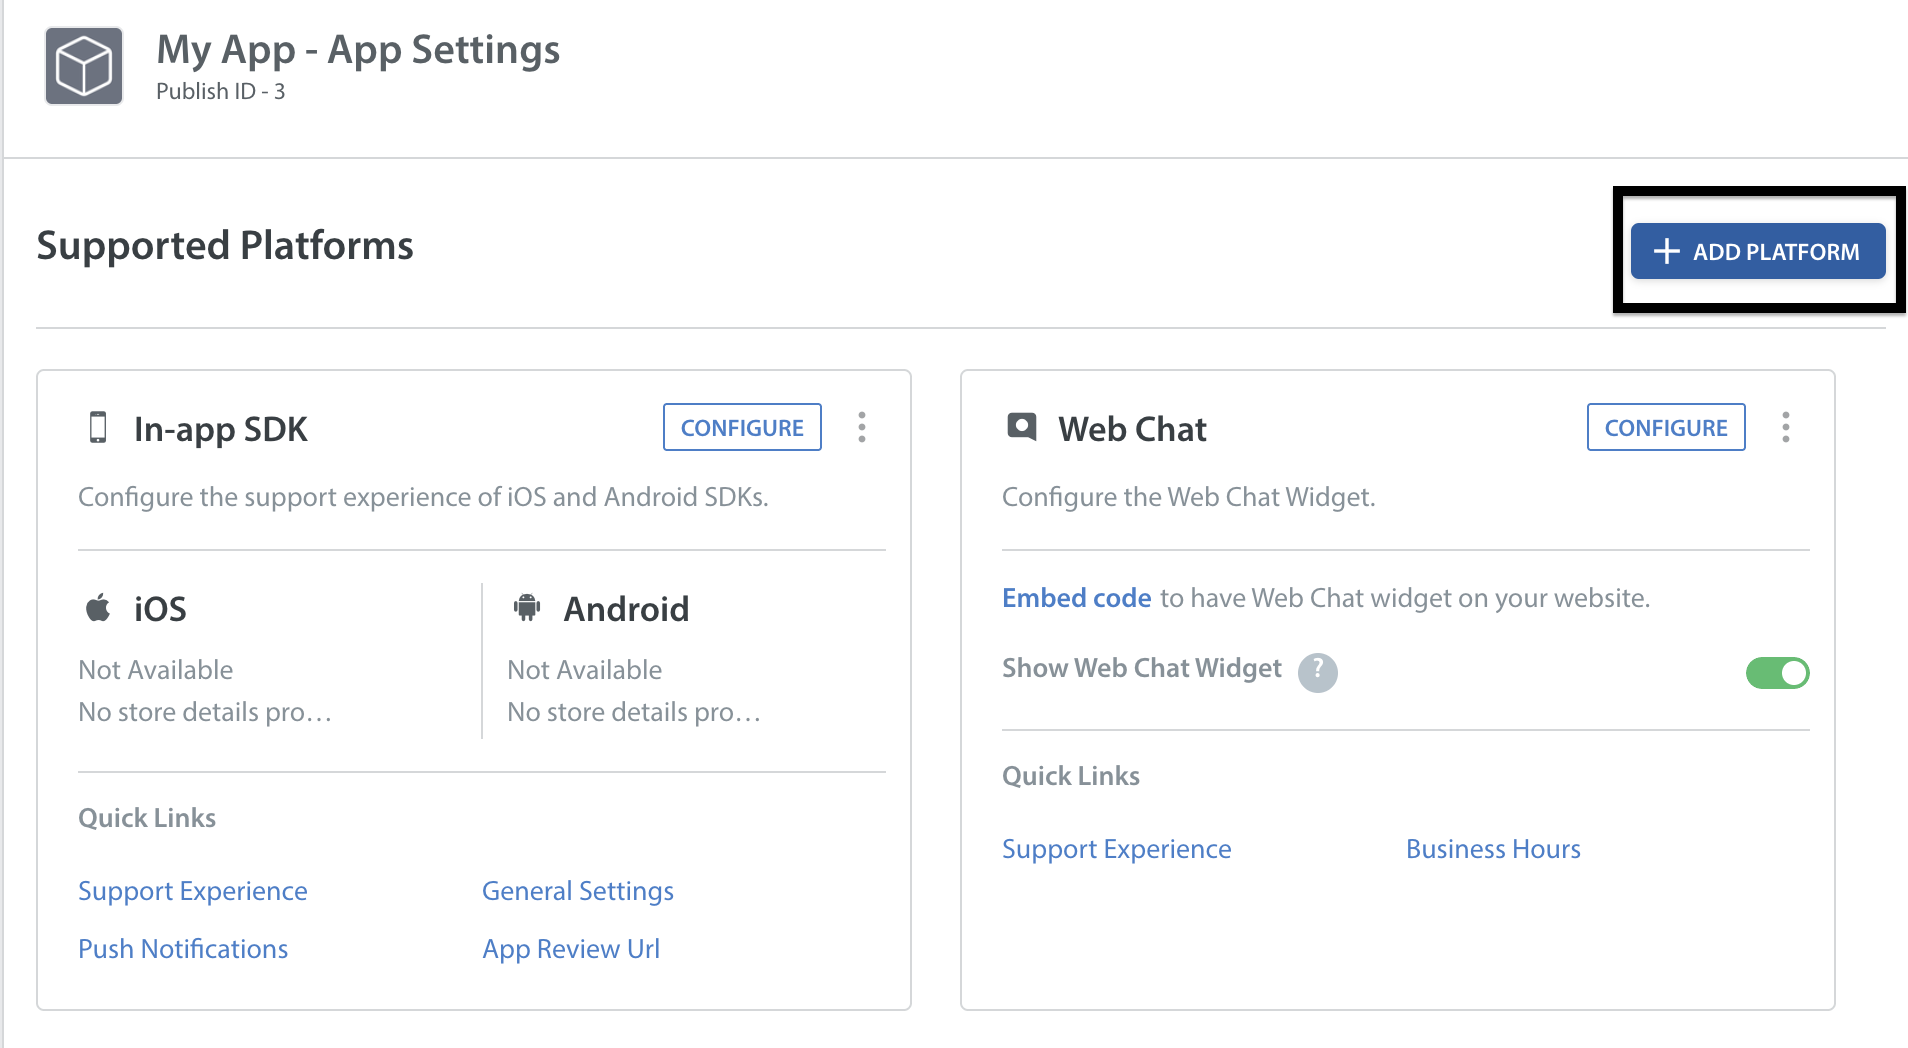
- In the pop-up that appears, check the box to the left of ‘Web Chat’, then click the ‘add platform’ button.

The Web Chat platform will now appear under the list of available platforms for this app.


2. For Developers: Implement Web Chat
The Web Chat widget can be added to any webpage using a single line of JavaScript.
This JavaScript snippet is available in the Embed Code section of the Getting Started guide for developers. It can also be found in the SDKs (for Developers) section of your app, which can be found via the steps below:
- Navigate to Settings > SDKs (for Developers).
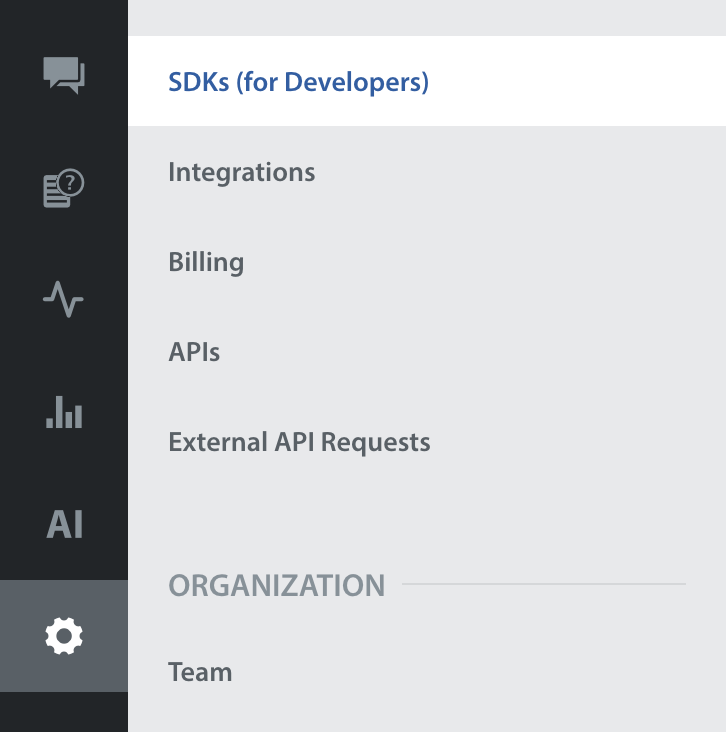
- Scroll down to where the ‘Web Chat’ platform is listed.


Your domain, platform_ID, and embed code (the JavaScript snippet with your domain and platform ID prepopulated) are listed in this area.
You can test the Web Chat widget by starting a chat as an end-user and then replying to yourself as a Helpshift Agent. To do so, reload your webpage with the code snippet added above, then type text into the ‘Send a message’ space to initiate a chat as an end-user.

3. For Support Admins: Configure the User Experience
You can configure and customize your Web Chat widget’s greeting and primary color from within the Helpshift Dashboard. The primary color appears in the following elements:
- The launcher icon
- Color in the title bar
- Accent color for buttons and other interactions, like FAQ suggestions
Note: For additional UI customization, such as the ability to configure and customize the color of chat text, customize the focus color, the typing indicator, error messages, and more, please refer your developer to our developer documentation on Web Chat design.
Navigate to Settings > App Settings > select the app you’d like to configure, then click on Configure Button in Web Chat Platform Card.

If you have only one language enabled, you’ll see text fields where you can enter a greeting message and widget title. If you have your Dashboard set up to support multiple languages, you’ll see fields to upload a CSV with translations of each of your messages for Web Chat.

You can enable the Audio Notifications toggle to prevent users from abandoning open conversations. When enabled, web chat uses audio notifications to notify end users of the following:
- When a new message is available for them in the chat window (from a Bot, Agent, or a system message)
- When a message they have sent back to the chat window has been successfully sent

You can also enable the Show Agent’s Nickname toggle to have your Agent’s nickname visible to the end-user during the chat.

(We’ll tell you how to set up business hours and Bots in the following sections of this guide – scroll down to the bottom to complete this section).
At the bottom of the page, the View Previous Conversations toggle can be enabled to allow your end-users to see their past conversations on Web Chat. To learn about how this works, see How do I allow my end users to see past conversations?

You’ll also see the User Attachments toggle. Enabling this will allow your end-users to attach files within Web Chat conversations.

Use the ‘Preview’ toggle to review the appearance of the chat window in Web Chat with Bots and other settings enabled.
4. Set Up Your Web Chat Bots
In the middle of the Web Chat configuration page, you’ll see three Bots listed: the QuickSearch Bot, the Identity Bot, and the Feedback Bot.
QuickSearch Bot
Quicksearch Bot will automatically suggest relevant, published FAQs to end-users based on their messages. After suggesting the FAQs, the Bot will ask the end-user if they still need Agent assistance.
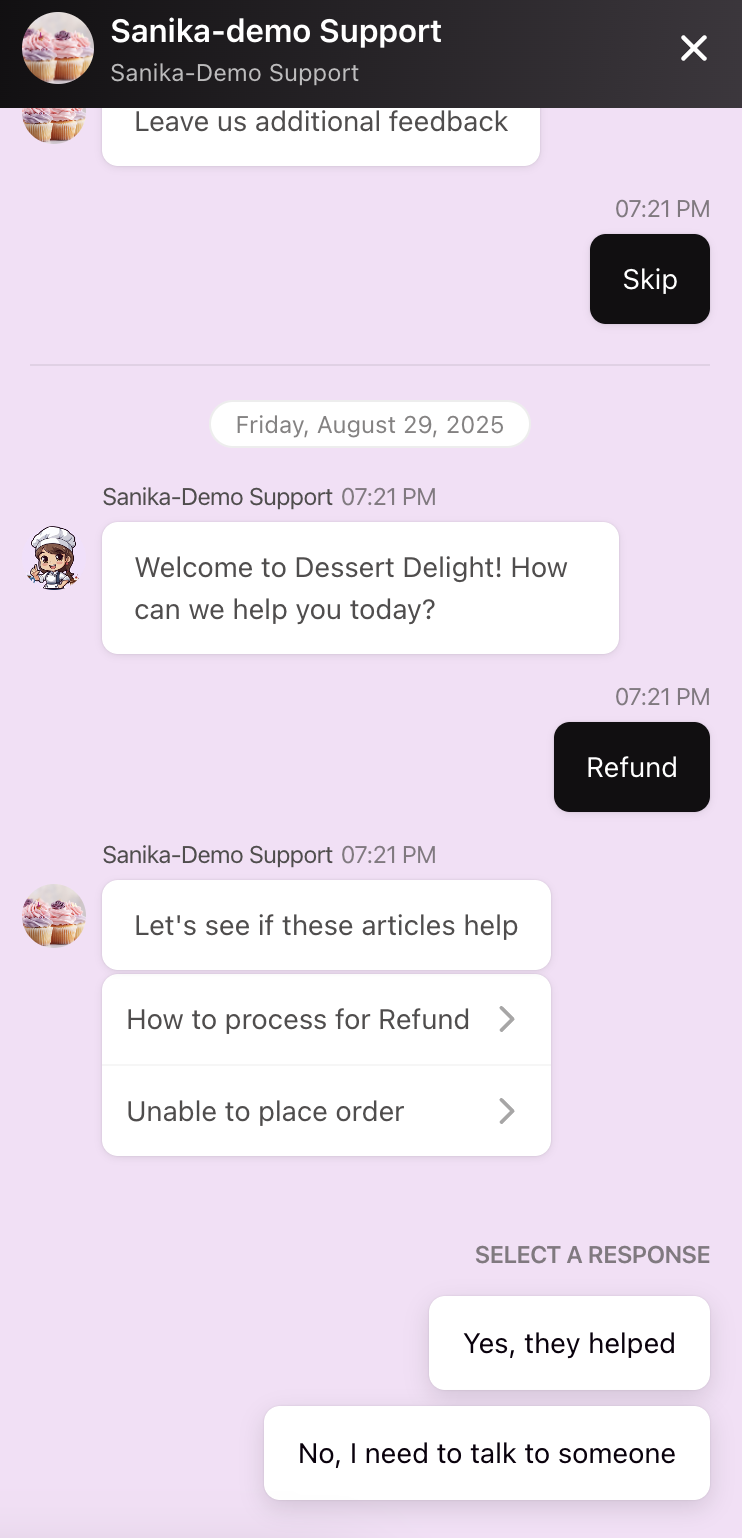
The end-user can click ‘No, I need to talk to someone’ to reach out to your support team. Only after they have clicked ‘No, I need to talk to someone’ to this prompt will a new Issue be created in your Helpshift Dashboard. The exception to this is if you also have the Identity Bot enabled, as detailed below.
QuickSearch Bot can be unlocked with an account upgrade. Please reach out to success@helpshift.com to learn more. If you already have QuickSearch Bot and want more details on how it works, see What is the QuickSearch Bot, and how do I set it up?
Identity Bot
The Identity Bot will prompt your end-users to provide their name and/or email after they have replied ‘Yes’ to the QuickSearch Bot prompt. This will appear as part of the normal flow of the chat.
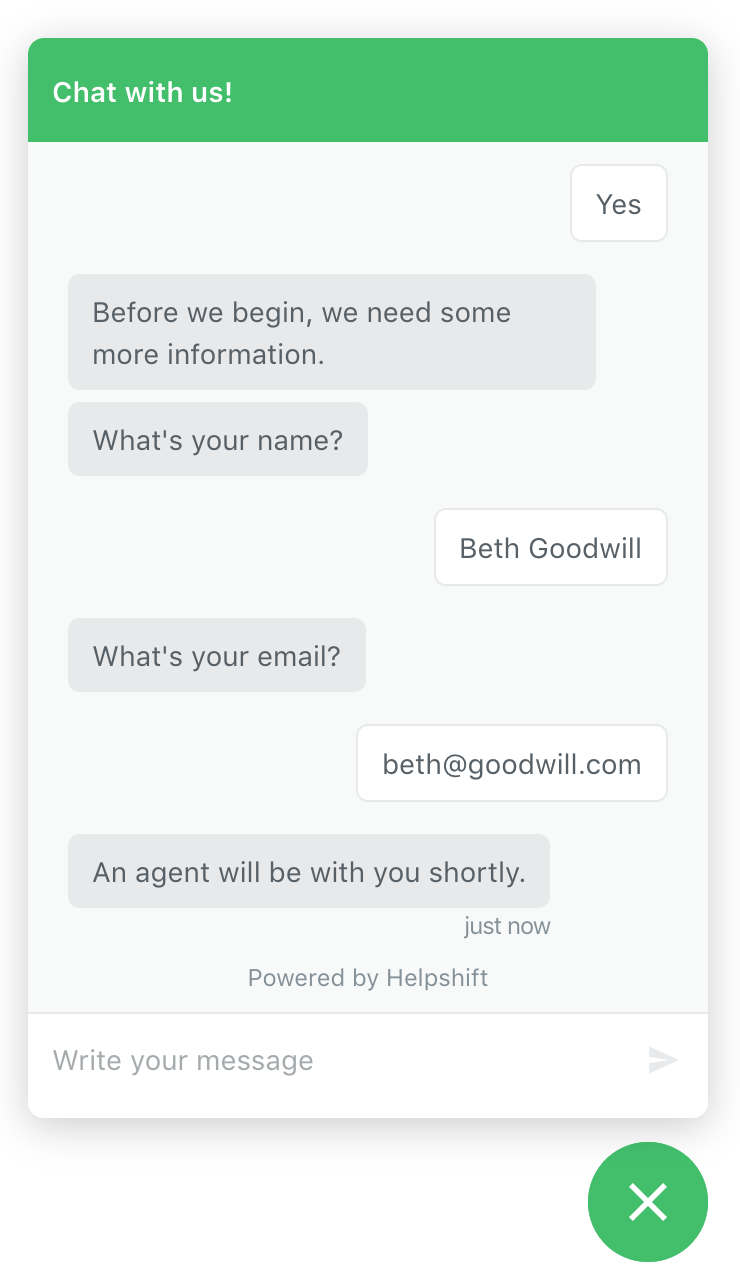
Note: In the screenshot above, a New Issue Automation has been used to send the ‘An agent will be with you shortly’ message. We recommend setting this up to manage expectations for end-users about when an Agent will be with them. To learn how, see What are New Issue Automations, and how do I set them up?
If you have both the Identity Bot and the QuickSearch Bot enabled, the new Issue will only be created in the Helpshift Dashboard after the end-user has provided their name and or/email address.
For complete details on how Identity Bot works and how to enable it, see What is the Identity Bot, and how does it work?
Feedback Bot
The Feedback Bot provides a custom request message to prompt your end users to submit feedback about their experience with the Agent once the Issue has been resolved. The end-user can complete the survey in-line within the Web Chat window, as seen below:

Prompt appears for the user to select a star rating
After the user has set a rating, they are prompted to provide additional feedback
Once they have completed feedback, it will appear in the Issue per your CSAT Permission settings.

Custom Bots
Custom Bots allow you to conduct end-to-end Issue management for common Issue types to save your Agents the work of having to respond to common question types over and over. They can be used with Web Chat to prompt users to provide an update, request additional information based on the type of inquiry, set expectations about when they should expect to hear back from your support team, and more.

To get started with Custom Bots, see What are Custom Bots, and how do I set them up?
5. Set Up Business Hours
You can set up business hours for Web Chat to set expectations with end-users by letting them know when your team will be available to help them.

On the Web Chat configuration page, you’ll see a section for Business Hours. Use the drop-downs in the ‘Hours’ sections to configure the dates and times when the business hours message should display.

In the Non-Business hours’ behavior section, you can select whether or not you’d like to allow your end-users to leave a message or hide your Web Chat widget entirely when your team is not available to respond.
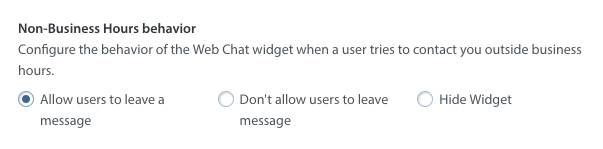
If you select ‘allow users to leave a message’, you’ll see additional options as listed below:
Provide a Contact Form Message to encourage users to reach out in the event that your team is unavailable.

Add Contact Form Fields they can complete to enable your team to follow up and continue communication.

Enable attachments so they can attach a file as needed.

Automatically tag these incoming Issues so they will be automatically routed to the appropriate Queues or filtered into Smart Views.

You can also set the message that displays to users during non-business hours by filling out the ‘Widget Title (Non-Business Hours)’ text field.

You can preview how your business hours will look on the right side by selecting the ‘Non-Business Hours’ option in the Preview drop-down.

You can track Issues that come in during non-business hours by setting up a Custom Issue Field or tag for Issues that meet these criteria. You can then track that tag data in Helpshift Analytics or the Custom Issue Field or tag data in Power BI.
6. Integrate Web Chat Into Your Workflow
New Web Chat Issues will look like this when they arrive in the Dashboard:
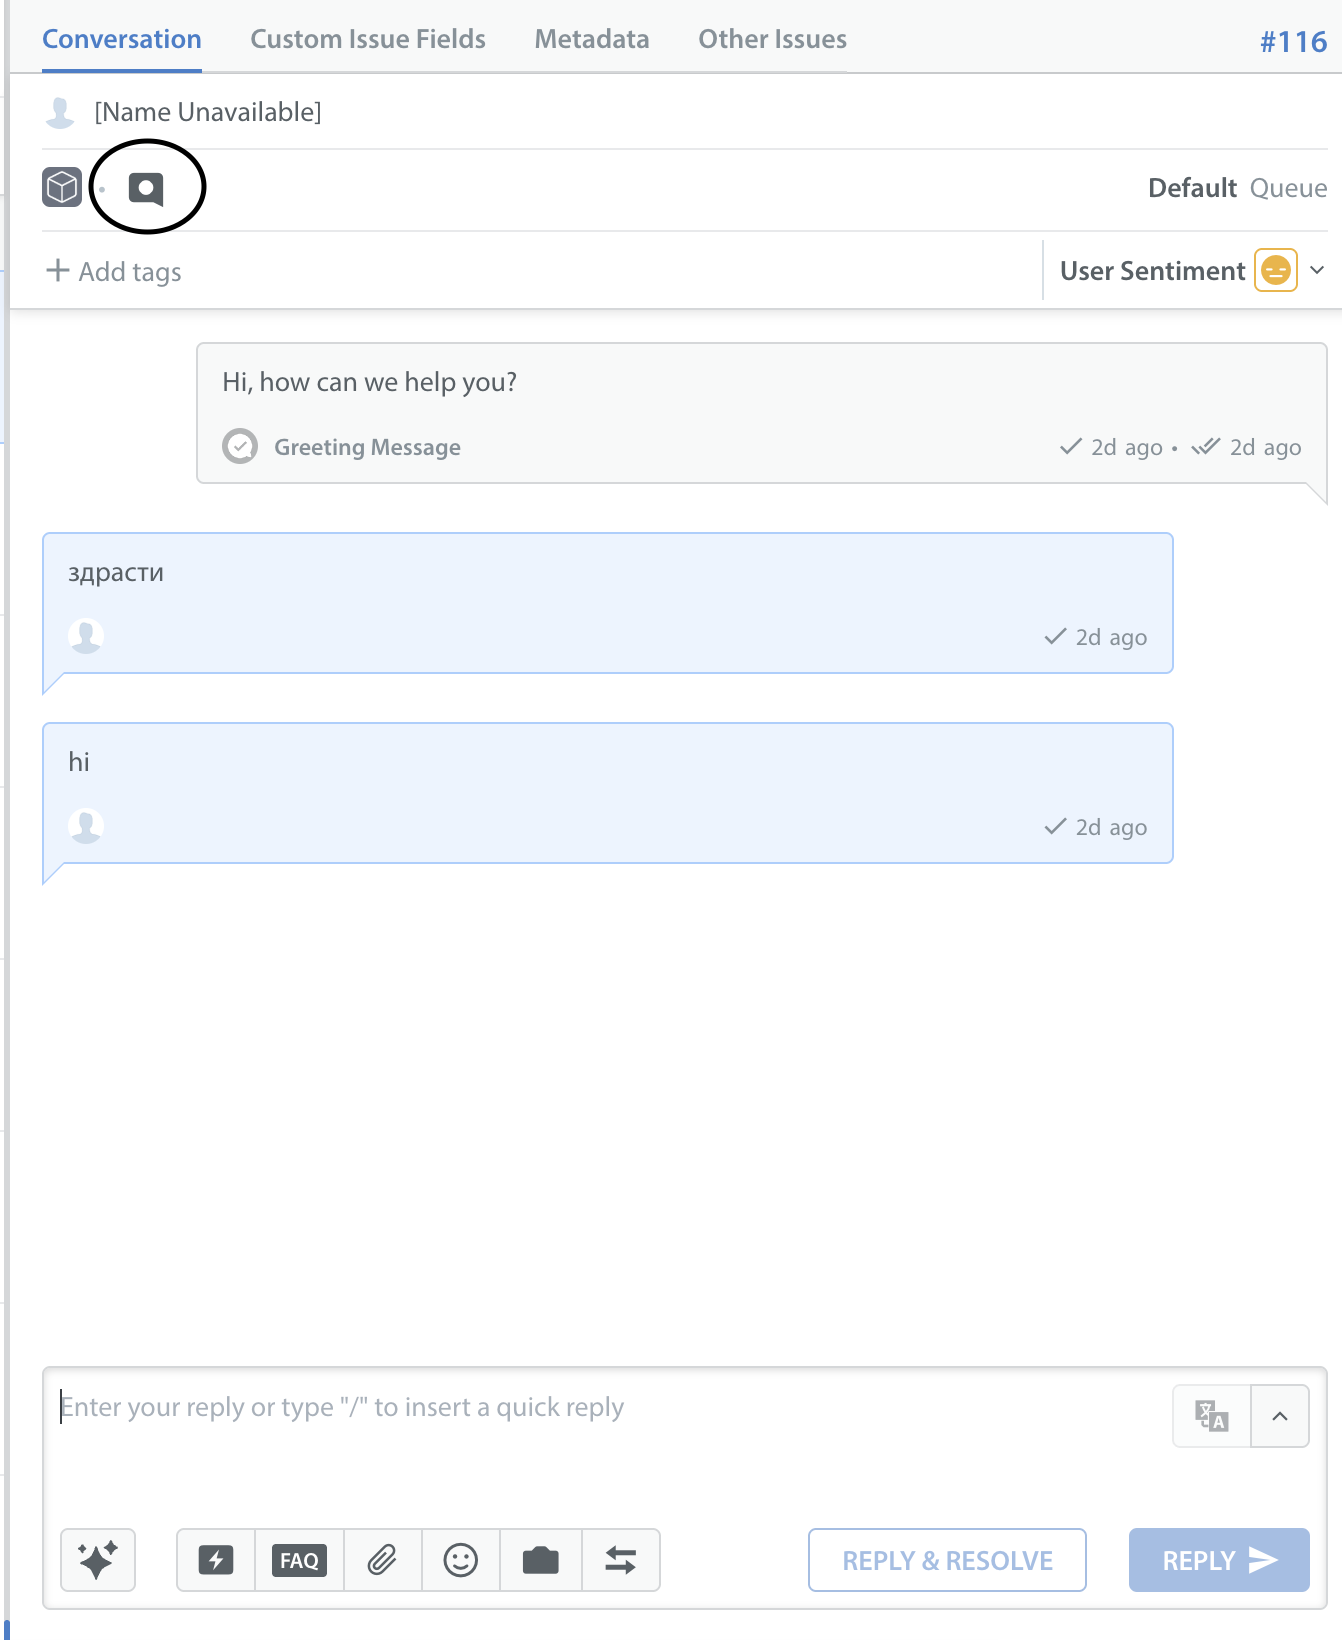
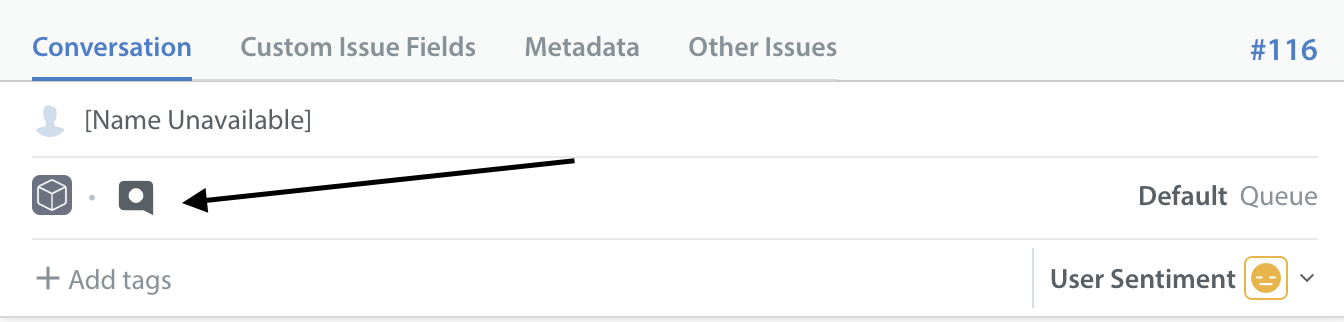
You can distinguish Issues created via Web Chat from other Issues by looking for the webchat icon on the Conversation page.
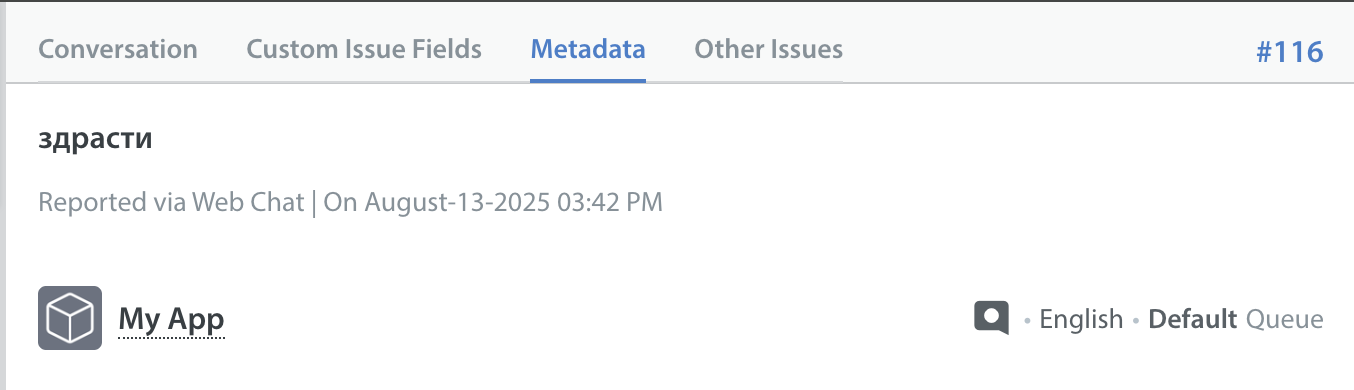
You can also check the ‘Metadata’ tab.
Web Chat is best used as a live chat experience, as this is what your end-users will expect when they start a chat. To set up additional tools for providing a live chat experience to end-users, please see our Live Chat Experience guide.
Additional resources for optimizing your workflow to support a live chat experience can be found in our Workflow Management guide.
To set up additional features and learn more about Helpshift best practices, please review our Knowledge Base.