
This guide is designed to walk you through setting up key workflow management features so that when a new Issue comes into your Dashboard, it will automatically be properly categorized and prioritized so the Agent can immediately tell what it’s referring to provide a solution.
The features you can use to create a custom workflow are as follows:
- Teams: allow you to maintain a large organizational structure
- Agent Groups: can be used to organize Agents by tiers of support, platform, specialization, and more
- Queues: a grouping of Issues sorted by end user wait time with a built-in backlog
- Automations: define conditions to trigger an automatic action on an Issue, such as reassignment, resolution, an automated response, and more
- Auto-Assignment: allows you to determine when Agents are listed as Available or Away
Each support team will configure the features above differently based on on their specific goals. This guide is designed to provide an overview of each feature and how you can use them together to build the optimal workflow to meet your needs. We will also show you examples of popular workflows to serve as a model for your team.
We also recommend evaluating the following features to further optimize your workflow:
- SensAI Predict to automatically classify new Issues for your Agents, Bots, and Automations to act on
- Bots for in-app messaging and Web Chat to offer a seamless, unified conversational support experience for end-users on both platforms
- Real-Time Operations to monitor Team and Agent performance live during support shifts and adjust your workflow as needed
- Power BI to continually evaluate your workflow needs over time by tapping into valuable analytics metrics
1. Workflow Examples
2. Planning Your Workflow
3. Team Organization
4. Integrating Features
5. Measuring Success
For more detailed steps and best practices, please see our Knowledge Base.
1. Workflow Examples
In this section, we’ve provided four examples of support workflows based on common goals that many support teams have. Keep in mind you can mix and match elements of these workflow examples to create the one that best suits your support team’s needs.
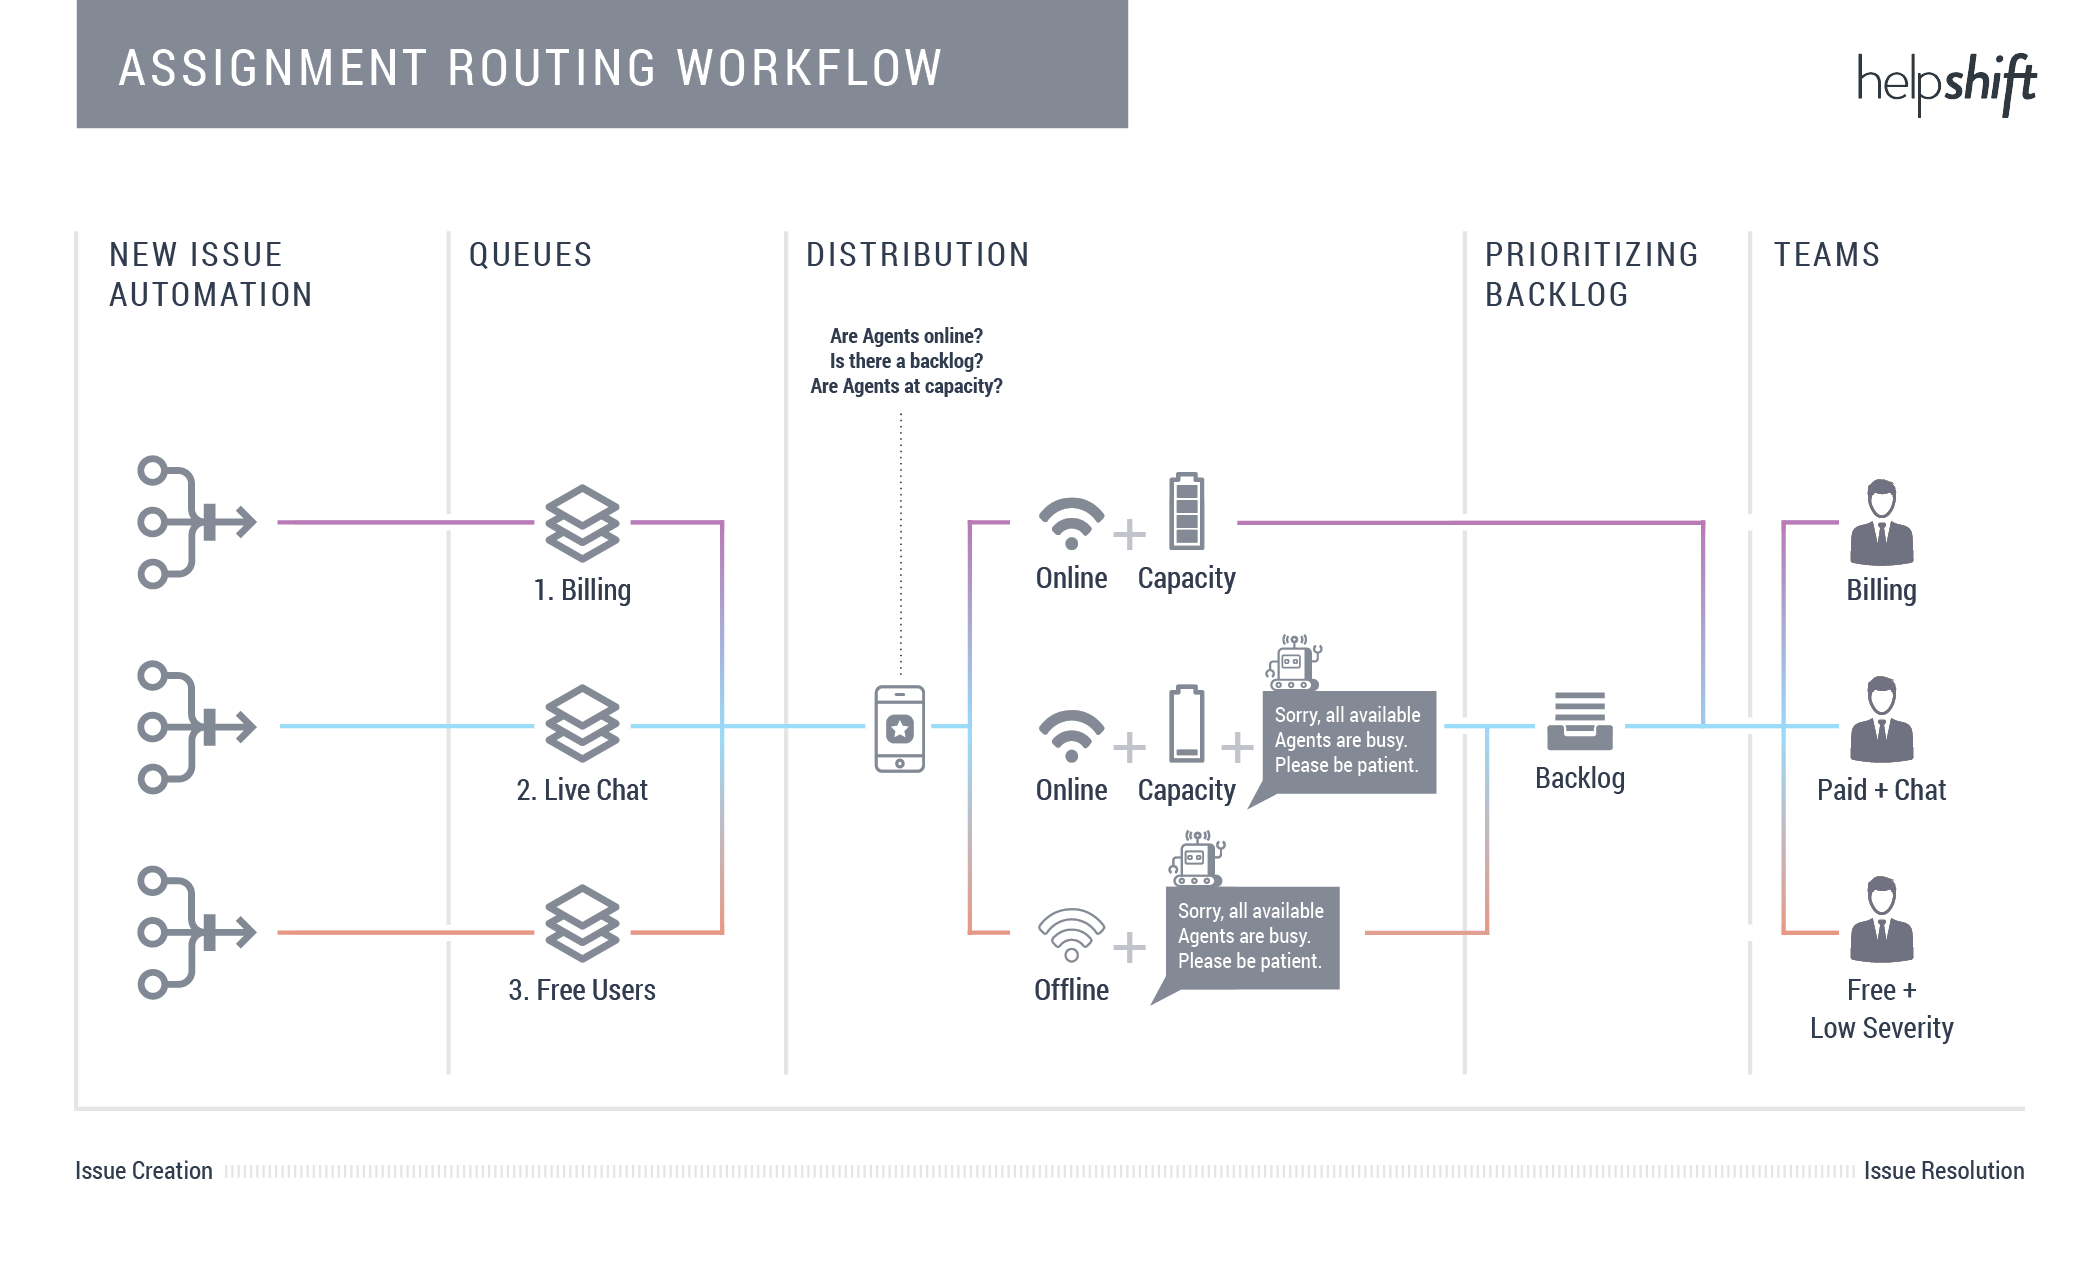
Workflow #1: Manage backlog and Issue prioritization
Use Queues with New Issue Automations to distribute new Issues automatically to Agents. During distribution, the backlog is prioritized over new Issues. Before assigning, the system checks if any Agents are available based on your Auto-Assignment settings and if they have capacity to work on additional Issues.
Workflow #2: Assign SLAs based on Issue priority
Dictate your SLA and the priority of new Issues based on channel (iOS, Android, web), type of problem (billing, bug, feedback), and the user’s value (VIP, paid vs. non-paid user). Our routing engine distributes new Issues to qualified and available Agents with time to first response being the top KPI.

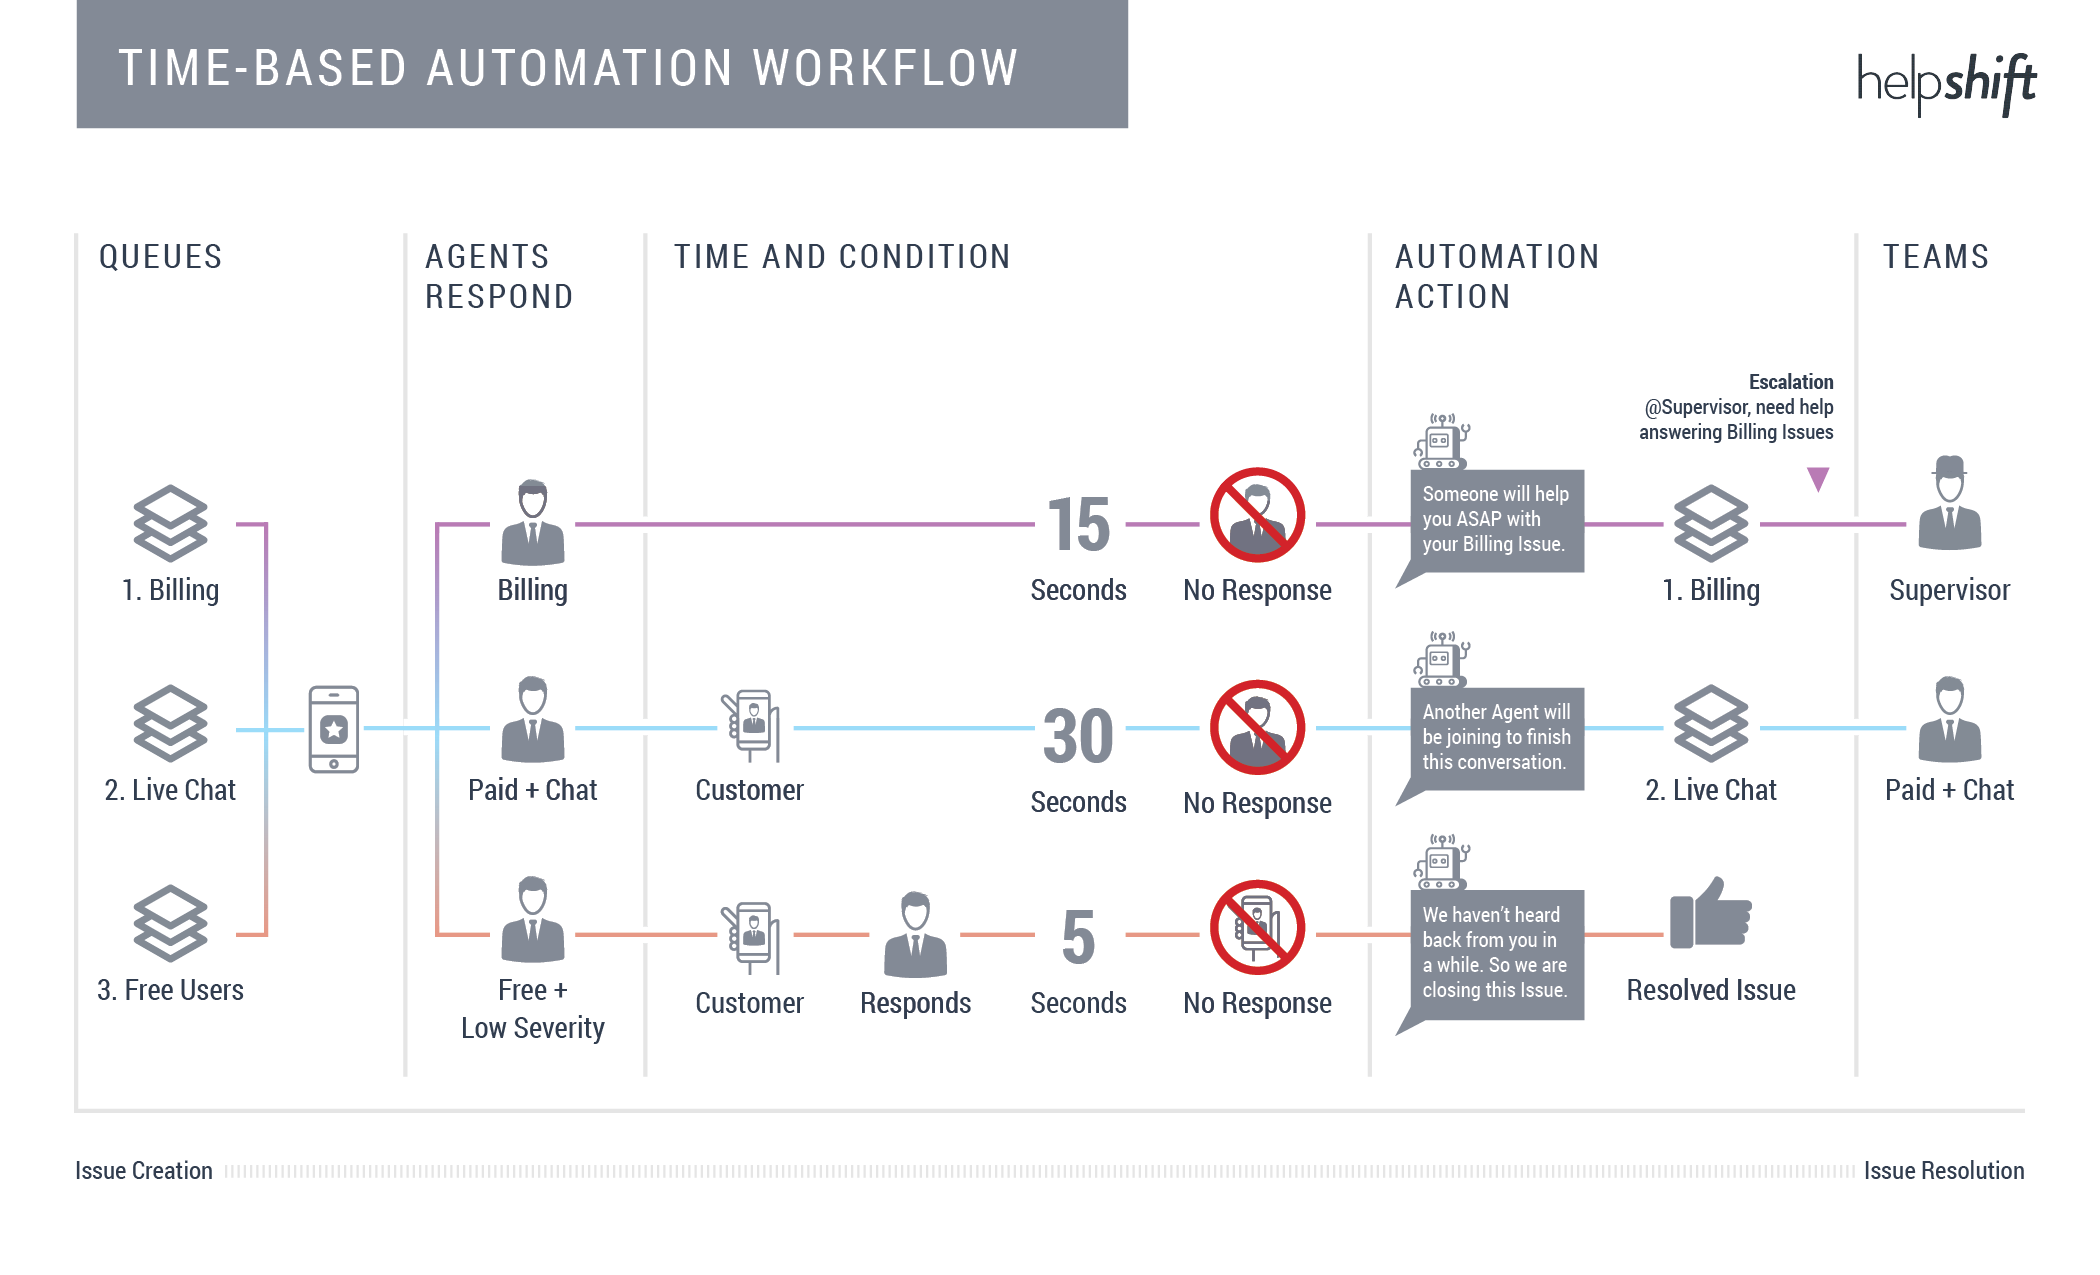
Workflow #3: Dynamically update Issues based on preset time conditions
Use New Issue Automations and Time-Based Automations to automate the distribution of new and open Issues to the right Queue or Team. Reroute, resolve, and escalate Issues within hours, minutes, or even seconds, so your end-users get an optimal support experience.
Workflow #4: Provide a live chat experience for select users
Time-Based Automations and Auto-Assignment can be used together to provide a live chat experience for some of your users, while others can have a more traditional support experience with a different SLA. The use of Queues and Teams enables you to balance the workload so customers are never left waiting for a response.
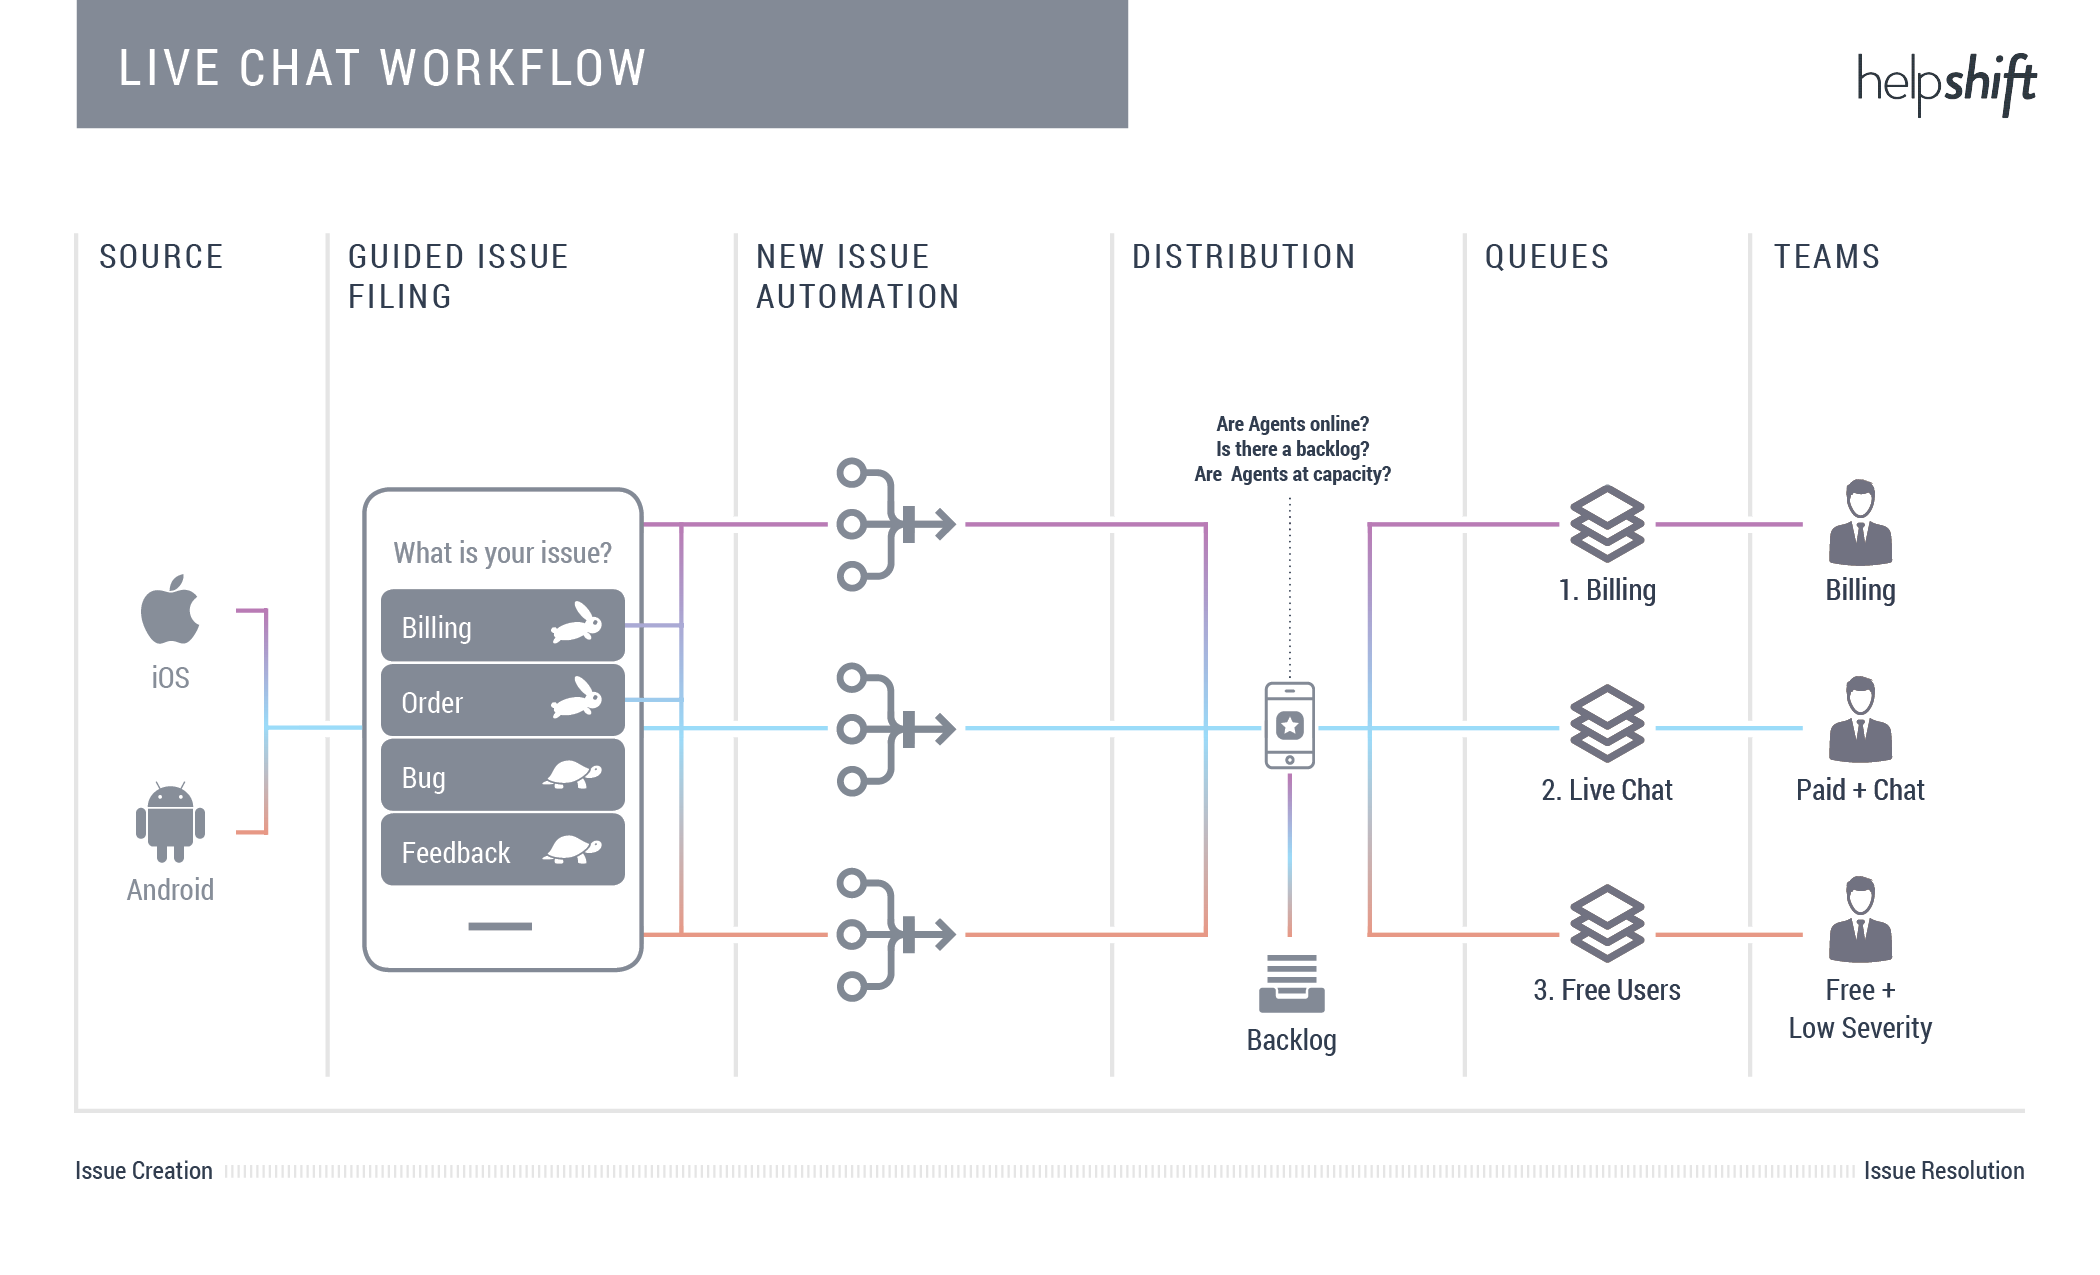
To learn more about setting up a live chat experience for your end users, please see our Live Chat Experience guide.
In all of the workflows listed above, a combination of Teams, Queues, Automations and Auto-Assignment were configured to achieve the support team’s goals. None of these workflows are exclusive – you can set up your workflow to manage a backlog, assign SLAs, update Issues per time conditions, and provide a live chat experience.
2. Planning Your Workflow
Your workflow should be planned around the size and organization of your support team, the types of Issues you want to prioritize, and your goals and SLAs for each team. To best decide what your goals should be, consider the following:
- Do you intend to offer a live chat experience to some or all of your users? If so, do you intend to offer the same SLAs for each channel and user type?
- What type of functionality is most important for your team? What do you need and not need? (live chat, Issue/backlog prioritization, backlog management, etc.)
- What platforms do you expect to offer support for over time based on your company’s product roadmap (iOS, Android, web, email)? Do you require the ability to set different SLAs for each platform?
- How do you organize your Issues? (by language, product type, Issue type, user type, etc.)?
- Are your Agents cross trained or are they specialized? Do you have specialized teams with different SLAs?
- What increments are your SLAs set in (days, hours, minutes, seconds)?
- Are your Agents internal or do you outsource?
- What does an escalated Issue look like for your team? How do you want to prioritize escalated Issues? Who do you want to escalate it to (Supervisors)?
- What do you want to happen if there’s a backlog?
Answering the questions above can help you come up with your goals and the desired structure of your workflow. Additionally, planning the organization of your team will allow you to come up with processes for managing a backlog, escalating priority Issues, and providing performance feedback for your team.
3. Team Organization
In Helpshift, you can structure your support organization using Teams, Agent Groups, and role assignments.
Teams is designed for large support organizations which are divided into specialized groups. You can give each Team operational independence by defining separate Admins, Supervisors, and Agents for each Team.
Some use cases for Teams include:
- Teams that are split up geographically, with each office location being one Team. User management can be controlled by the local Supervisor.
- Teams that are organized by function (Trust and Safety, Operations, Support) can have performance tracked via Analytics.
- Teams which consist of outsourced Agents who may have different SLAs, skills, and permission sets.
If you do not have Teams enabled on your Dashboard, you’ll only see one Team listed in the ‘Teams’ area, which includes everyone in your Dashboard as members.
You can organize your Team into Agent Groups. Groups enable you to manage different tiers of support and improve team efficiency when responding to large volumes of Issues. You can use Groups with Smart Views and Queues to organize Issues by category for your Agents to handle.
Agent Groups are great for:
- Large support teams with hierarchy (Directors, Managers, Associate Managers, Representatives)
- Apps that offer support in multiple languages (English Group, French Group, Japanese Group)
- Accounts with multiple apps (groups to support users for each app)
You can further organize your Team or Agent Group with our 3-tiered role structure consisting of Agents, Supervisors, and Admins.
- Agents (support staff and specialists): Primary function is to respond to users via the Dashboard
- Supervisors (support lead or team lead): Can do a select set of Admin functions, including the following:
- Add, remove, and change the roles of team members
- Add, remove, and edit Agent Groups
- Add and archive tags
- Block email addresses
- Admins (head of operations or support): Have full permissions and can control all aspects of the Helpshift Dashboard
Admins can toggle select permissions to grant additional functions to Supervisors and Agents. The permissions available to be toggled on/off for those team members are available on the Settings > Permissions page of the Admins Dashboard.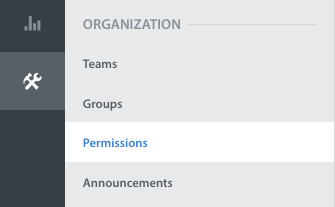
When thinking about how to organize your support team in Helpshift, consider the following:
What is the hierarchy of your support team? Review the functions of each Helpshift role against the responsibilities you’d like the different roles in your team to have. For example, if you have team leads for each of your specialized groups, you may wish to define those leads as supervisors.
How do you currently organize your support team? By language, tier, specialization, app, etc. It’s best to define a team in Helpshift that mirrors your current team’s organization.
Based on your company’s roadmap, do you foresee the need to restructure your team in the near future? For example, if you currently only need to offer iOS support but may need to hire Android specialists after a future product release, it’s important to consider how to plan to reorganize your team for this change.
Is everyone in your team cross-trained (able to address all different types of Issues), or do they only specialize (Issue type, language)? This is important when considering what types of permissions and visibility to allow.
Once you’ve appropriately set up your Teams and Agent Groups and defined your team members roles, you’re ready to integrate our workflow features to route Issues to your team.
4. Integrating Features
Now that you’ve set your goals and become familiar with our workflow and team organization features, you’re ready to use these features to set up a custom workflow to support your team.
If you haven’t done so already, first organize your support organization into Teams or Agent Groups. Steps to do so are available in the following articles:
Now that your support team is organized, set up Queues to group together incoming Issues of the same type. You’ll be able to use Automations to route Issues to Queues, and organize Queues by priority to let your team know which types of Issues to address first. This removes the busywork of Agents manually reviewing, prioritizing, and organizing Issues on their own.
To set up Queues, review the following articles:
Now that you have your Queues in place, set up Automations to route Issues to the right Queues. There are two types of Automations in Helpshift, detailed below.
New Issue Automations allow you to add tags, set Custom Issue Fields, assign Issues to Queues or Agents, and send custom autoreplies right when the Issue is created. You can use autoreplies to set expectations for users, and have VIP or live chat experience Issues assigned to high priority Queues for your Agents to address first.
Time-Based Automations run on open Issues and are triggered by the amount of time that has elapsed since the last action was taken on an Issue. These can be used to escalate priority Issues which have not yet received an Agent reply, assign Issues which are past SLA to a backlog, and reply to and resolve Issues where users have not replied back.
Use cases and steps to set up each of these Automations can be found in the following FAQs:
Once you have Automations routing Issues into Queues for your team to work out of, you’ll need to configure your Auto-Assignment settings to ensure your Agents aren’t overwhelmed with too many Issues and that Issues are only assigned to Agents who are available to reply.
You can allow Agents to mark themselves as available or away, giving them the agency to indicate when they are available for new Issues. To do so, see What is Agent Availability, and how can it optimize my team’s workflow?
You can also define a max Issue limit for each of your Teams to ensure they do not receive too many Issues at once and exceed their SLA goals. To learn how to define the max limit, see How do I limit the number of Issues Agents are assigned?
More information on the different configurations available with Auto-Assignment can be found in How can I make sure Issues aren’t assigned to an Agent who is sick, taking a break, or otherwise unavailable?
Feel free to reference the workflows in the Planning Your Workflow section of this guide to determine the best configuration of these features for your team. Keep your top priorities and potential future growth in mind when setting up your workflow.
5. Measuring Success
Now that you’ve set up your workflow, you’ll want to track key performance metrics to see if you need to make any changes.
Real-Time Operations allows you to monitor Queue and Team performance live. This enables team leads and shift managers to:
- Actively track the number of open Issues in each Queue to watch for unusual trends and reallocate resources as needed
- See which Agents are currently online and which are on break to avoid any breaks in coverage during a shift
- Mark Agents as Available or Away right from within the Real-Time Operations page
- Set a threshold which will visually let Agents know if they are meeting team goals by changing the color of the metric
- Check the number and type of Issues each Agent is working on to ensure your Agents aren’t overwhelmed
- Monitor the size of the backlog for each Queue to effectively plan for backlog management
- Support live chat operations by quickly handling spikes and anomalies that would result in delayed Agent responses
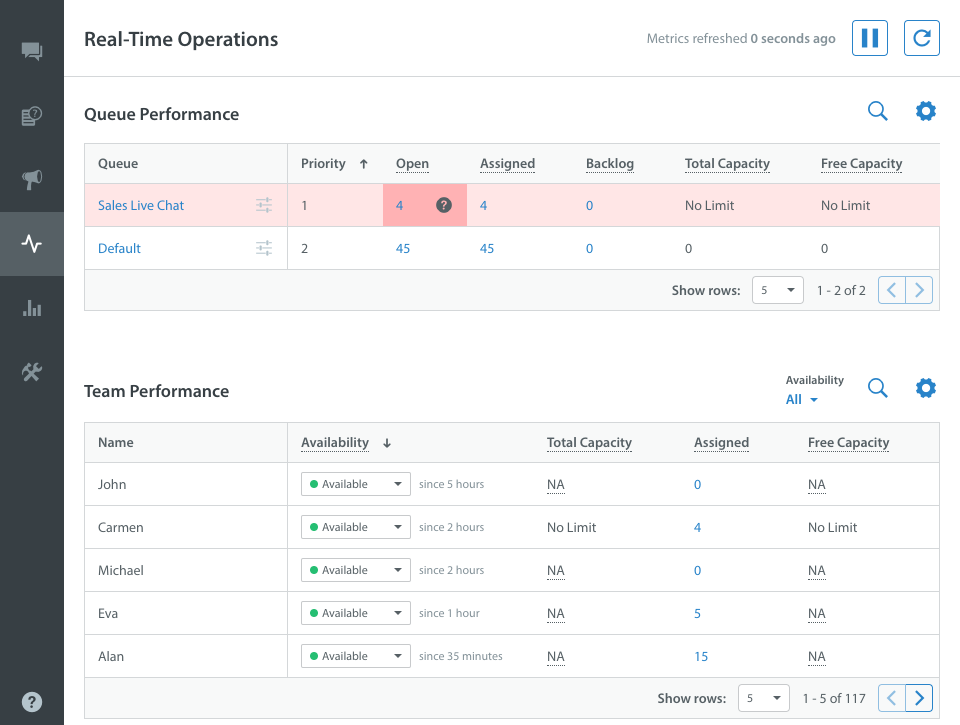
As an Admin or Supervisor, you can customize the Real-Time Operations visible to you on the page to only see the metrics that are important for your team. To learn more, please see What Is Real-Time Operations, & How Do I Use It?
Power BI provides a wealth of valuable analytics data to allow you to review changes in your support experience over time, and adjust your workflow as needed. You can use Power BI metrics to evaluate your workflow efficiency as follows:
- Review Incoming Volume to see what times of day you receive the most Issues and what Issue types are the most common to set appropriate SLAs for your teams
- Check the average amount of time it takes for a new Issue to receive a first response (known as the Time to First Response), either by an Agent or an Automation
- Review the percentage of Issues resolved by the first response sent by an Agent or Automation, known as the First Contact Resolution (FCR). A high FCR with high CSAT rates is a good goal for your team
- Look at the Time to Resolve to drill down into what percentage of Issues are exceeding your SLA goals – see which types of Issues they are by filtering by tags
- Use Agent Analytics to compare Team, Group and individual Agent CSAT ratings to see how satisfied your end users are after a support interaction
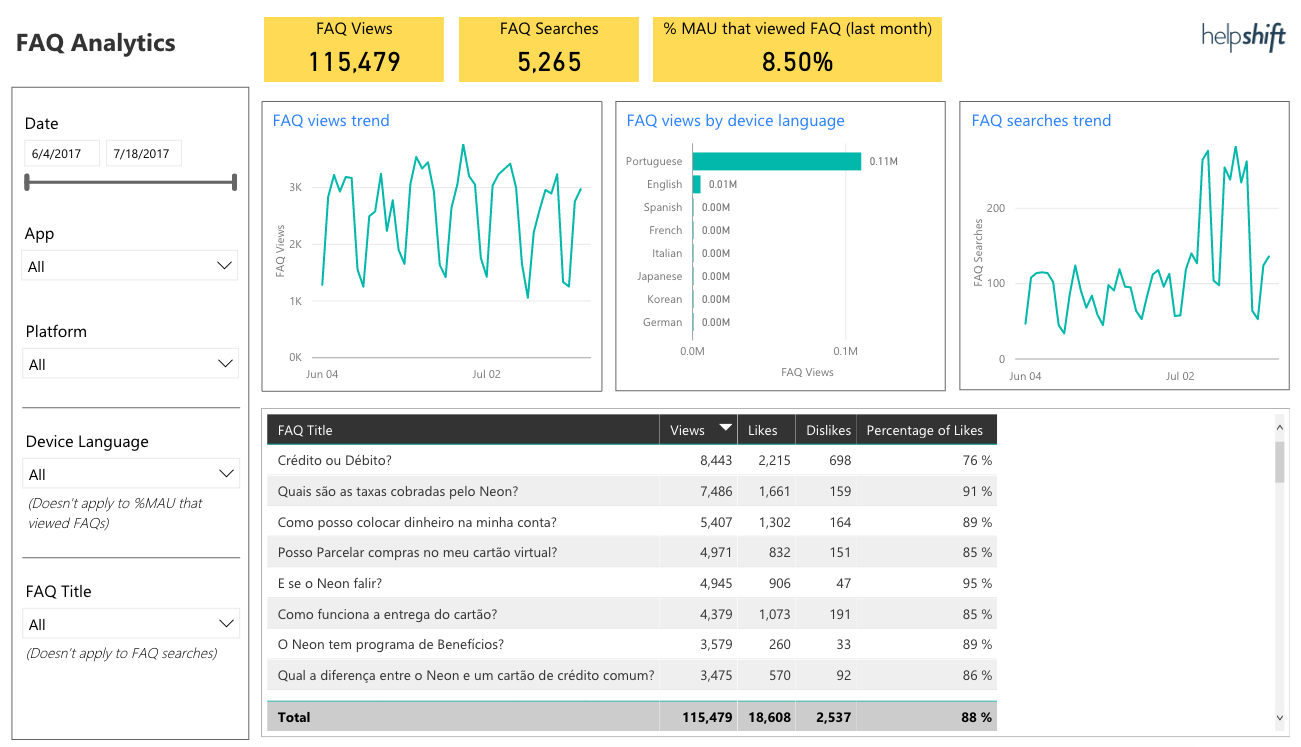
- Review your FAQ Analytics, including positive/negative feedback, what users are searching for in your FAQs, and which are the most popular FAQs to look for opportunities to improve your self-service offerings
More information on which reports provide what data can be found in our Power BI Reports Overview. To learn more about how to use Power BI to get all of these critical business insights directly from your Helpshift Dashboard, see How Can I Get More Out Of Helpshift Analytics With Power BI?
To set up additional features and learn more about Helpshift best practices, please review our Knowledge Base.