
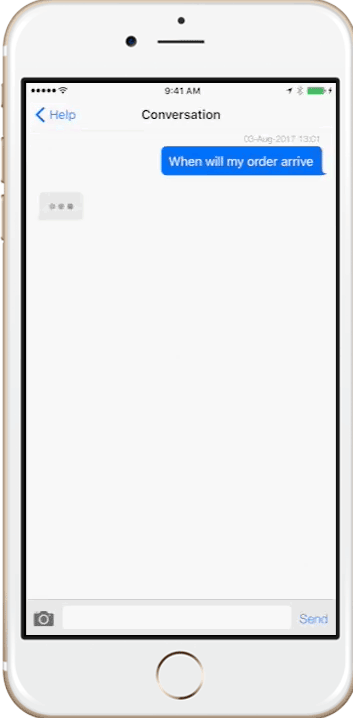
Helpshift provides all the tools you need to offer a live chat experience for some or all of your users. Implementing our typing indicator allows your users to see when an Agent is typing a reply back. This is similar to the behavior of many conventional chat applications, such as iMessage or Whatsapp.
In addition to the typing indicator, you’ll also need to integrate our workflow management features to ensure your users are replied to quickly and that you always have Agents available to answer these chats. These features include Auto-Assignment, Automations, and Queues.
Supervisors and Admins can use Real-Time Operations to monitor the performance of your Teams and Agents during their shifts. To learn more, see What is Real-Time Operations, & how do I use it?
Here are the components required to offer a great live chat experience:
1. Configure the In-App Experience
2. Set up Issue Routing
3. Maintain SLAs and Manage Backlogs
4. Tracking Analytics For Your Live Chat Experience
For more detailed steps and best practices, please see our Knowledge Base.
1. Configure the In-App Experience
The first step to setting up a live chat experience is to configure a few SDK settings. In the example below, we are going to assume that you want to start offering a live chat experience for all of your users.
If you haven’t done so already, we strongly encourage you to enable Conversational Issue Filing for your Dashboard, as this will allow you to easily manage all of these SDK settings without the need for developer assistance. Please note that this requires an update to Helpshift SDK v7.1.0. To get started, see What is Conversational Issue Filing, and how do I set it up?
1. Enable QuickSearch Bot
QuickSearch Bot automatically suggests FAQs to your users based on the content of their first message. This allows you to add a real-time layer of self-service, and frees up your Agents to only address Issues that are not already covered in your FAQs.
For SDK versions below v7.0.1, you’ll need to set the showSearchOnNewConversation flag to Yes (iOS) and True (Android). This flag is applicable from iOS version v4.9.0 – v6.4.3 and Android v3.6.0 – v6.4.2.
2. Enable the typing indicator
When your Agent is typing a response, users will see the typing indicator to let them know that a message is about to be sent to them. This lets your end users know that they should stay inside the conversation, as they will be receiving a reply very soon.

For steps to enable this feature from the In-App Configurations page of your Dashboard, see What is the typing indicator and how do I set it up?
For SDK versions v6.0.0 – v6.4.1, you can enable the typing indicator by having your developers configure the enableTypingIndicator flag to Yes (iOS) and True (Android).
Please note that the typing indicator will only be present in Issues created on devices with a Helpshift iOS or Android SDK 6.0 and up. This means that once your Helpshift SDK is updated, your users will still need to update to the latest version of your app which includes this SDK update to see the typing indicator.
3. Enable the resolution question
With this setting, when an Agent closes a conversation, the “Did we answer your questions” prompt will not be shown. This gives control over the end of the conversation back to the Agent, so your end user cannot reopen that same conversation repeatedly. Please note that if the end user submits a new message, it may initiate a new live chat experience.
For steps to enable this feature from the In-App Configurations page of your Dashboard, see What is the resolution question, and what does it look like to end users?
For SDK versions below v7.0.1, this setting can be enabled by having your developer set the showConversationResolutionQuestion flag to No (iOS) and False (Android).
4. If not using Conversational Issue Filing, set the gotoConversationAfterContactUs flag to Yes (iOS) and True (Android)
This setting will ensure your users are automatically redirected to the new conversation window when they send a message. This matches the natural flow of a conversation and sets the expectation that they are entering a live chat.
For guidance in setting up other implementations, please write into success@helpshift.com with details about your use case.
2. Set up Issue Routing
Once you have set up your in-app configurations, you’ll need to set up your workflow to route these new Issues to the right place to receive an immediate first response. This requires configuring the following features:
- Agent Groups
- Teams (optional)
- Queues
- Automations
- Auto-Assignment
Please consider the following questions when configuring these settings:
- Should the new Issue be routed and assigned to a particular Agent?
- What is the maximum number of Issues that your Agents can handle at any given time?
1. Consider creating a new Team or Agent Group for the Agents that will be addressing new Issues which you’d like to have a live chat experience. Which one you’ll create is dependent on the size and organization of your support team.
For steps to create a new Agent Group, see How do I create Agent Groups? To learn about Teams, see What are Teams, and how should I use them?
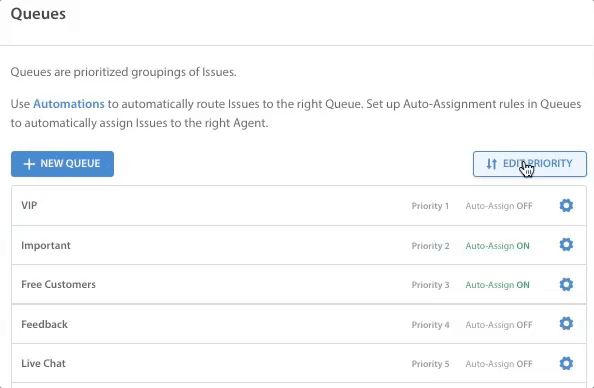
2. Create a new ‘Live Chat’ Queue. Set up the Queue as follows:
- Update the priority number in the top left to ‘1’ to ensure this Queue receives all new Issues intended for a live chat experience

- Toggle ‘Auto-Assign Issues in this Queue’ to ON

- Under ‘Assignees’, add the Agents and Groups you would like to have handing these new Issues

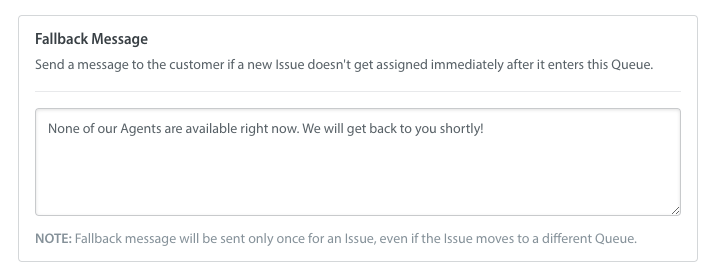
- Add a relevant Fallback Message for times when users may reach out when all your live chat experience Agents have hit their maximum Issue cap
- As a note, if you forgot to set the priority as #1 when creating the Queue, you can still reorder it in the Queues list to be the top-level Queue.
3. Set up two New Issue Automations: one for business hours and one for non-business hours. Set up the Automations as follows:
- Use the Issue Arrival condition to ensure these Automations provide the appropriate response based on whether they arrive during times when your live chat Agents are working
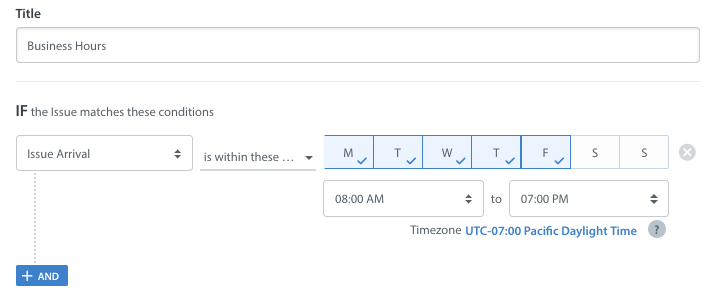
New Issue Automation Issue Arrival condition Issues created during business hours

New Issue Automation Issue Arrival condition Issues created during non-business hours
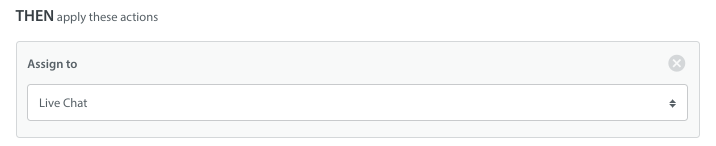
- Use the action ‘Assign to’ to have these Issues assigned to your new Live Chat Queue
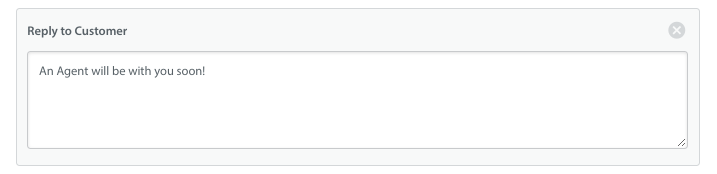
- Add a custom ‘Reply to Customer’ message to let users know that an Agent will be with them soon
4. In your Auto-Assignment settings, you’ll want to set a maximum of 3-4 Issues for the Team assigned to provide a live chat experience. Also make sure that the checkbox of ‘Exclude Agent Reply’ is not checked.

This will allow open Issues to remain assigned to Agents while they are waiting for your end users to reply.
Please note: if your support organization only has one Team, then the settings above will automatically apply to all of your Agent Groups.
To learn more about how to manage your Auto-Assignment settings, see How do I limit the number of Issues Agents are assigned?
3. Maintain SLAs and Manage Backlogs
Once you’ve set up your workflow to support a live chat experience, you’ll want to set short SLAs so your users aren’t upset if an Agent does not reply to their messages fast enough. The expectation you set for users with a live chat experience is for an instant response.
To meet this expectation, you can use Time-Based Automations to track Issues that breach your SLAs, send autoreplies, and alert Supervisors when there is a backlog.
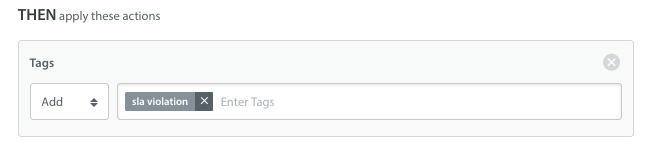
To set a Time-Based Automation to track Issues which have breached your SLAs, first create a new tag, such as ‘sla violation’. This will help you appropriately track and reassign those Issues. For a refresher, see How Do I Create And Use Tags?
When creating the Automation, set the following three conditions:
- For the time filter, set ‘Agent’s first response was not set in’ to 30 seconds

- Set ‘Queue’ is ‘Live Chat’

- Set ‘Assignee’ value to ‘is set’, to make sure it runs on Issues that have already been assigned to your Agents and that are not in a backlog

- Last, set the action of your Automation to add the tag ‘sla violation’
With this Automation running, if your Agents have been assigned a new Issue but haven’t replied to it in 30 seconds, then those Issues will be tagged as ‘sla violation’. When you review your daily and weekly metrics, you can see how many of your Agents did not hit their SLAs.
To set up a Time-Based Automation to send an autoreply when the user hasn’t responded back in a while, set the Automation as follows:
- Set the time filter ‘User has not replied in’ to 45 seconds

- Set ‘Queue’ is ‘Live Chat’

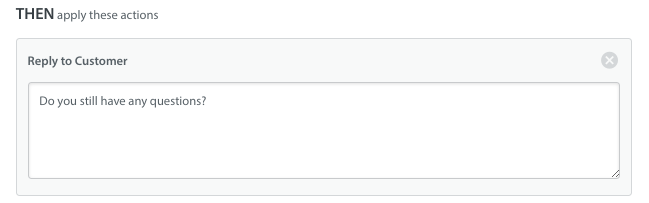
- Last, set the action ‘Reply to customer’ to check in and see if they are still there
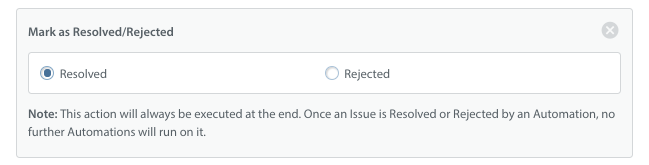
- Optional: use ‘Mark as Resolved/Rejected’ if you’d like to send an autoreply and close the Issue.
If your users haven’t sent a reply in 45 seconds during an in-progress conversation, then this autoreply will be sent.
You can run one autoreply Automation first to check in with the user, and then if you don’t hear back after that, follow it up with a second autoreply Automation to send one final message and resolve the Issue. Just make sure that you send the second Automation to be at 60 seconds so there is a 15 second gap between them running.
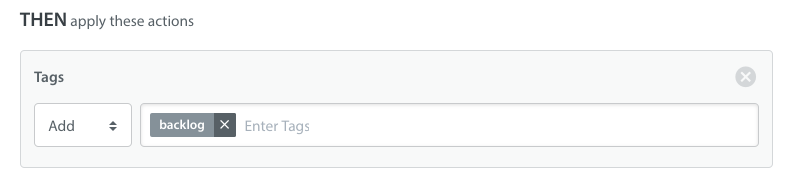
To set up a Time-Based Automation to manage a backlog, You’ll want to first create a tag like ‘backlog’ for tracking. For a refresher, see How Do I Create And Use Tags?
Once you’ve created that tag, set up the Automation as follows:
- Set the time filter ‘Agent’s first response was not sent in’ to 45 seconds

- Set ‘Queue’ is ‘Live Chat’

- Set ‘Assignee’ value to ‘is set’, as this will make sure it runs on Issues that have already been assigned to your Agents

- Set the action of your Automation to add the tag ‘backlog’
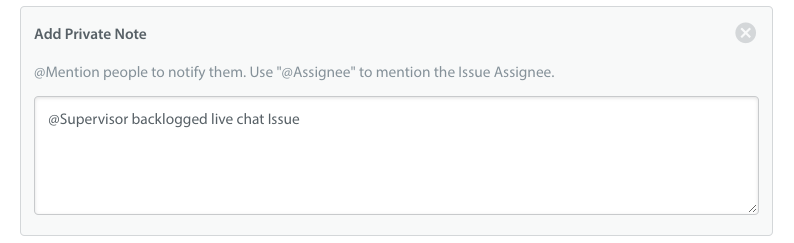
- Optional: If your Agents are at capacity and it’s been 45 seconds since the new Issue was created, you can also set the action ‘Add Private Note’ to add a mention to escalate the backlog to a Supervisor or to backup Agents
For analytics purposes, you’ll be able to track when backlogs occur and how many Issues ended up in the backlog.
4. Tracking Analytics For Your Live Chat Experience
Once you’ve started offering a live chat experience to your users, you’ll want to track trends in Issue type, backlog, and SLAs. The KPIs and data points you should strive to meet are as follows:
- Time to First Response: 30 seconds
- Maximum Chats per Agent: 3 Issues
- Holding Time: 20 seconds
- We recommend your Agents update your customer
consistently if it’s taking longer for the Agent to investigate the problem
You can learn more about tracking this data with Helpshift Analytics by reviewing our FAQ What Can I See In The Analytics Dashboard?
You can also use Power BI, Microsoft’s data analytics tool, to get critical business insights from your Helpshift Dashboard. To learn more, see How Can I Get More Out Of Helpshift Analytics With Power BI?
For any additional questions on how to offer a live chat experience, please reach out to your Account Manager or to success@helpshift.com.
To set up additional features and learn more about Helpshift best practices, please review our Knowledge Base.