
This guide is designed to walk you through steps to set up your products and platforms in your Helpshift Dashboard. For complete steps to get started, including setting up workflow features and analytics tools, see our Getting Started page.
1. Add Your App
2. Set Up In-app Support (Developer assistance needed)
3. Launch Web Chat (Developer assistance needed)
4. Create FAQs & Quick Replies
5. Provide Email Support
6. Invite Your Team
1. Add Your App
Apps in Helpshift represent each of the products or services you support. For example, if you have two major products, ShiftAzon (for buying travel accessories) and ShiftAway (for booking travel), where each product has its own website, mobile app and branding, you should create two separate apps (one for each product) within Helpshift. This allows you to customize the support experience for each product, and keep all related configurations organized in one place.
You can add your first app while signing up for a new account, and may also add apps by following the steps below:
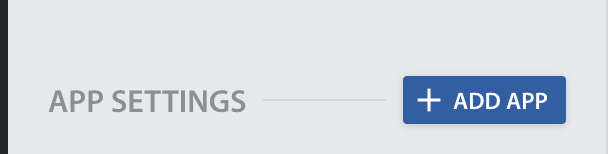
- From your Dashboard, click the Settings icon in the left navigation bar.

- Scroll to the bottom where ‘App Settings’ is listed, then click ‘Add App’.
- From here, you’ll be able to add your app nickname, available platforms, and the store URL. Once you’ve provided this info, click “Add”.
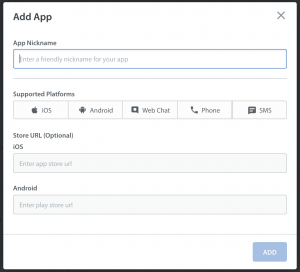
You’ll then be automatically routed to the new app page, where you can add additional details, such as the languages supported and the mobile SDK configurations.
2. Offer In-App Support
Our native iOS and Android SDKs allow you to offer a seamless, conversational messaging experience to your in-app users.

As part of the process of setting up in-app support, you’ll set up Bots. Bots are essential for providing a streamlined, conversational support experience for your in-app users. They allow you to take the weight off of your support team by automating basic manual tasks such as recommending relevant FAQs based on the user’s first question, collecting information about their inquiry to share with your team, requesting updates from users who haven’t responded to the most recent message, and more. You can enable the same Bots for Web Chat to harmonize your support experience across different platforms.
Implementation of in-app messaging requires collaboration between your web development and support teams. To get started with in-app messaging and Bots, review our In-App Messaging Guide.
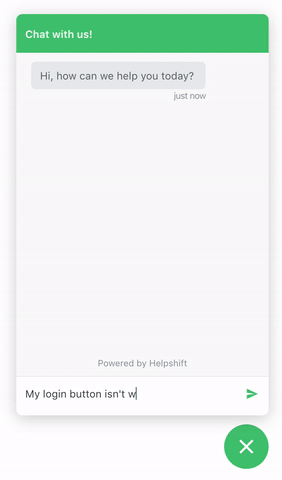
3. Launch Web Chat
Our Web Chat widget allows you to offer a live chat experience on your website. This additional channel makes it easy for your team to communicate with all of your end users, whether they visit your website or your mobile app.
You can enable and use Bots to provide a streamlined, conversational support experience for your web users. They allow you to take the weight off of your support team by automating basic manual tasks such as recommending relevant FAQs based on the user’s first question, collecting information about their inquiry to share with your team, requesting updates from users who haven’t responded to the the most message, and more. You can enable the same Bots for in-app messaging to harmonize your support experience across different platforms.
Implementation of Web Chat requires collaboration between your web development and support teams. To get started with Web Chat and Bots, review our Web Chat guide.
4. Create FAQs & Quick Replies
You’ll want to create a set of organized, easily searchable FAQs to deflect common Issues and offer users self-service. To help you get started, here are a few questions that may or may not be common for your customers to ask:
- I can’t log in
- How do I set up my account?
- How do I update my information?
More best practices can be found in What should I include in an FAQ article?
Before setting up individual FAQ articles, you’ll want to add Sections. Sections are categories you use to organize related FAQs, such as ‘Billing’ or ‘Account’.
To add Sections, follow these steps:
- Navigate to the FAQs Section via the FAQs icon on the left navigation bar.

- On this page, select your app from the drop-down menu.
- Next, click the ‘Add Section’ button in the left header.

This will open a pop-up window where you can title the Section.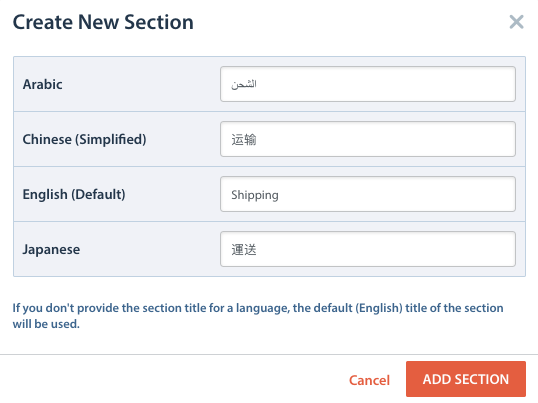
- Click ‘Add Section’ to add the new section in your Web Support Portal.
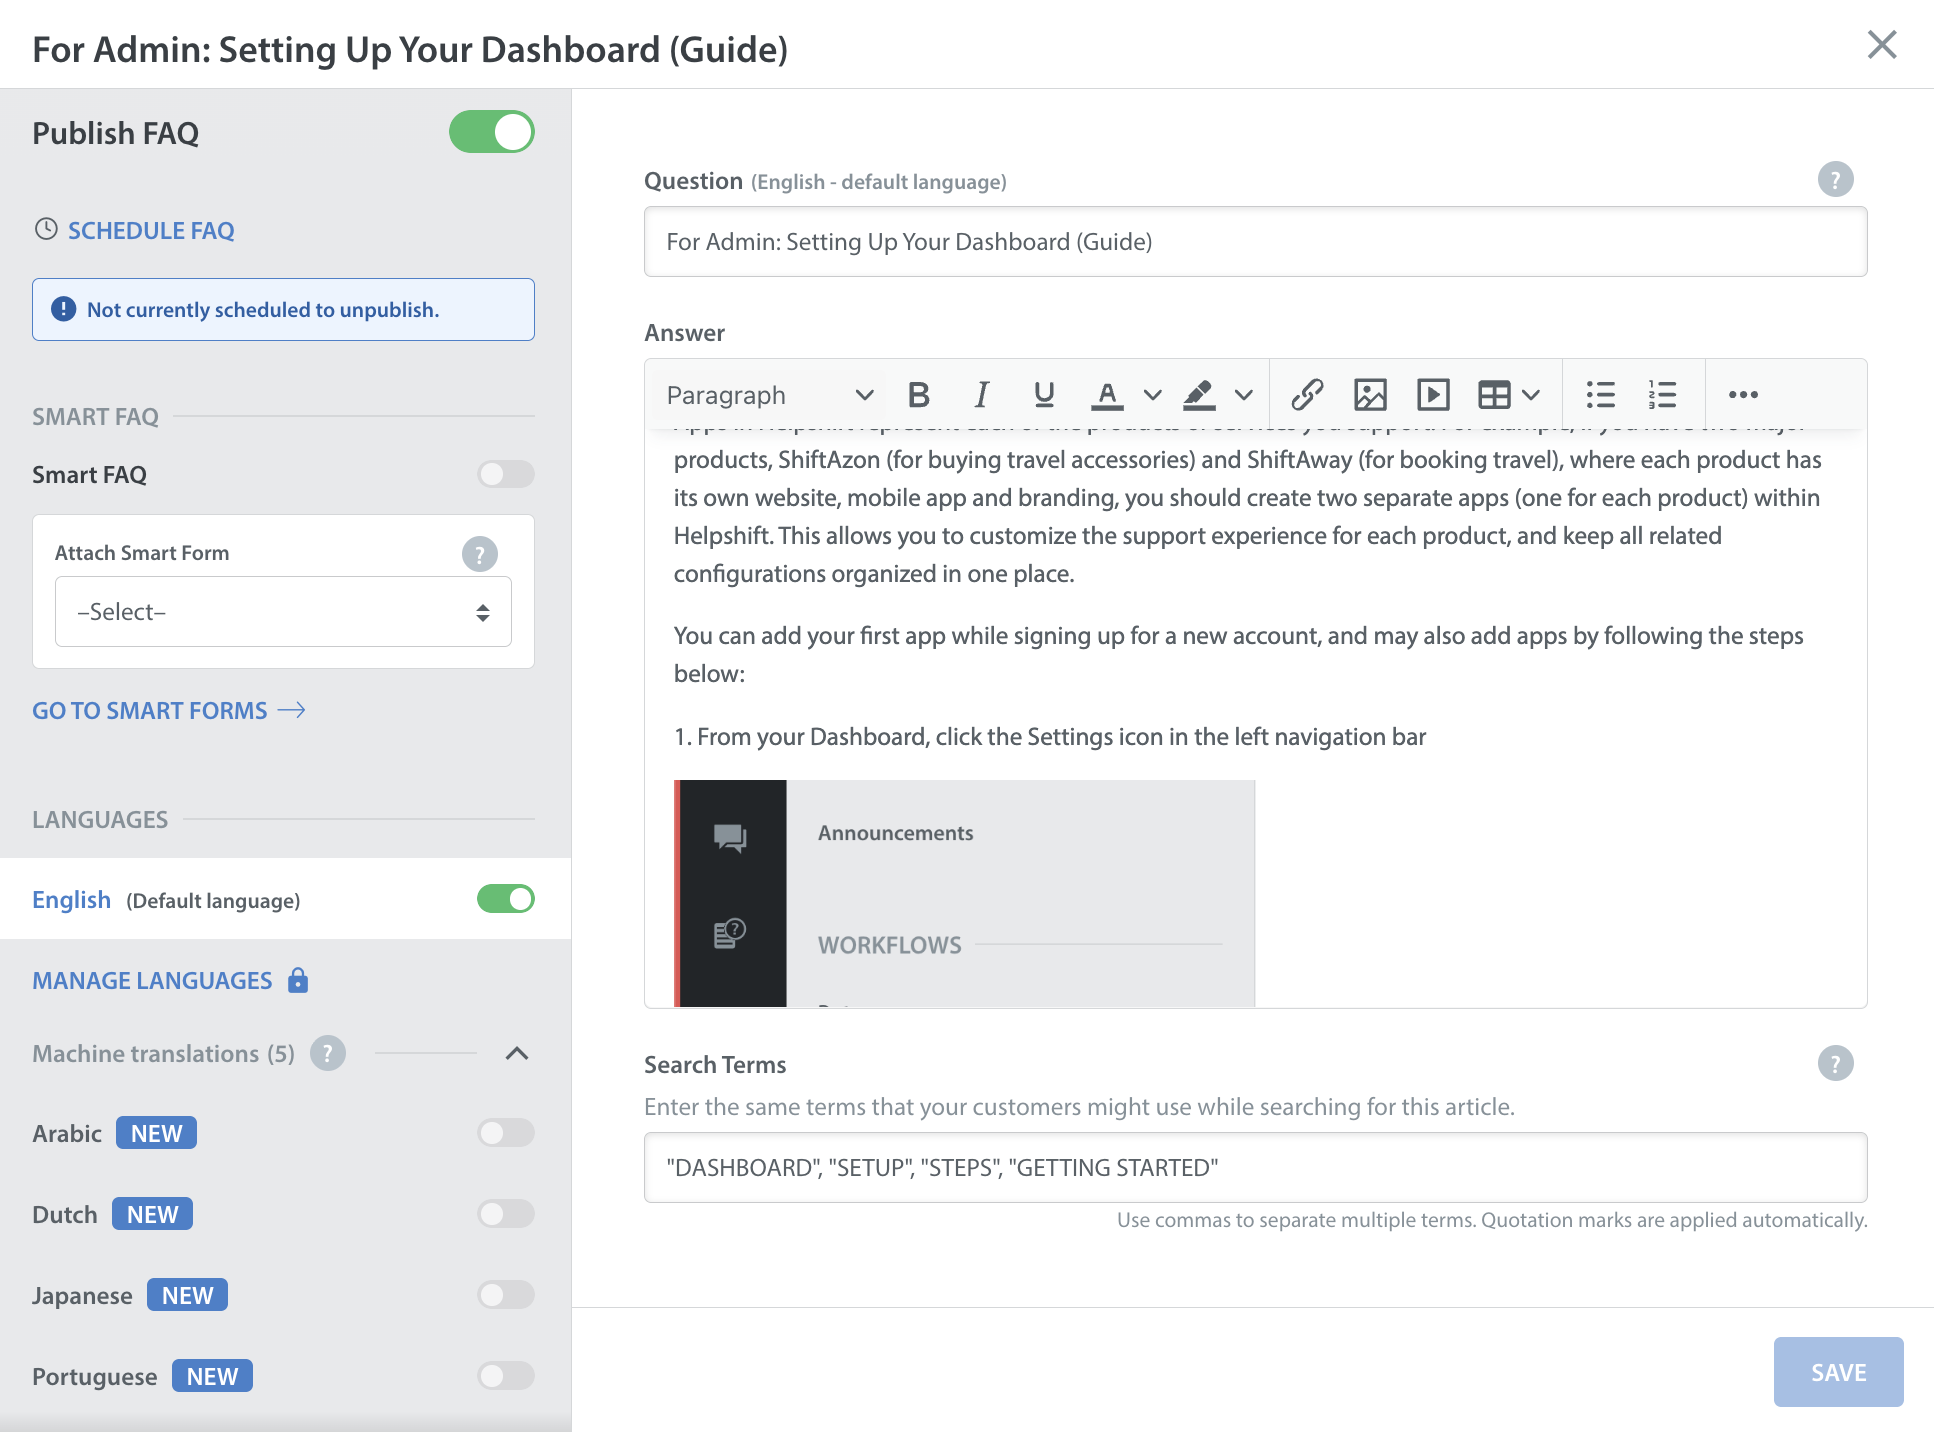
To add your first FAQ article, click the ‘New FAQ’ button, also located in the FAQs section via the FAQs icon.
![]()
A pop-up will appear where you can add the question, answer, and keywords for the article.
Keywords help your users find your FAQs easily using common search terms.
For detailed steps on setting up FAQs, please see our guide to Creating & Publishing FAQs.
You’ll also want to create Quick Replies, which are templated messages that Agents can easily search for and use to reply to end users. These messages include greetings, frequently asked questions, signatures, and more.

To get started with Quick Replies, see What are Quick Replies, and how do I use them?
5. Provide Email Support
Email support allows you to provide an email address that your end users can use to reach out to your support team. Emails received via this channel will appear as new Issues for your Agents to respond to, enabling you to manage support for all different channels in one place. This provides your users with a simple, easy way to get in touch with you, regardless of which product or service they are using or which platform they are using it on.
To set up email support, follow these steps:
- Navigate to the Settings page via the icon on the left side.
- From here, scroll down to ‘Email Support’ under Support Settings.
- On this page, you’ll see the support email address that Helpshift has automatically generated for you. This is the address that your emails must come through to be filtered into your Helpshift Dashboard.
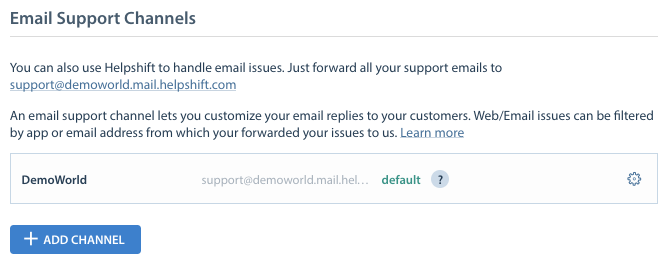
If you are already offering email support via a different address, you can set your current support email address to forward all emails to this one to ensure they appear in your Dashboard. - Click the gear icon shown in the screenshot above to adjust your account settings and add features, such as an automatic response to new Issues.
For more info on how to do this, please see the following FAQs:
The Web & Email Support guide provides a detailed overview on setting up email forwarding and customizing your Web Support Portal, which houses your FAQs and contact us form on the web.
6. Invite Your Team
Now that you’ve set up your workflow and core support features, you’re ready to invite your team to start using Helpshift.
There are 3 roles that team members can be assigned to in Helpshift: Agents, Supervisors, and Admins.
- Agents (your support specialists) primary function is to respond to Issues from the Dashboard. They can only manage Issues and review FAQs.
- Supervisors (your support/team leads) can manage Issues and have additional permissions, including the ability to manage Agent Groups, add tags, block email addresses, and much more.
- Admins (your support managers/head of operations) have full permissions and can control all aspects of the Helpshift Dashboard, including workflows, web/email support, and individual app settings.
To learn more about these specific roles and see screenshots of what the Dashboard looks like for each one, review What are the different roles in Helpshift?
As you invite your support team to the Dashboard, consider which roles are the most appropriate for each member of your team and how you can use the 3-role system to effectively structure your current team structure. If you have a larger support team, you may also need to use Agent Groups or Teams to further organize your support organization. You and your Admins should review the Managing Your Team guide to learn how to use Agent Groups to organize your team.
When you’re ready for your team to join, you can invite them to your Dashboard as follows:
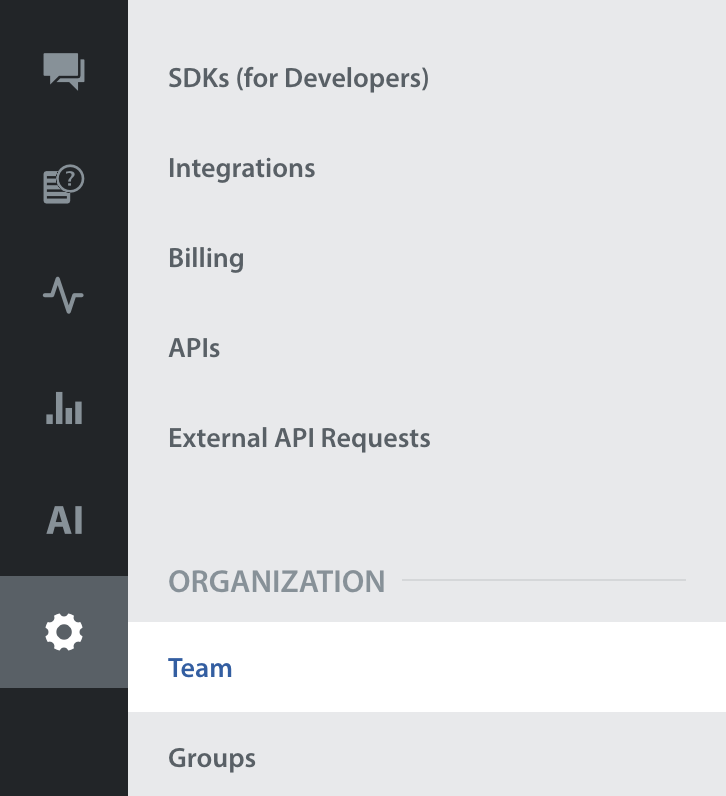
- Click the Settings icon in the left navigation bar from the Dashboard, then under Organization, click ‘Teams.’
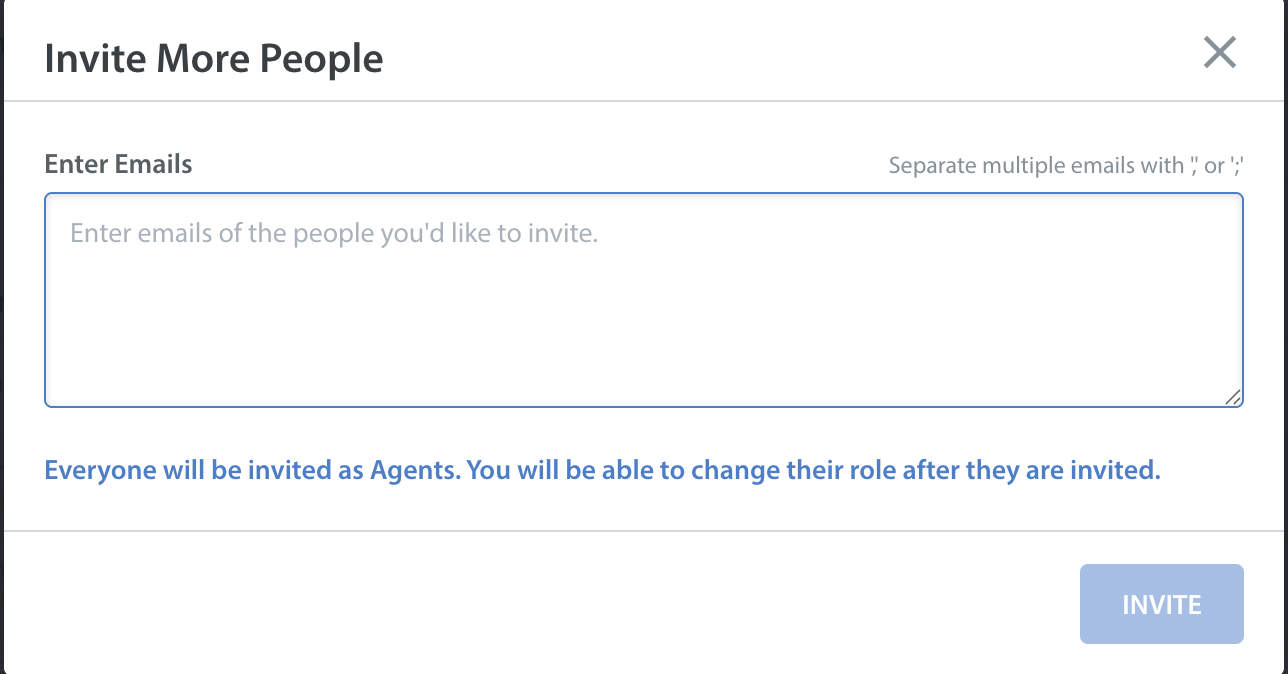
- At the top of the page, click the ‘Invite People’ button.

- A pop-up will appear where you can fill in the email addresses of team members you’d like to invite. Be sure to separate email addresses with a comma or semicolon. They will receive an email prompting them to activate their account.
- After you’ve invited your Agents, they will be listed as pending on your Teams page. They will gain access to their account as soon as they have created a password. Once they have done that, they will no longer be listed as pending.

When you invite new team members to your Dashboard, they are added as Agents by default. After they’ve accepted the request to join, they can be upgraded to the Supervisor or Admin role from the Teams page.
Simply click on the gear icon parallel to their name, and a pop-up will appear, which will allow you to change their role.

Once you start receiving Issues, you can create Smart Views to manage them. You’ll want to share the Agent Experience guide with your new Agents to help them get to know the Dashboard and start managing Issues.
Larger support organizations may wish to implement a custom workflow to automate Issue prioritization and assignment. Learn about our workflow tools, including Queues, Automations, Auto-Assignment, and Teams, by reviewing our Workflow Management guide.
For steps to set up your workflow features and analytics tools, see our Getting Started page.