
Our Zendesk Integration allows you to sync Issues and knowledge base in Helpshift to your Zendesk dashboard. This enables your Zendesk Agents to review and respond to Helpshift Issues as Zendesk tickets.
With this integration, you can continue offering world-class mobile and web support via the Helpshift SDK, while also optimizing your workflow by providing access to Helpshift Issues within your Zendesk dashboard.
The Zendesk Integration can only be unlocked via an account upgrade. Please reach out to your Account Manager or to success@helpshift.com to upgrade.
The following is required prior to completing the Zendesk Integration setup:
- Have your Zendesk domain in place – if you do not yet have a Zendesk domain, visit Zendesk’s website to create one
- Have your Helpshift domain in place
- Train your Agents on how to use Helpshift
Once you have set up your Zendesk and Helpshift domains and trained your Agents, complete the steps below.
1. Set up Integration in Helpshift
2. Sync Agents between Zendesk and Helpshift
3. Set up Integration in Zendesk
4. Sync between Zendesk Help Center Articles and Helpshift FAQs
5. For Agents: Managing Issues with the Helpshift Chat App
6. For Agents: How Helpshift Issues Appear In Zendesk
1. Set up Integration in Helpshift
Note: You must be an Administrator in both your Zendesk and Helpshift domains to complete the steps below.
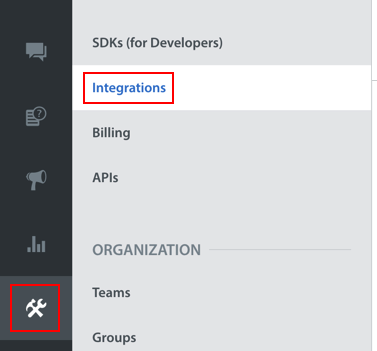
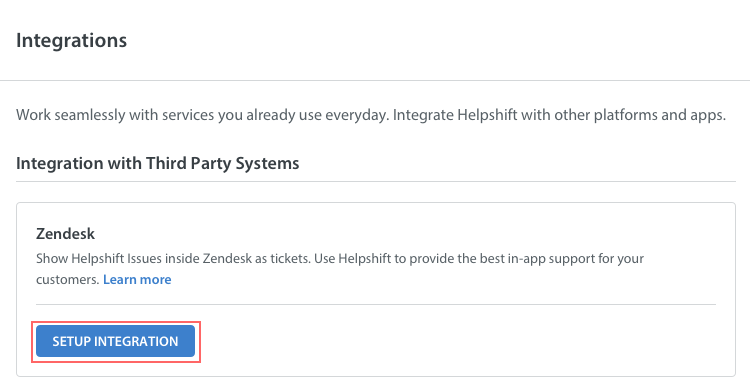
To connect your Zendesk and Helpshift domains, navigate to Settings > Integrations from within the Helpshift Dashboard.
Click the ‘Setup Integration’ button from within the Zendesk field.
Provide your Zendesk domain, email, and API token in the setup pop-up. Hover over the tooltips to learn how to find each of these pieces of information in your Zendesk account.
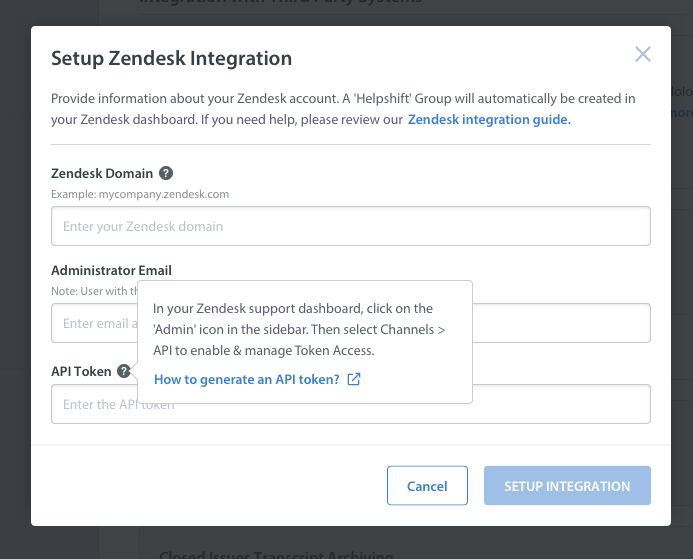
Click the ‘Setup Integration’ button to complete this step. Please note that setup is not complete until you sync your Agents, as detailed below.
2. Sync Agents Between Zendesk and Helpshift
During the Integration process, a new ‘Helpshift’ group was automatically created in your Zendesk Dashboard. At this stage you must navigate to that group in Zendesk and add the Zendesk Agents who you’d like to grant access to Helpshift Issues. Steps to do so can be found in Zendesk’s documentation on Creating, managing, and using groups.
Once you’ve added Agents to your Helpshift group, return to your Helpshift Dashboard. From within the Zendesk Integration area in Settings > Integrations, click the ‘Sync Agents’ button.
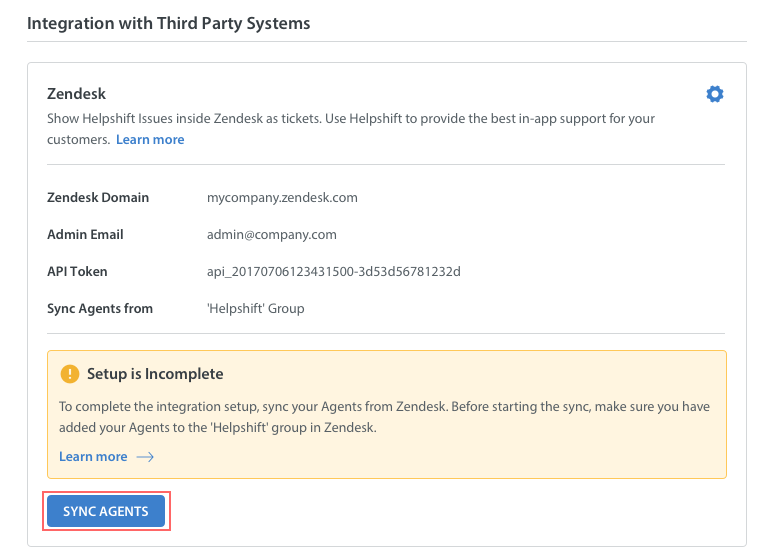
After you click this button, it will update to show that the Agents are being synced.
When your Agents have been synced successfully, a ‘Successfully synced Agents’ toast will appear in the right corner of your screen.

Once you’ve synced your Zendesk Agents, those Agents will receive an email inviting them to create a Helpshift account. Once they’ve created that account, they will have access to your Helpshift Dashboard.
Note: You must perform this sync process again each time you add or remove Agents in your Helpshift group in Zendesk.
3. Set up Integration in Zendesk
Once you’ve configured your Helpshift domain for Zendesk and synced Agents, you’ll need to set up your Zendesk domain to be able to receive and manage Helpshift Issues.
Navigate to the Zendesk apps page, then search for ‘Helpshift’. Click on the app to go to the Helpshift app page.
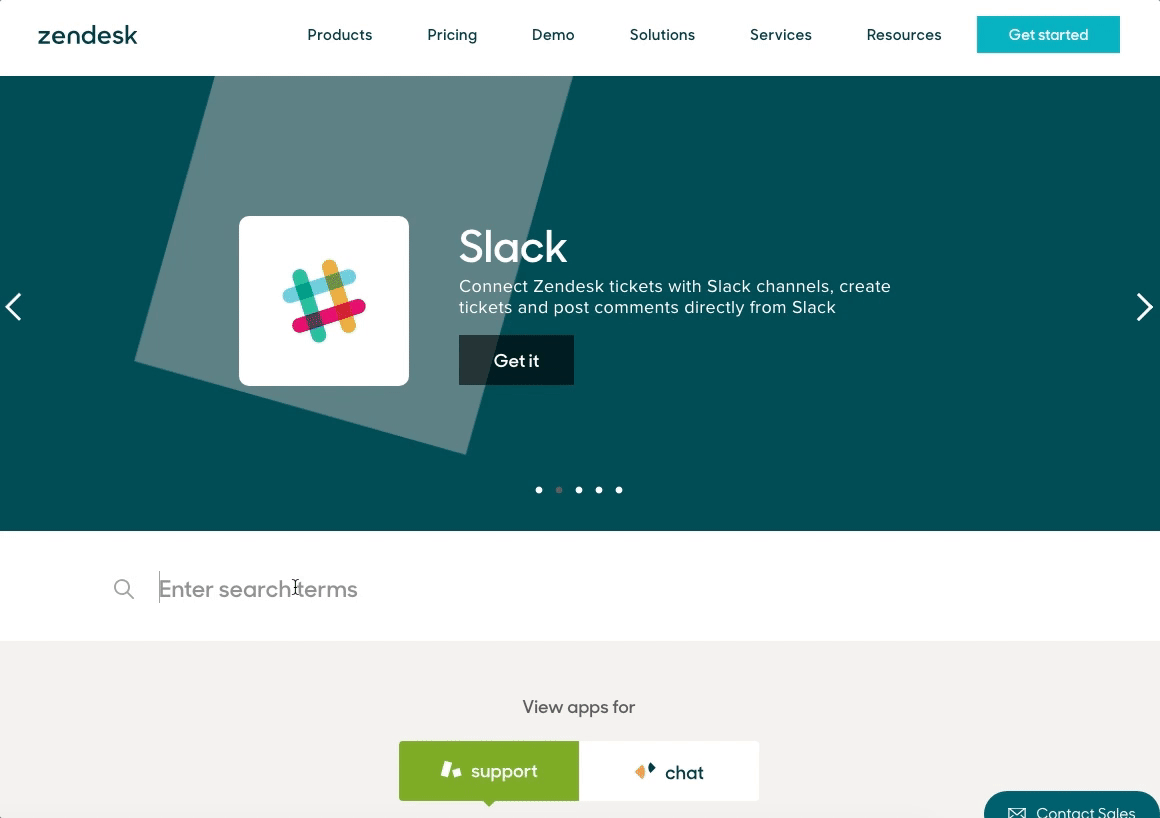
On the Helpshift app page, click the ‘Install’ button on the right.
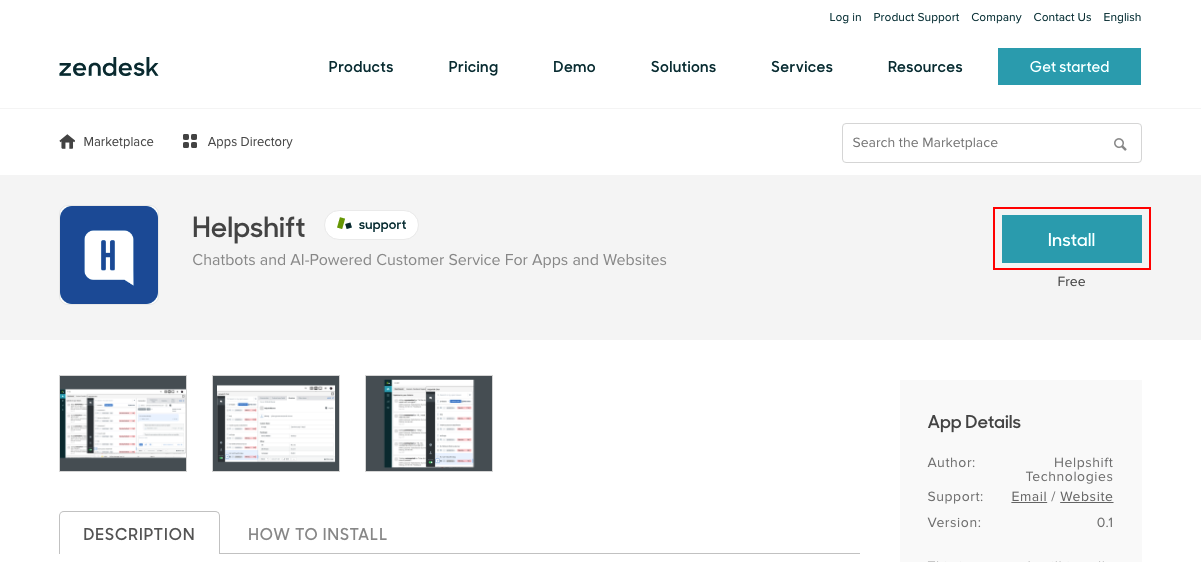
In the pop-up that appears, confirm that your domain is correct, then click ‘Install’.
After you’ve installed the Helpshift app, the installation page will appear. On this page, enter your Helpshift domain and API key in the fields listed.
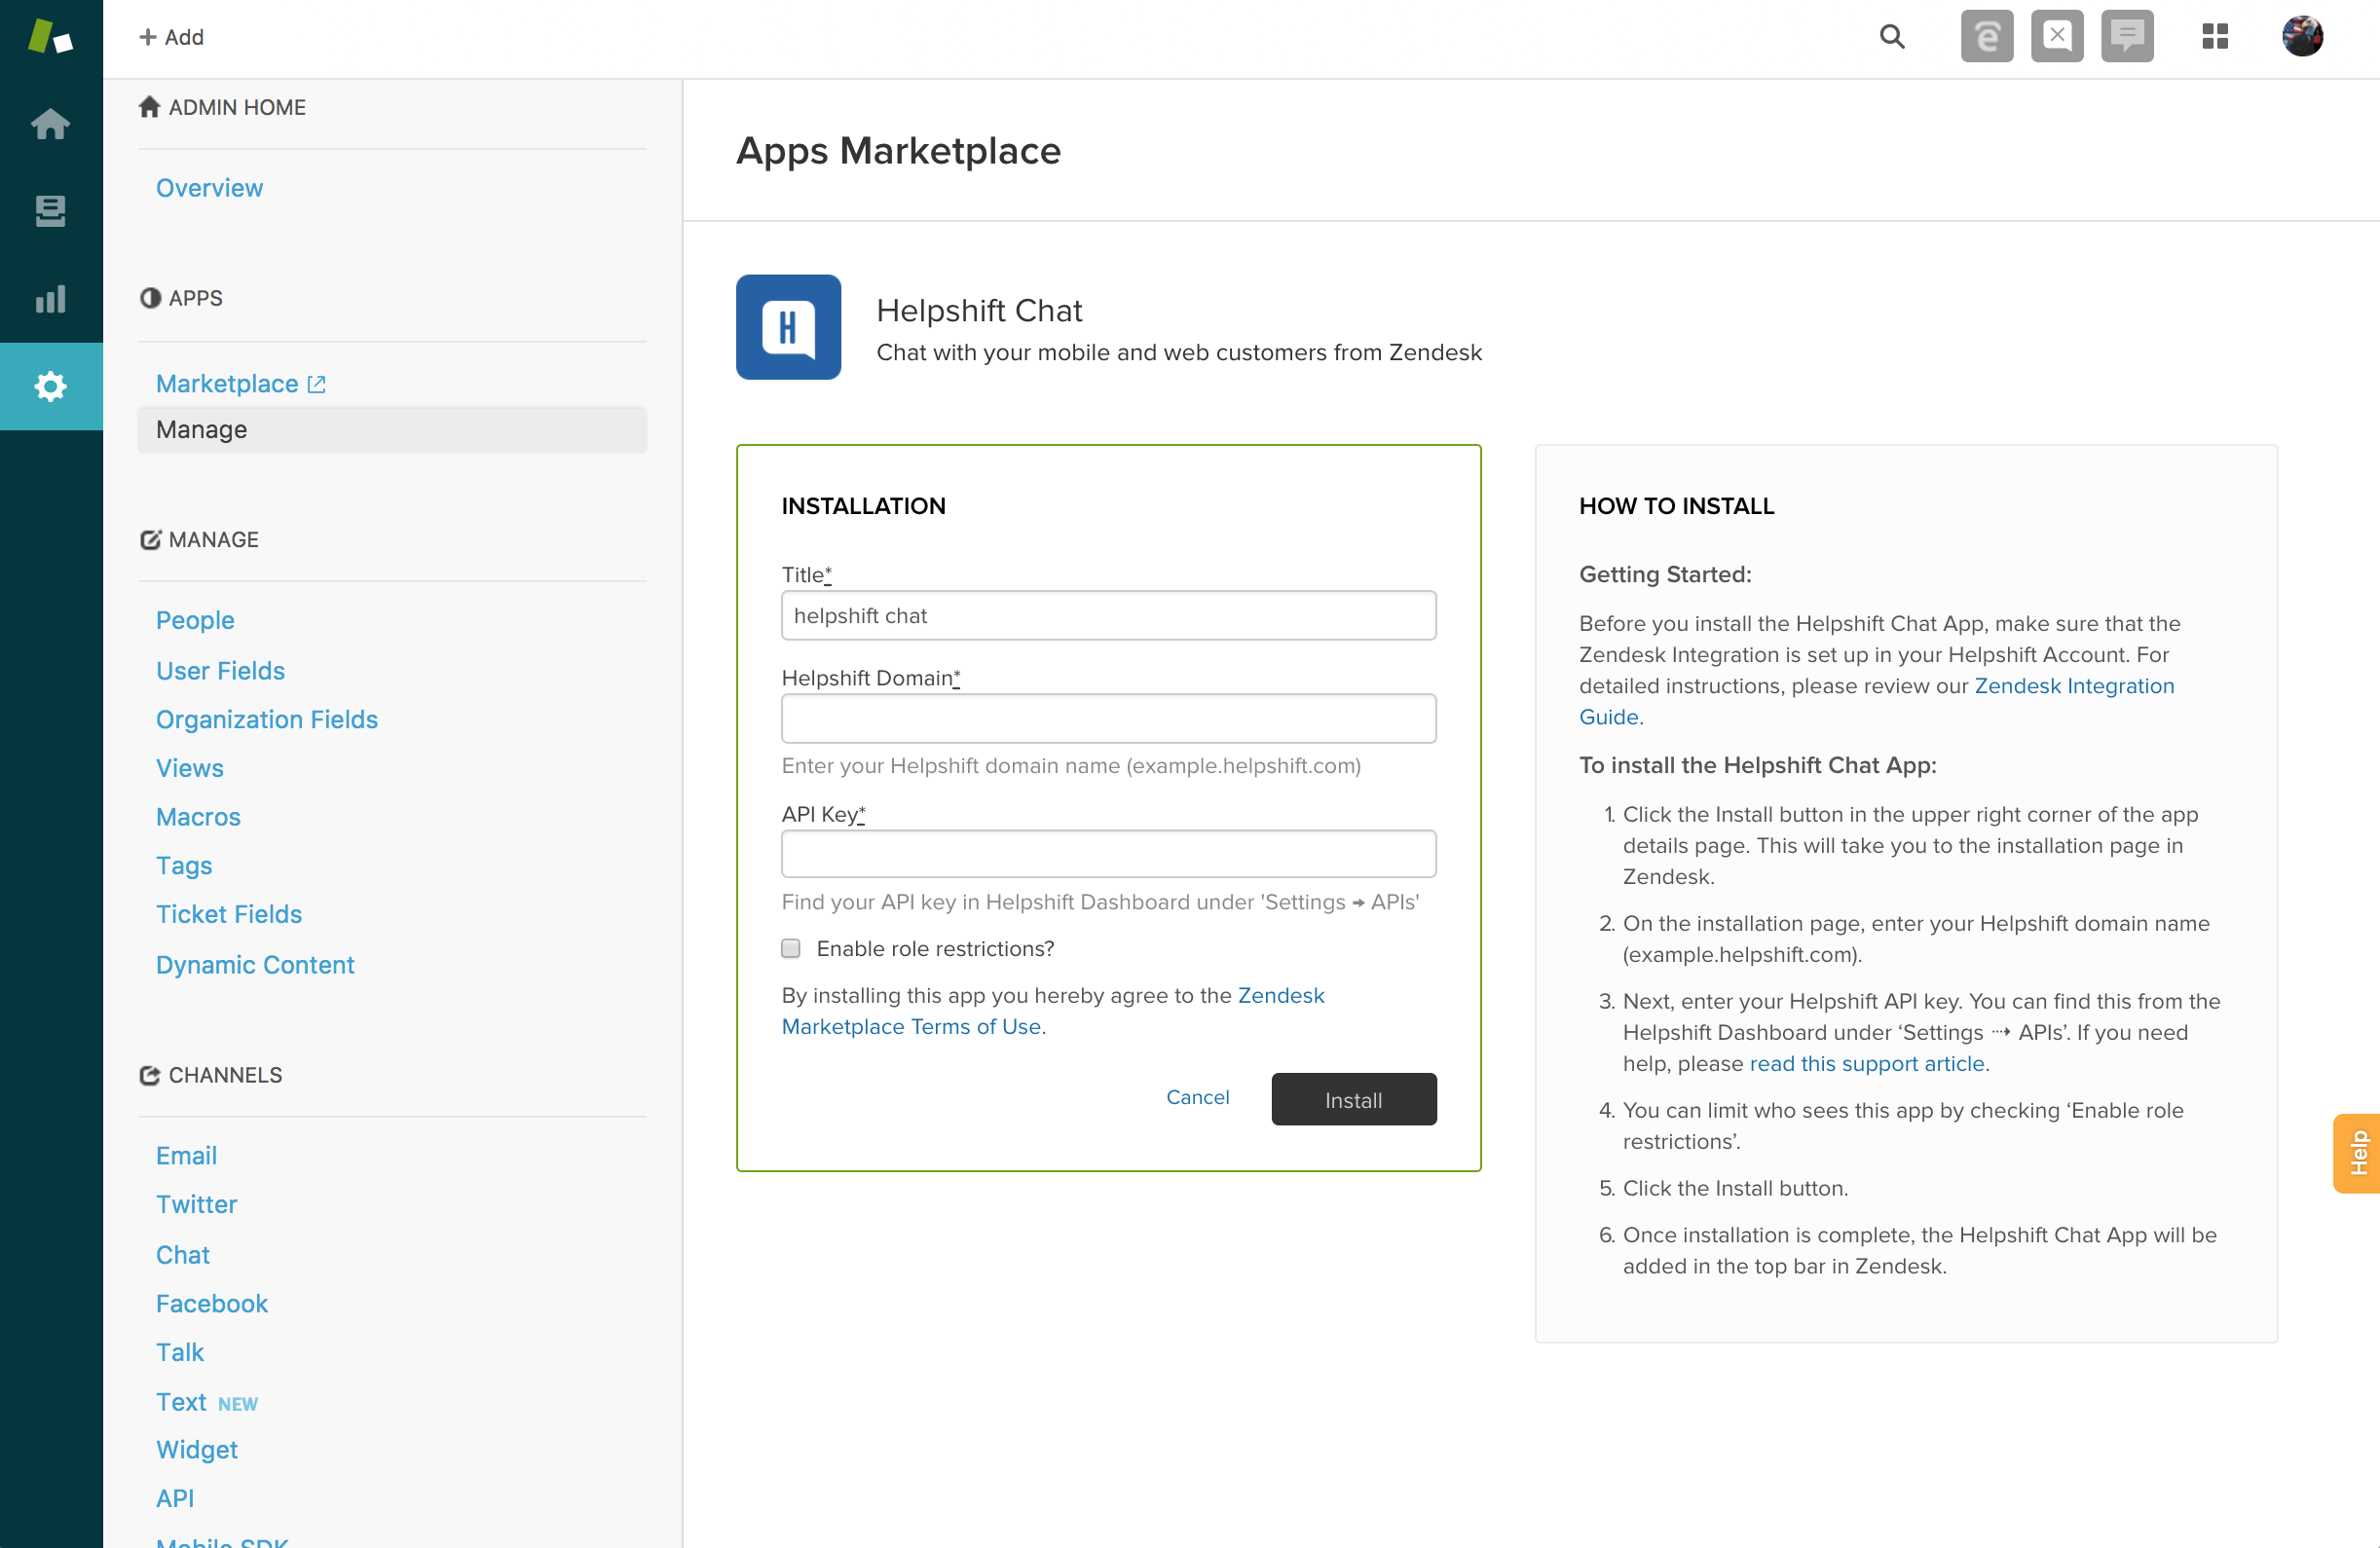
Your Helpshift API key can be found on your Helpshift Dashboard under Settings > APIs.
Encode the API key in Base-64 using https://onlinestringtools.com/convert-string-to-base64, then paste it into the “API Key_*” input box.
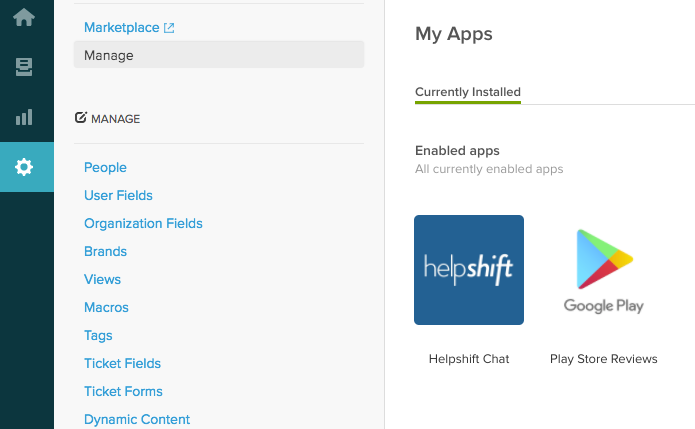
Once you have completed the installation process, this app will appear in your list of installed apps on the Manage Apps page.
4. Sync between Zendesk Help Center Articles and Helpshift FAQs
Helpshift helps you to sync Zendesk knowledge base articles to Helpshift FAQs. Using the Helpshift Integration feature, you can do the following:
- Sync the new and updated articles in Zendesk to Helpshift FAQs. The synchronization process of data occurs only once in a day.
- Sync the Articles across all the languages that Helpshift FAQs supports. However, make sure that language translations are available within Zendesk.
- Sync only the Published Zendesk articles to Helpshift FAQs. Avoid the unpublished, archived and deleted articles.
- If you delete an article in Zendesk, the previously synced FAQ in Helpshift is also deleted.
- If you update FAQs within Helpshift, they do not get synced back to Zendesk.
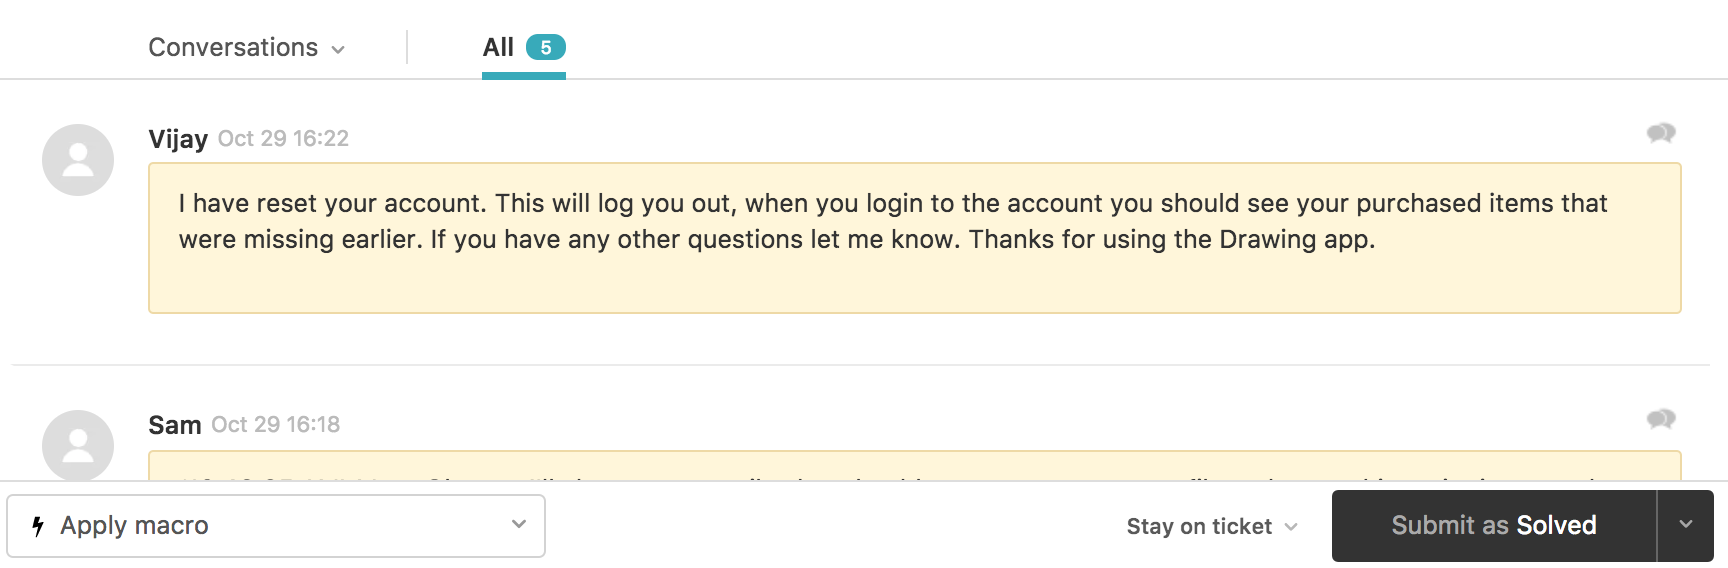
5. For Agents: Managing Issues with the Helpshift Chat App
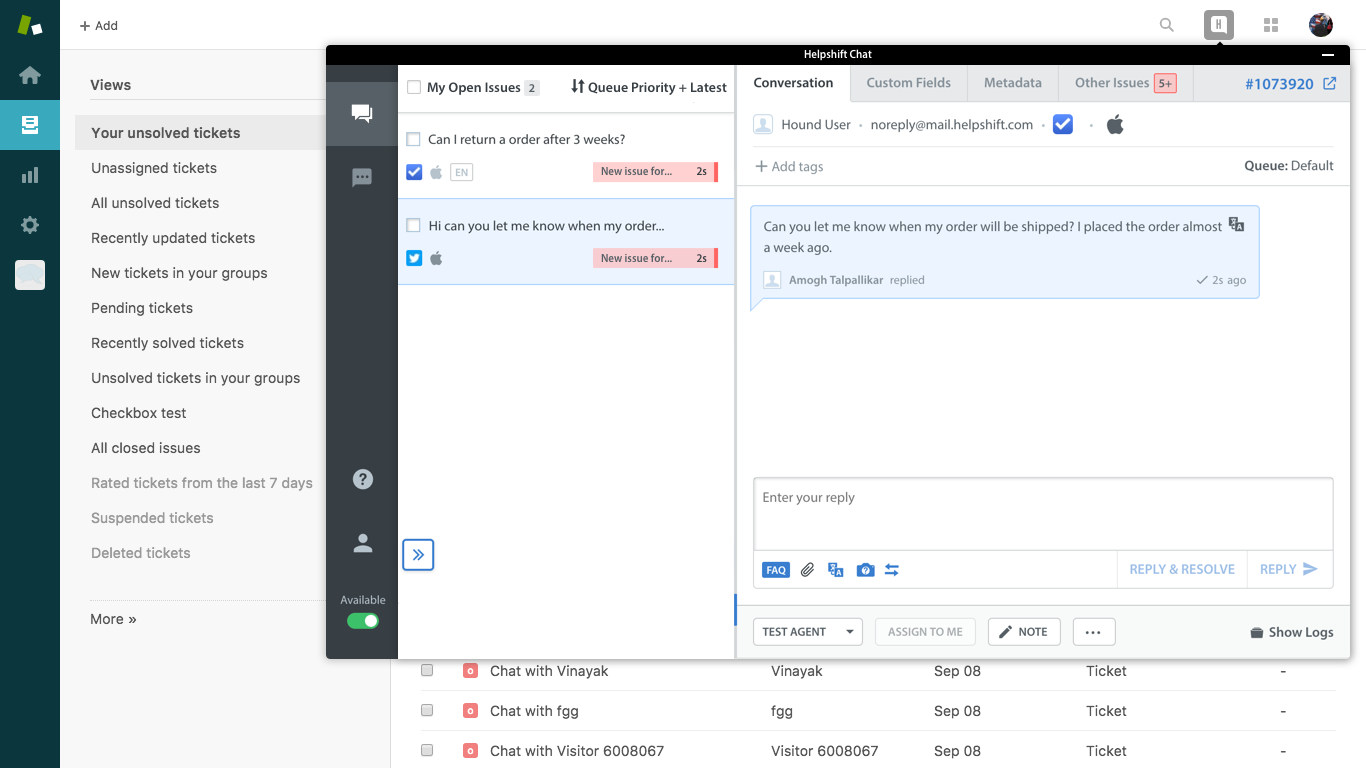
You can only manage and reply to Helpshift Issues inside of Zendesk via the Helpshift Chat app. To access the app, click the ‘H’ icon in the top bar to open the chat app.

Note: If you have not logged into your Helpshift account from the Zendesk Dashboard, this icon will appear as an ‘X’ instead. Once you’ve logged in, the ‘H’ icon will appear.

The Helpshift Chat App will appear as a large pop-up containing the Helpshift Dashboard. You can review your Smart Views, Issue feed, and Issue details via the 3-pane view that Helpshift provides.
To learn more about what is available in the 3-pane view, see How do I review Issues in Helpshift?
You can complete the following actions on an Issue from within the Helpshift chat app:
- Create a new Issue, which is useful for testing
- Bulk edit Issues to move them back to their original Queue in Helpshift
- Sort your Issues feed by Queue priority + wait time, latest, or oldest
- Conduct advanced searches on Helpshift Issues
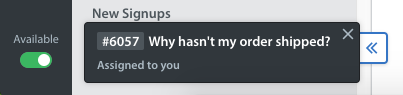
- Manage your account settings, including updating your availability
- Create or switch to a different Smart View by clicking the >> icon in the bottom left corner of your screen
From within the Issue details view in the Helpshift Chat App, click into the reply window, type a response, and click ‘reply’ to respond to the user.
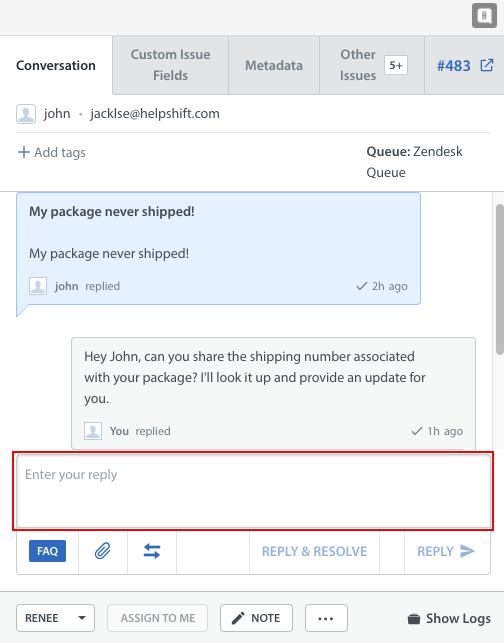
When replying to Issues from the Issue details page within the Helpshift Chat app, you can also complete the following actions:
- Review the Custom Issue Fields, metadata, and other Issues associated with the Issue
- Assign the Issue to yourself or to another Helpshift/Zendesk Agent
- Insert a predefined answer in your response
- Attach a file to provide to the end user
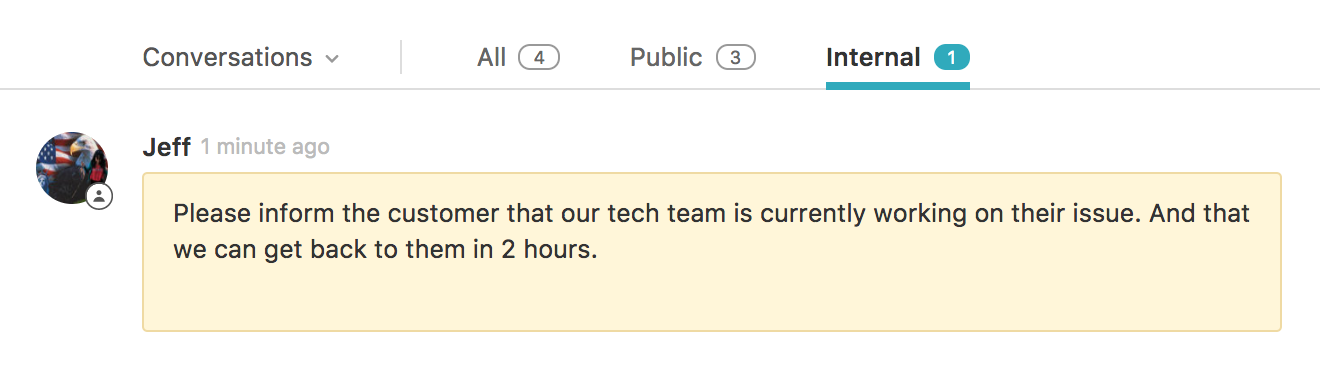
- Add a Private Note, as detailed in section 4 of this guide
- CC another Agent on the Issue
- Review Issue logs
- Resolve the Issue within Helpshift
Note: Depending on your required field settings in Zendesk, you may need to go into Zendesk and manually solve the Issue to ensure it is closed on both platforms. To learn more about how to review and update your required field settings, please review Zendesk’s documentation on required ticket fields.
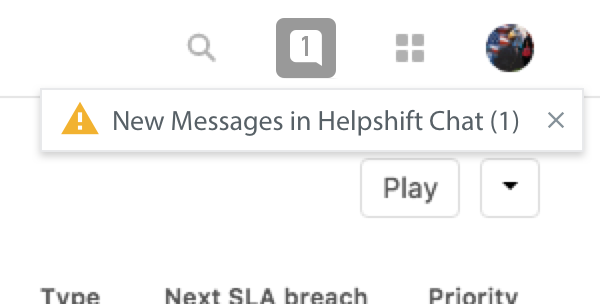
Growl notifications also appear inside of the Helpshift Chat App whenever one of the following actions occurs:
- A new Helpshift Issue is assigned to the Agent
- When a new message from an end user is received for an Issue assigned to the Agent
- When an Agent is mentioned in an Issue
For a full overview of what you can do within the Helpshift Chat App in Zendesk, please review our Agent Experience Guide.
6. For Agents: How Helpshift Issues Appear In Zendesk
When a new Issue in Helpshift is synced to Zendesk, in addition to appearing within the Helpshift Chat App where it can be managed by an Agent, it will appear in Zendesk as a ticket with all of the relevant details and a link to Helpshift where you can reply to the Issue.
We recommend using Helpshift’s Workflow Management tools like Automations, Queues, and Auto-Assignment to route new Issues to Agents in Helpshift. You should also use Zendesk automations to appropriately organize Helpshift Issues which appear as tickets in your Zendesk Dashboard. To learn how, see Zendesk’s documentation on automations.
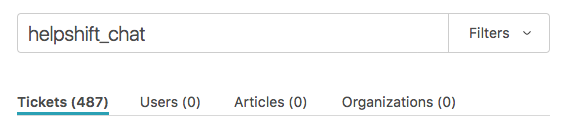
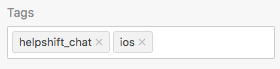
To review Helpshift Issues in Zendesk, look for the helpshift_chat tag on the ticket. You can conduct a search for all tickets tagged as helpshift_chat to easily pull them up.
Note: If a new Issue in Helpshift is assigned to a Helpshift Agent who is not in Zendesk, it will appear in Zendesk as unassigned.
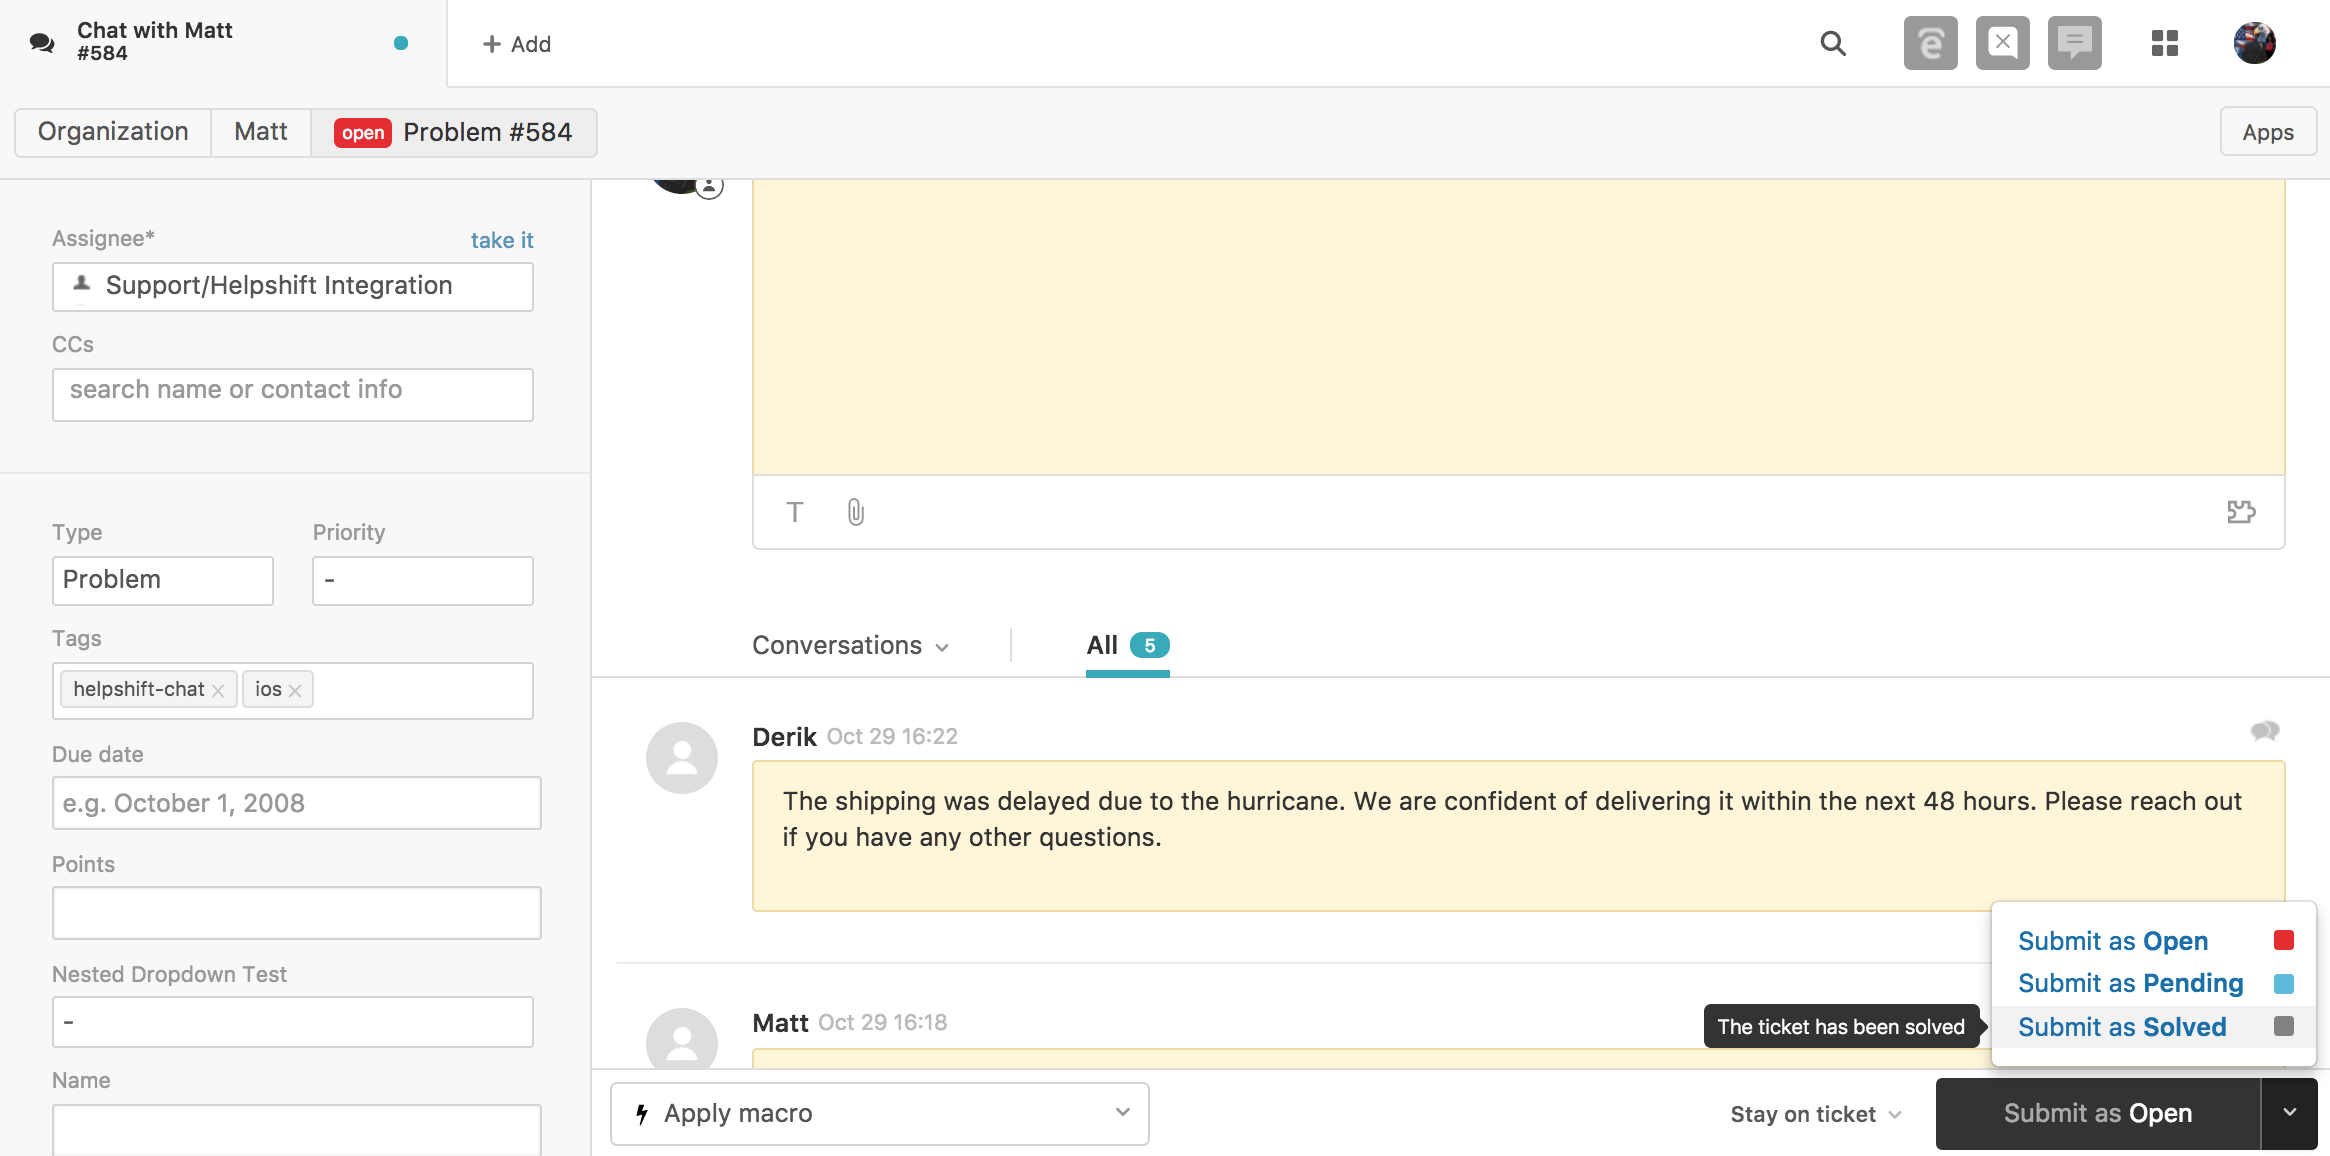
Within the Zendesk ticket, Issue details will appear as follows:
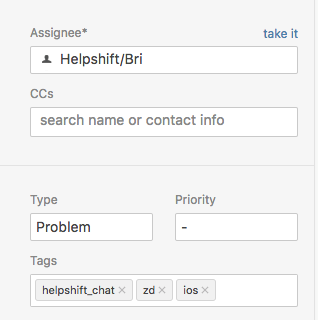
1. Assignee info in Zendesk includes the Agent the Issue is assigned to, the name of the end user, and any tags added to the Issue in Helpshift. Please note that the ticket type will default to ‘problem’.
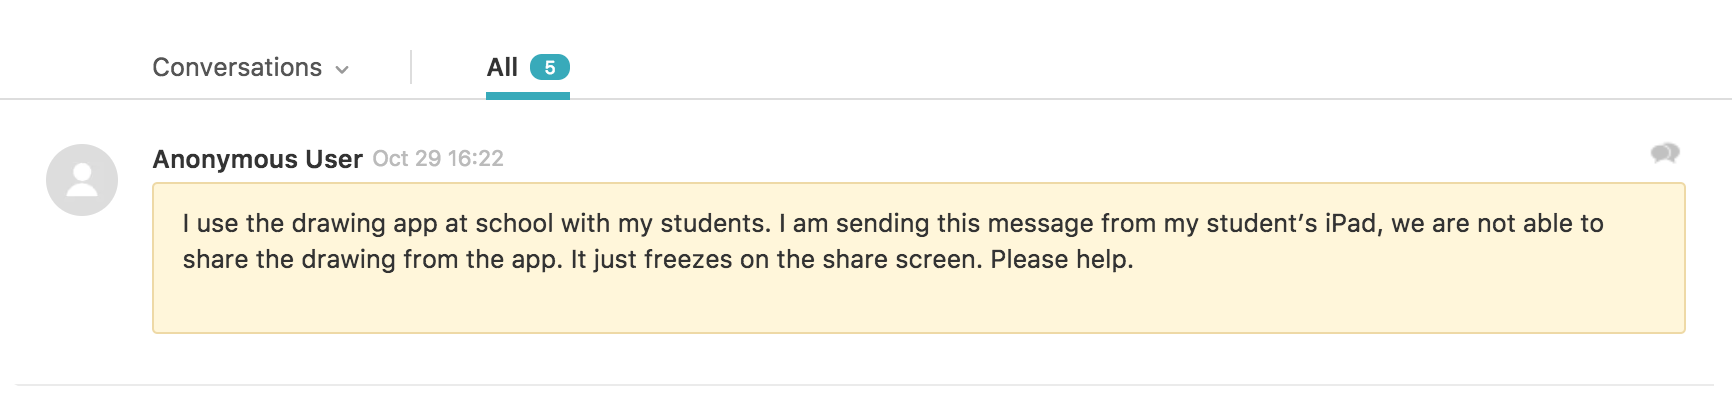
2. The first message in the Issue will be the title of the ticket, which will be truncated if it exceeds 255 characters.

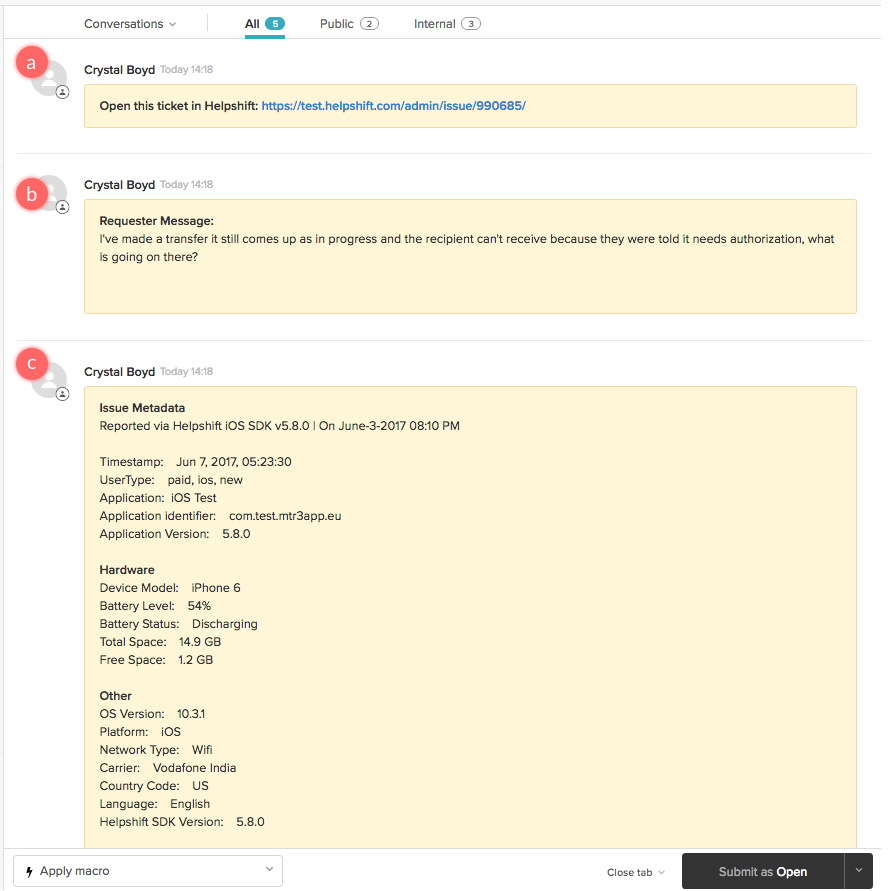
3. The internal message area in Zendesk will include:
a. A link to the Issue in Helpshift where you can reply to the end user
b. The first message from the end user, which will appear as an internal note in Zendesk
c. An internal note with all of the Issue metadata from Helpshift
Note: All end user and Agent messages which originate from Helpshift will appear as internal notes in Zendesk.
4. Private notes in Helpshift will appear as internal notes in Zendesk.
The Helpshift integration also utilizes Zendesk notifications for Helpshift Issues appearing in Zendesk. An Agent will receive a notification in Zendesk when one of the following actions occurs:
- A new Helpshift Issue is assigned to the Agent
- When a new message from an end user is received for an Issue assigned to the Agent
Please note the following regarding how Issue details in Helpshift appear in Zendesk:
When reviewing Helpshift Issues alongside regular Zendesk tickets within your Zendesk dashboard, you can distinguish Helpshift Issues by looking for the ‘helpshift_chat’ tag. This tag will always be automatically applied to all new Zendesk tickets which were initially created as Helpshift Issues – this functionality comes out-of-the-box with our integration.
Please also note that tags set in Zendesk will not sync back to Helpshift. However, tags added in Helpshift will sync back in Zendesk, and will appear within the Zendesk ticket details.
When an Issue is filed anonymously in Helpshift, a ‘Unique User’ for the corresponding message will need to be generated in Zendesk.
When an Automation or bot replies to an Issue in Helpshift, it shows as a public message in Zendesk. When an Automation replies to an Issue, the Zendesk user is listed as Helpshift Automation. When an API bot replies to an Issue, the Zendesk user is listed as Helpshift Bot.

When an Issue is resolved in Helpshift, the status of the ticket in Zendesk is also updated to ‘Solved’.
To completely close an Issue in both Helpshift and Zendesk, after you Reject or Resolve an Issue in Helpshift, you may need to go into Zendesk and manually resolve the Issue. To learn more about how to review and update your required field settings, please review Zendesk’s documentation on required ticket fields.
When an end user leaves a CSAT score, it appears in Zendesk as a public reply with the rating and message.

Helpshift Issues represented as Zendesk tickets cannot be replied to from within the Zendesk Dashboard. To reply to and update Helpshift Issues, you’ll use the Helpshift Chat App.
To set up additional features and learn more about Helpshift best practices, please review our Knowledge Base.