
Reordering the list of fields on the Custom Issue Fields page also reorders how they will appear on the Issue details page for every Issue.
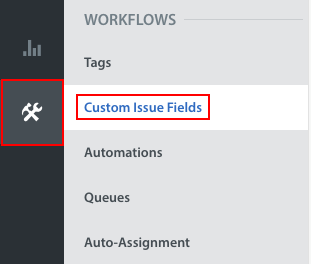
You can reorder Custom Issue Fields from the Custom Issue Fields page. To get there, navigate to Settings > Workflows > Custom Issue Fields.
On this page, click the ‘Edit Order’ button on the right side. The page will update to provide drag-and-drop marks to the left of each field, and an ‘edit order’ panel with a number assigned to each field on the right.
You can update the field order in two ways:
- Click on the drag-and-drop marks on the left, then drag the field up or down into the desired placement.
- Click into the ‘edit order’ field, then update the number.

Once you’ve finished updating the order of the fields, click ‘Save Changes’. The new field order will appear.
To learn how to edit your Custom Issue Fields, see How do I edit an existing Custom Issue Field? If you need to remove an existing Custom Issue Field, see How do I remove a Custom Issue Field, and what happens if I do?