
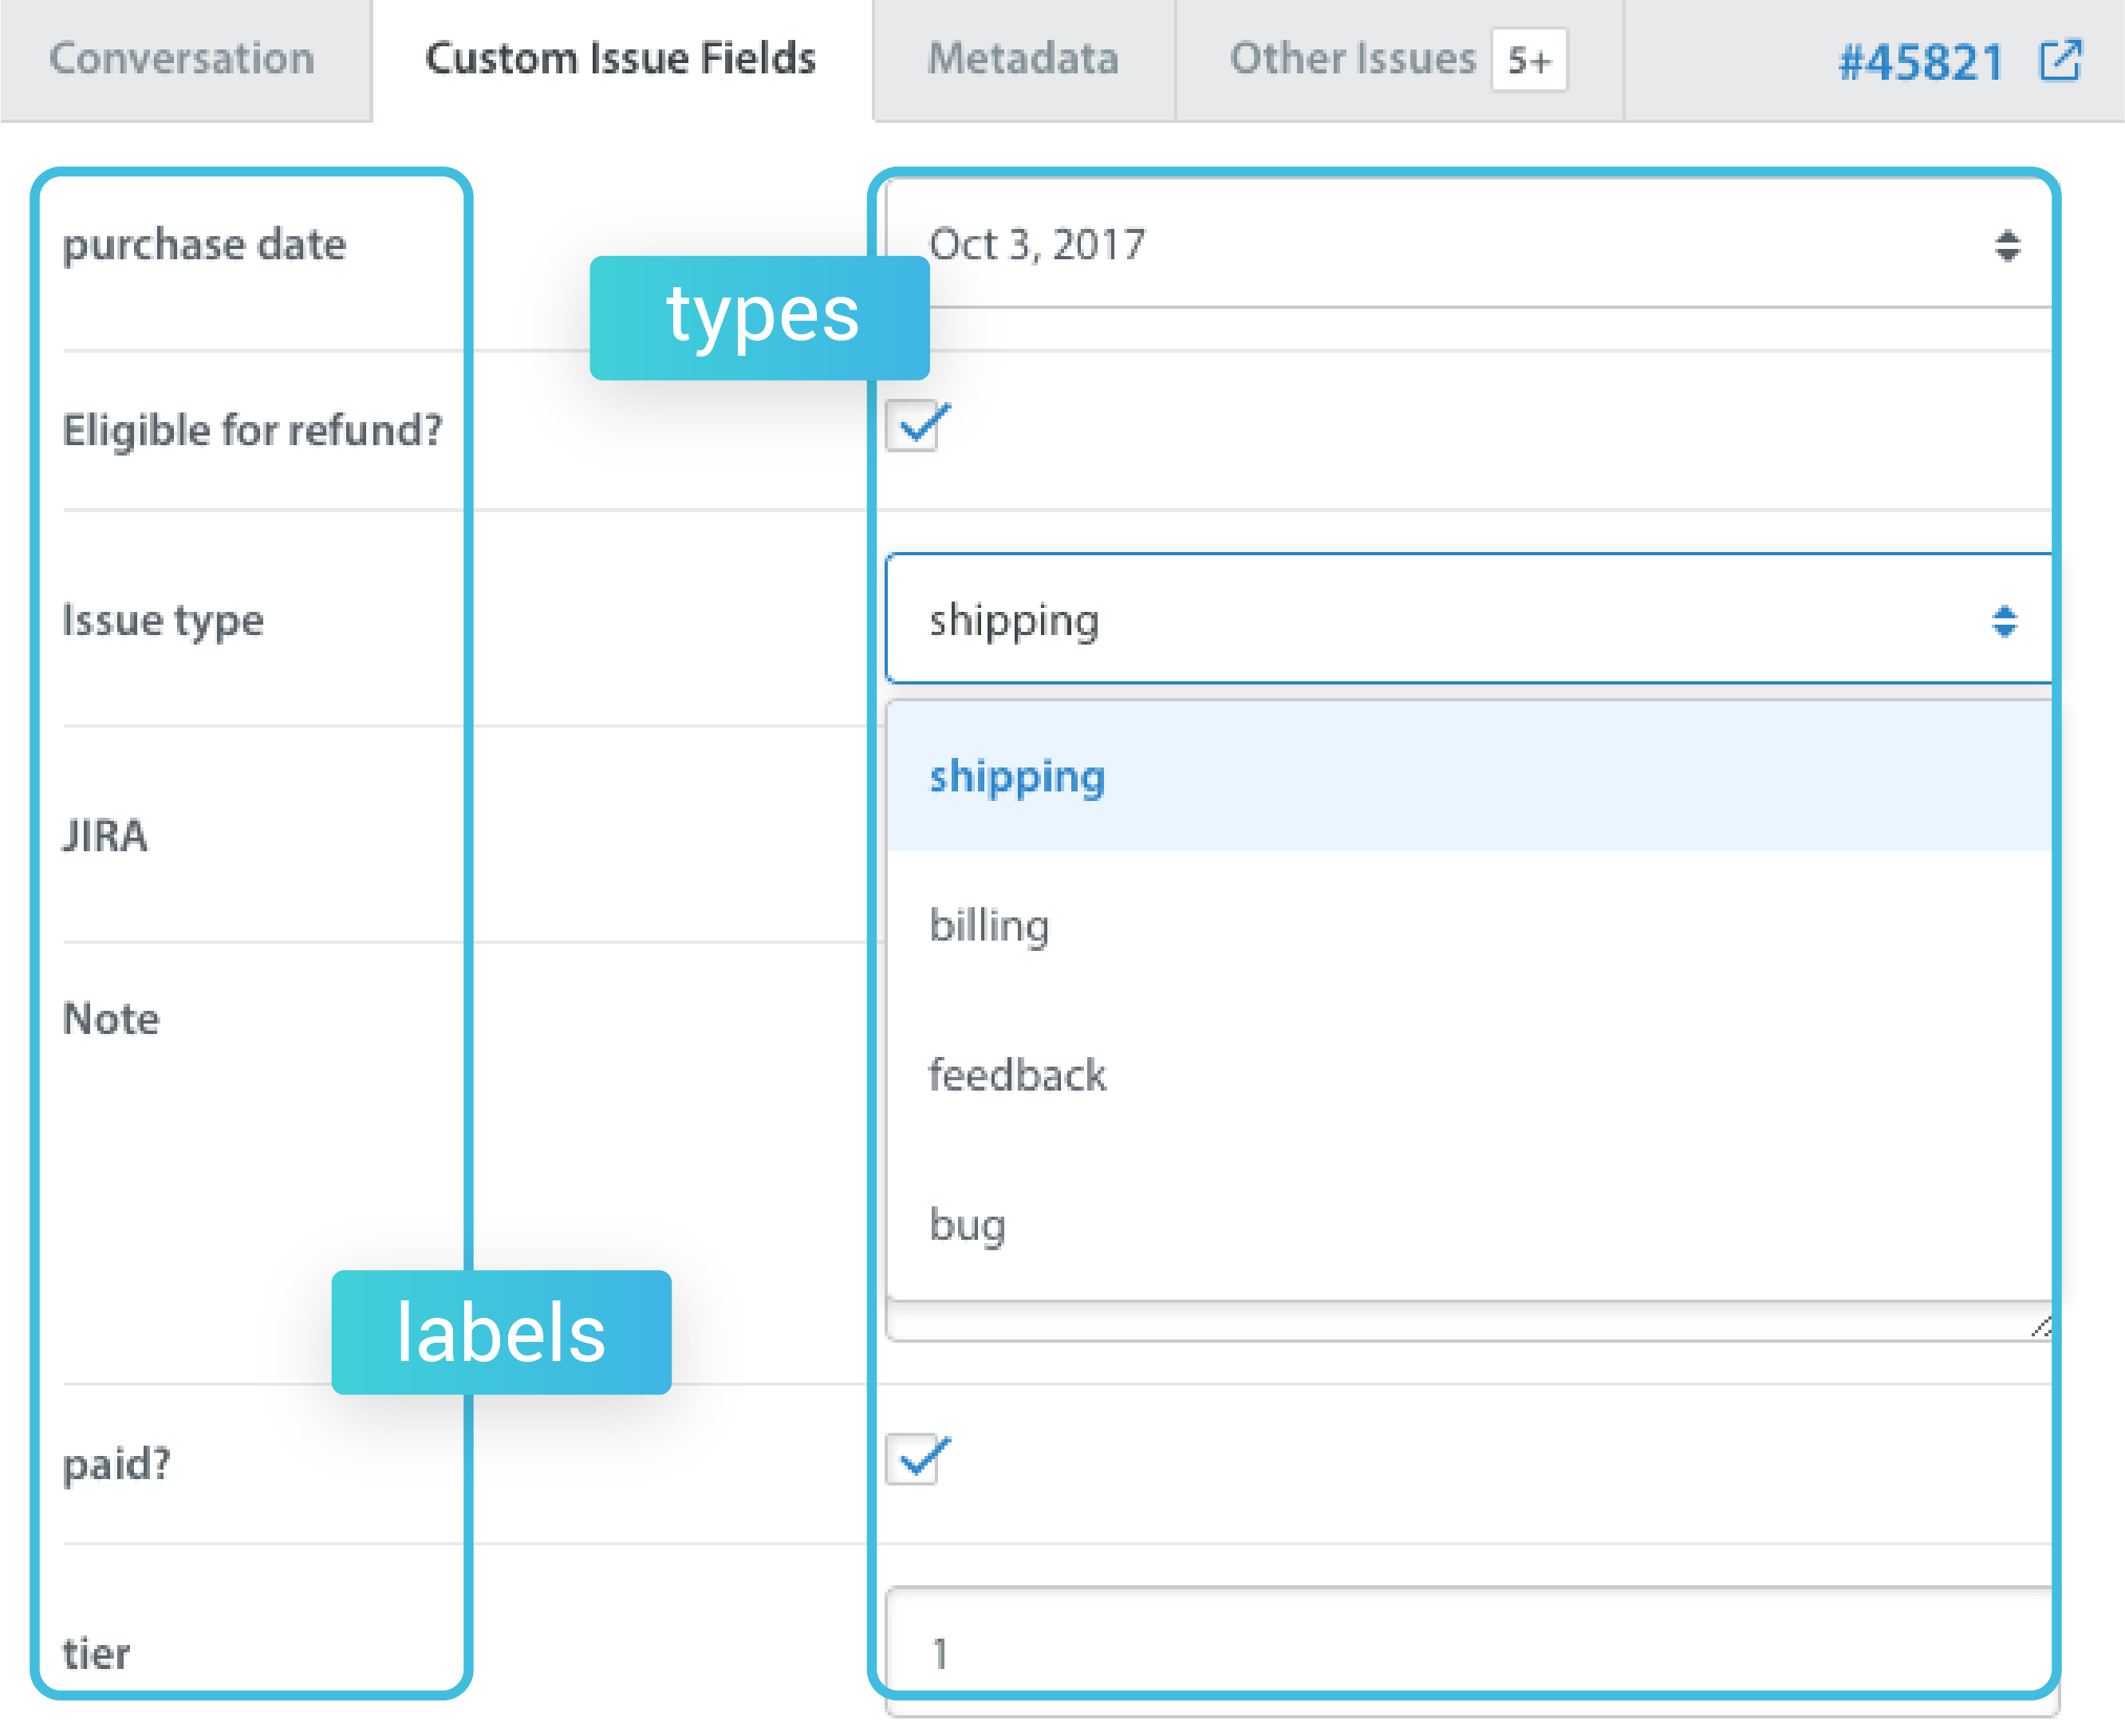
Custom Issue Fields are the powerhouse of your workflow for passing through data from your app – they allow you to organize Issues based on a number of categories using fields made up of a label and a type. The label is where you provide the category of the field (tier, purchase date, country) and the type is where you define the kind of value which should be allowed to be entered into the field (a number, date, string, a drop-down, and more.)
We recommend using Custom Issue Fields to organize your Issues into specific, stable categories that benefit your workflow. As part of our Getting Started flow, you’ll want to plan your Custom Issue Fields while planning your overall workflow.
They can also be configured to support the following platforms:
- Web Chat: Configure the Web Chat SDK to automatically map Web Chat data into Custom Issue Fields, including user responses to Bots.
- Email support: Use Custom Issue Fields with Automations to automatically route and assign new Issues based on the email address that the user has reached out to.
- Contact us form: When end users reach out via your Web Support Portal, you can configure that form to collect specific data about the end user’s inquiry and map that data to Custom Issue Fields.
To best utilize Custom Issue Fields for your workflows, we recommend directly passing through your metadata as fields. To do so, please point your developer to our developer documentation on Custom Issue Fields for iOS and Android.
1. Create Custom Issue Fields
2. Manage Custom Issue Fields
3. Use Custom Issue Fields with Smart Views
4. Add Custom Issue Fields Into Your Contact Form
5. Use Custom Issue Fields with Automations
6. Use Custom Issue Fields with Power BI
For more detailed steps and best practices, please see our Knowledge Base.
1. Create Custom Issue Fields
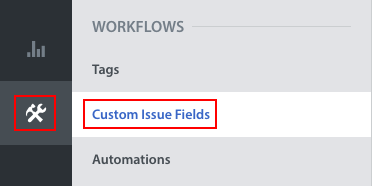
Please note: you must be an Admin to create and manage Custom Issue Fields.
To create a new Custom Issue Field, navigate to Settings > Workflows > Custom Issue Fields.
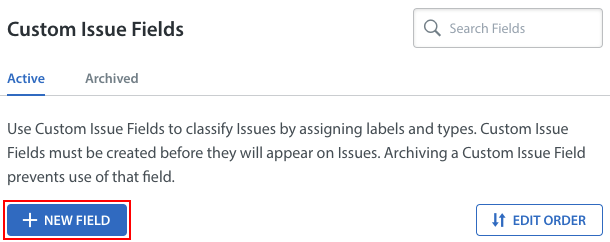
The Custom Issue Fields page lists all of the active and archived Custom Issue Fields associated with your Helpshift Dashboard. To add another, click the ‘New Custom Issue Field’ button.
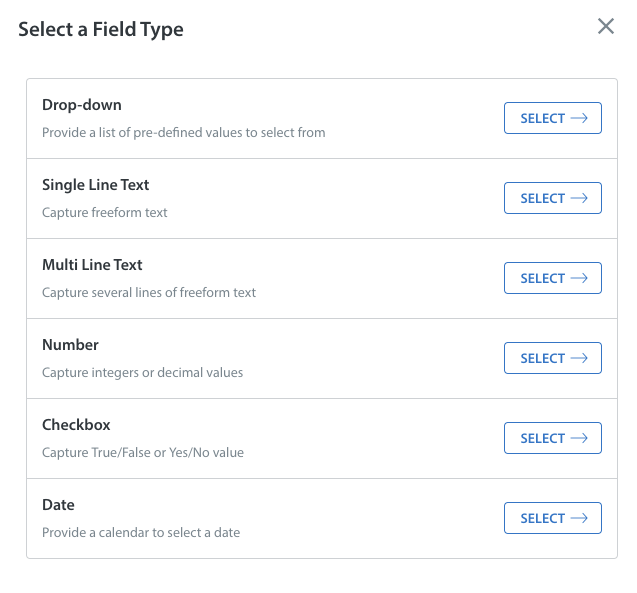
On the page that appears, you’ll be prompted to select the field type, which is the type of data you want to allow your Agents to be able to input into the field. Available field types are as follows:
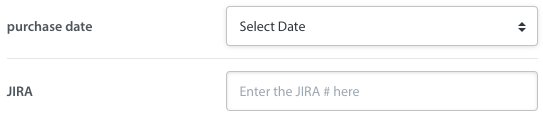
- Single line text – allows the Agent to enter a freeform text line (with a maximum 255 character length) within this field. This is good for data that will frequently be unique, such as a JIRA link.
- Multiline text – allows the Agent to enter several lines of freeform text within this field (with a maximum 100,000 character length). This is helpful for storing customer information, such as mailing addresses.
- Number – restricts the field to number values, such as the tier level or purchase amount.
- Date – this field type will provide a calendar where the Agent can select a date, such as the user’s signup or purchase date.
- Drop-down – drop-downs allow you to limit the values the Agent can select to a set list. You could define your Issue types as a drop-down. Drop-downs are helpful for creating useful analytics metrics, since Agent’s can’t mistype the selection.
- Checkbox – this is best for yes/no or true/false values, such as “VIP” or “paid”.
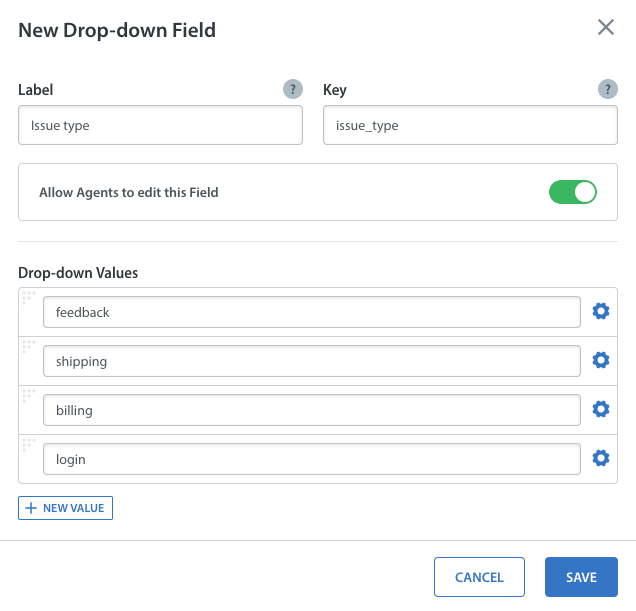
As an example, if you wanted to create a Custom Issue Field to track the Issue type, you would select the drop-down option.
Once you’ve selected a field, on the page that appears, you’ll be prompted to make the following selections:
- Enter the label, which is what will appear in the Custom Issue Fields tab on the Issue details page.
- Once the label is entered, a key will be automatically generated. The key is how you communicate Custom Issue Field values from your SDK. Please note that the key is not editable once the field has been created.
- Determine whether Agents will be allowed to edit the field by toggling ‘Allow Agents to edit this Field’ to OFF (grey) or ON (green).
- Enter the field placeholder(s) (not applicable for date, drop-down, or checkbox). This is the text that will appear in the field before an Agent has filled it in, and can be used to provide options.
For our Issue type example, you would enter the label as ‘Issue type’. Drop-downs come with drop-down values instead of a field placeholder, where you will enter the Issue types you want available for your Agents to select. You can reorder the values and set one as the default by clicking the gear icon to the right of each field.
When creating a new single-line or multi-line Custom Issue Field, you’ll notice an ‘Advanced’ link in the pop-up. Clicking this link provides the ‘’Map Metadata to Field’ option, which relates to how this data will appear in Power BI. To learn more, please the last section of this guide, Use Custom Issue Fields with Power BI.
Once you have provided all of this information, click the ‘Save’ button. The new Custom Issue Field will appear in your list of active Custom Issue Fields.
To see what Custom Issue Fields will look like in the full Issue page view, see How do I adjust my 3-pane view?
You can also set Custom Issue Fields when creating an Issue on behalf of a user. To learn how, see How do I create an Issue on behalf of a user?

Please note the following regarding the behavior of Custom Issue Fields:
- If the value in a drop-down field is deleted later, it will be removed from all Smart Views, Issues, and Automations it is associated with. If it is re-added later, it will need to be manually re-added to those Smart Views and Automations.
- You can only have a maximum of 250 active and archived Custom Issue Fields at any given time. If you’ve reached this limit, we recommend deleting older archived Custom Issue Fields to free up space for more.
- You can only have a maximum of 1000 options in a dropdown type Custom Issue Field.
2. Manage Custom Issue Fields
Now that you’ve created your first few fields, you can edit, reorder, and delete them from the Custom Issue Fields page.
Reordering Custom Issue Fields
Reordering the list of fields on the Custom Issue Fields page also reorders how they will appear on the Issue details page for every Issue.
To reorder your fields, click the ‘Edit Order’ button on the right side. The page will update to provide drag-and-drop marks to the left of each field, and an ‘edit order’ panel with a number assigned to each field on the right.
You can update the field order in two ways:
- Click on the drag-and-drop marks on the left, then drag the field up or down into the desired placement.
- Click into the ‘edit order’ field, then update the number.
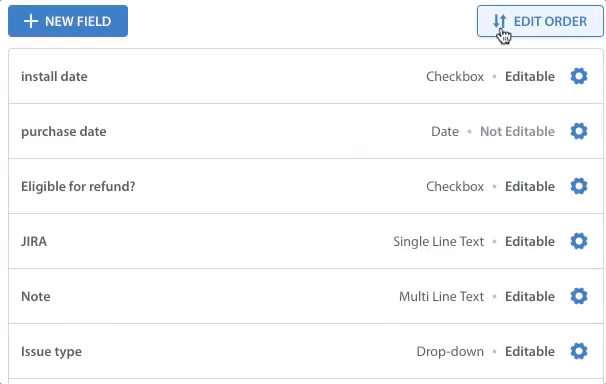
Once you’ve finished updating the order of the fields, click ‘Save Changes’. The new field order will appear.
Editing Custom Issue Fields
To edit a Custom Issue Field, navigate to Settings > Workflows > Custom Issue Fields.
The Customer Issue Fields page displays the list of Custom Issue Fields (CIFs) which are used to classify issues. An edit icon will be displayed for the CIFs that are editable by Agents. If you hover over the icon, the tooltip displays the ‘Editable by Agent’ text.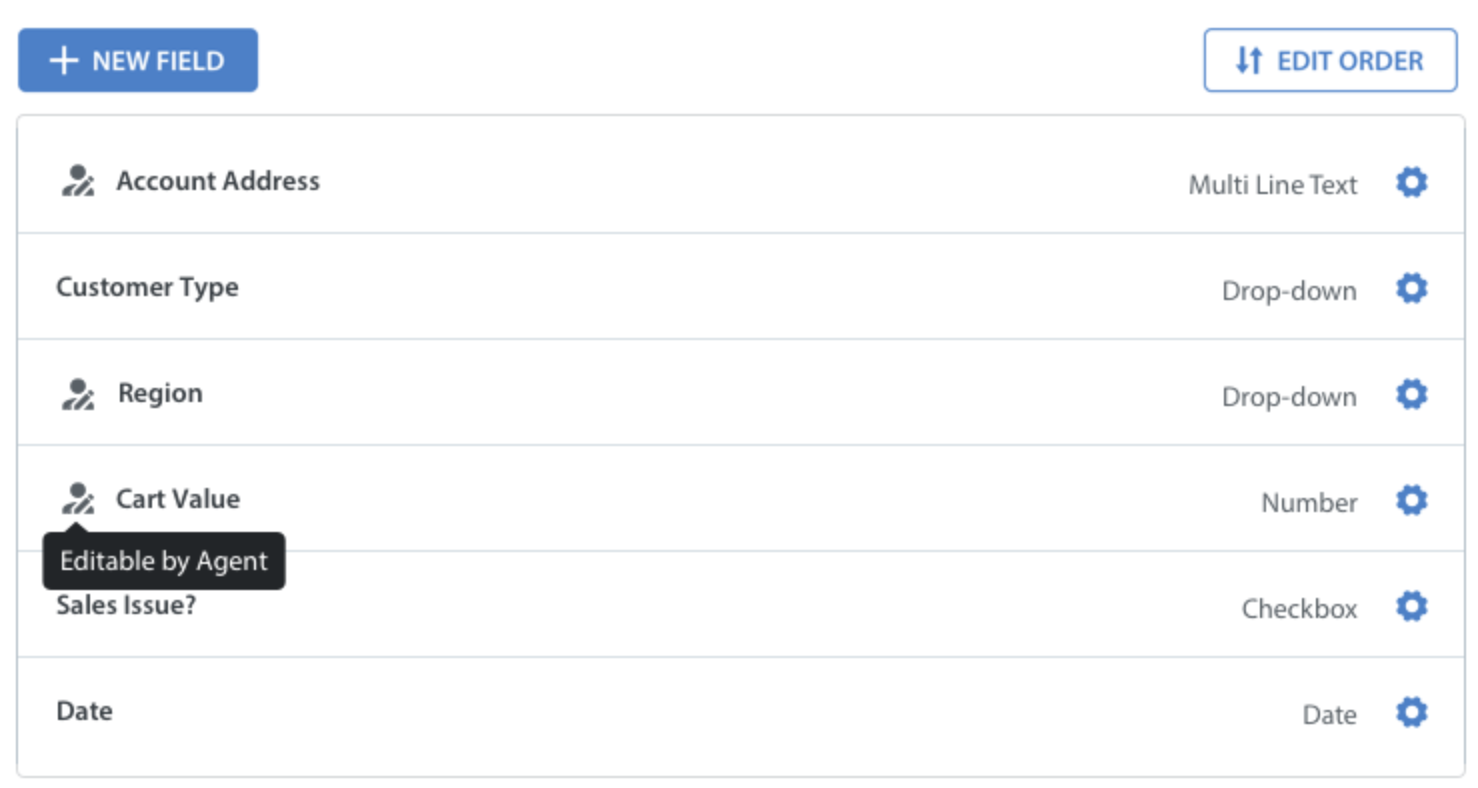
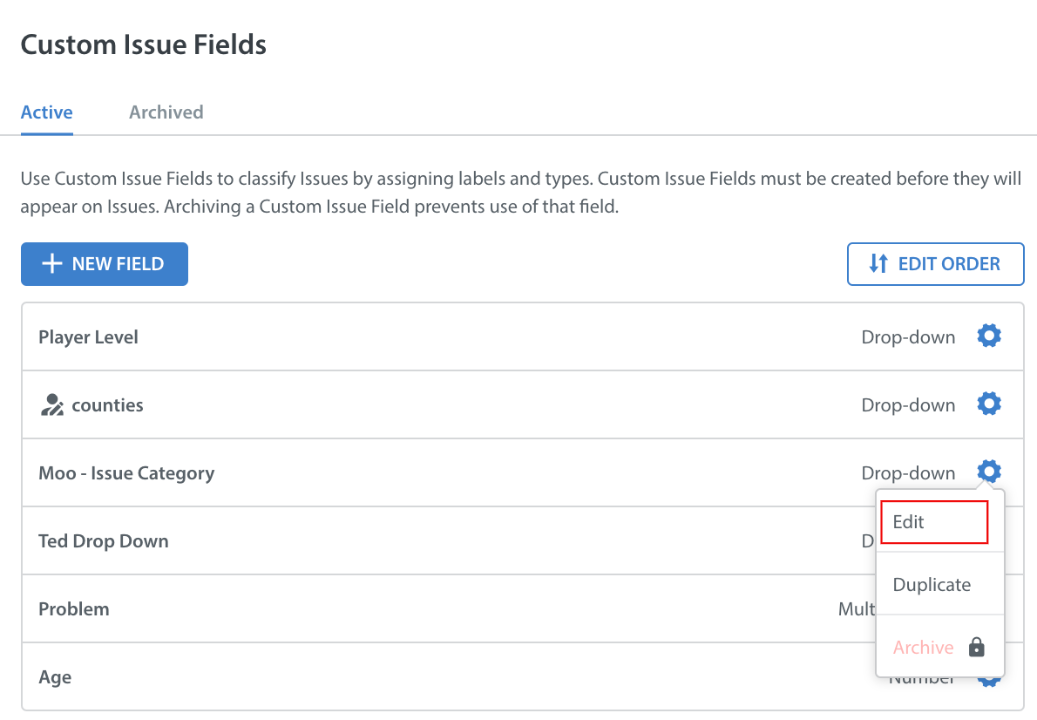
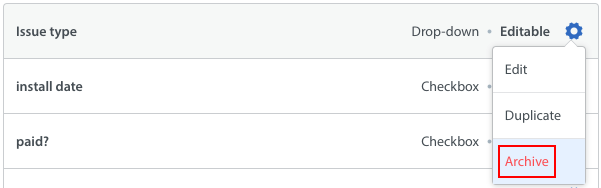
To edit a CIF, click the gear icon to the right of the Custom Issue Field, then select ‘Edit’ in the drop-down that appears.
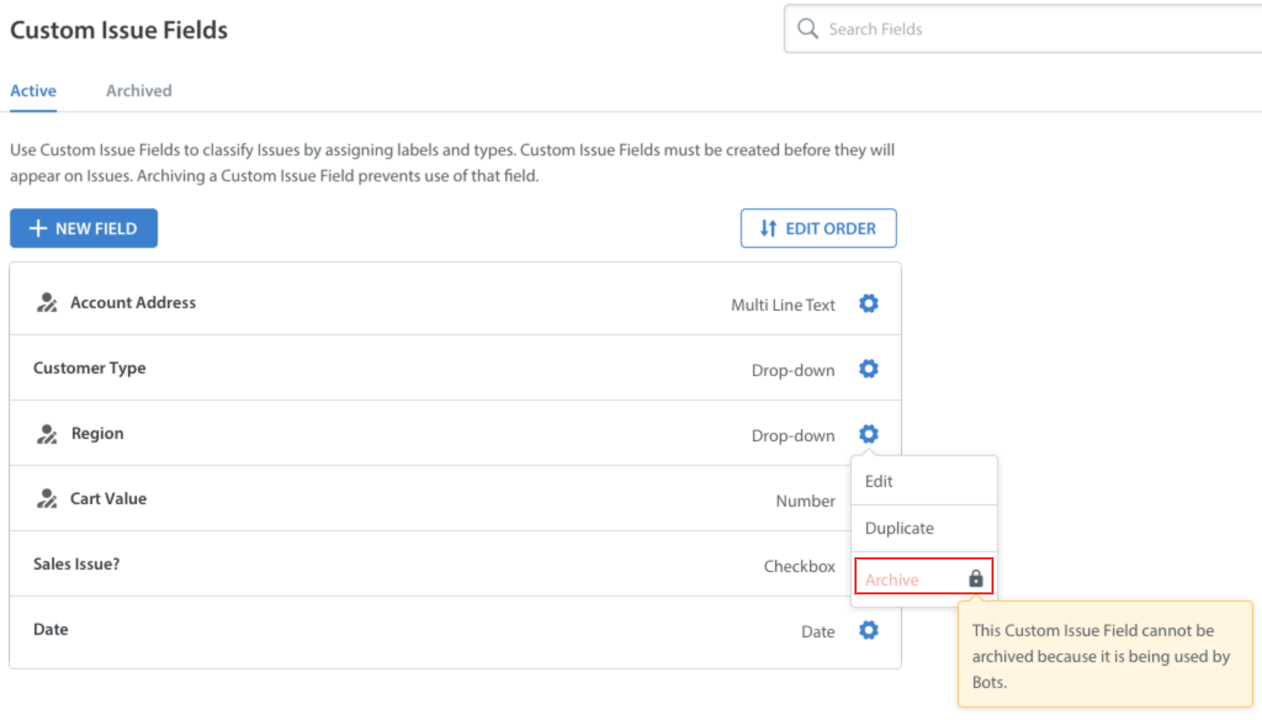
If a Custom Issue Field is used in a bot, the Archive option in the drop-down will be disabled. You can hover over the Archive option to view the message ‘the Custom Issue field cannot be archived because it is being used in bots’.
Once you select the ‘Edit’ option, the ‘Edit Customer Type Field’ modal appears and includes the Content and Usage tab with all the same options that were available when you created the CIF.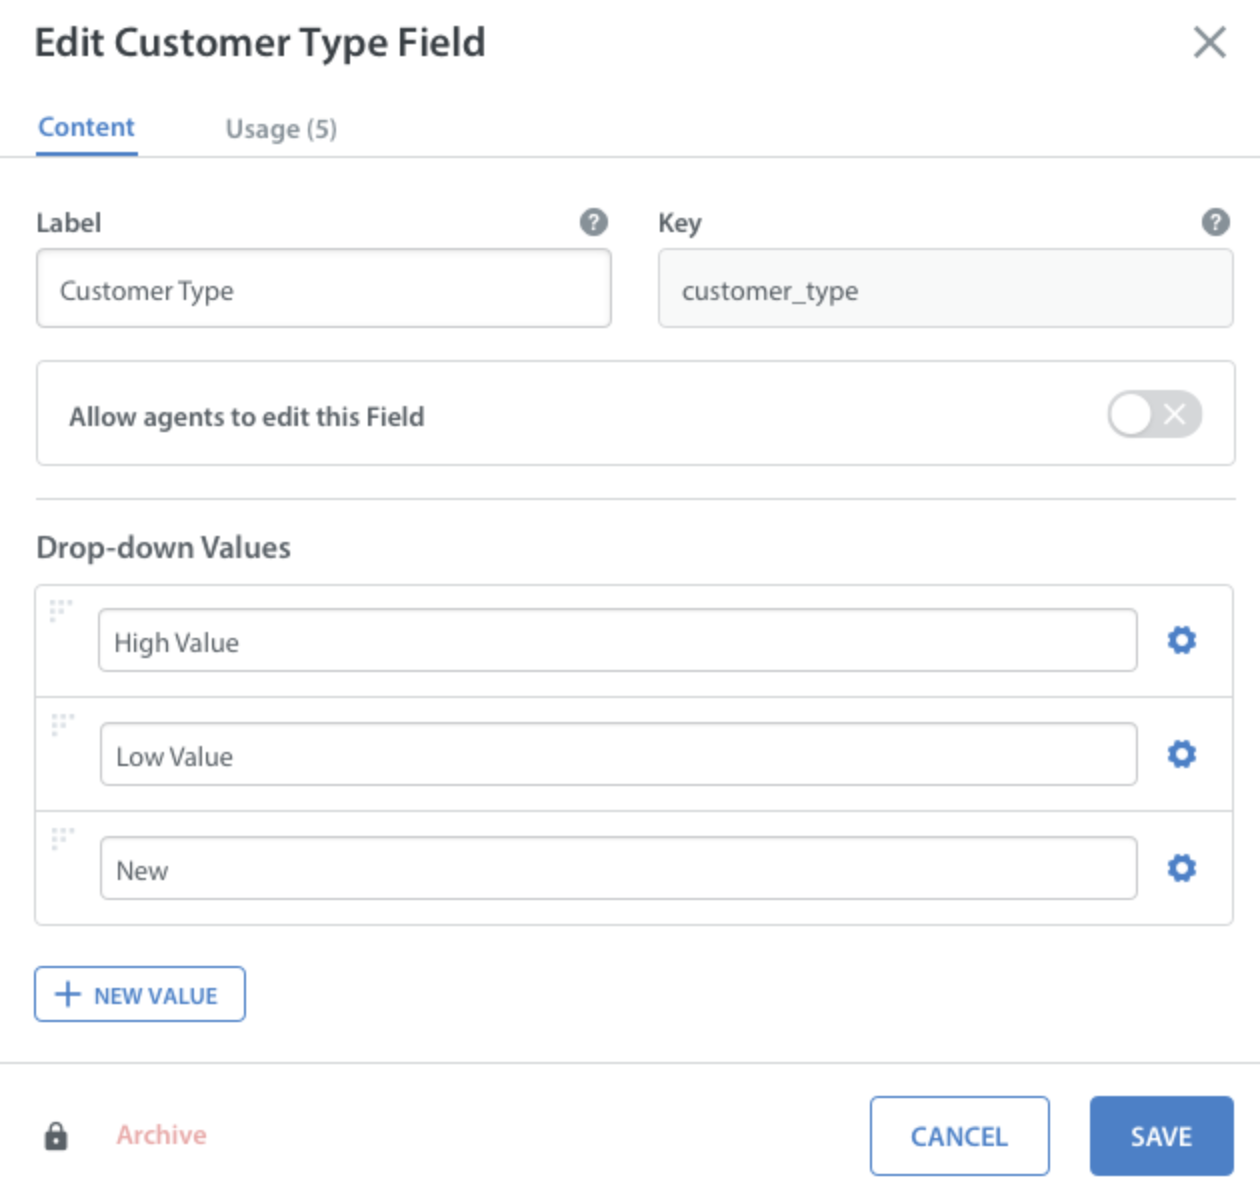
If the CIF is used in Custom Bots, you can perform the following actions:
- Add a new value under the Drop-down Values using the + New Value button
- Edit any of the existing options
- Change the order of the existing drop-down values
To save your edits, click ‘Save’ in the bottom right.
Please note that the ‘key’ field and drop-down values cannot be edited /removed once the Custom Issue Field has been created.
Note: The dropdown value can be removed if it is not used in any of your workflows.
Removing Custom Issue Fields
A Custom Issue Field can be removed from your list of active fields in 2 ways: it can be archived, and then after it is archived, it can be deleted.
Archiving a Custom Issue Field will remove the field from older Issues, and make it unusable within Advanced Searches. It will still be available as a filter within any Smart Views (though they will turn up no results), Saved Searches, and Automations that it was previously added to; however, you will not be able to edit it in those places, and will only have the ability to remove it.
Deleting a Custom Issue Field effectively removes the field in every place it has appeared in your Dashboard. This action cannot be reversed.
To archive, a field, navigate to the list of active fields on the Custom Issue Fields page, click the gear icon to the right of that field, then select ‘Archive’.
A pop-up will appear reviewing what will happen when this Custom Issue Field is archived.
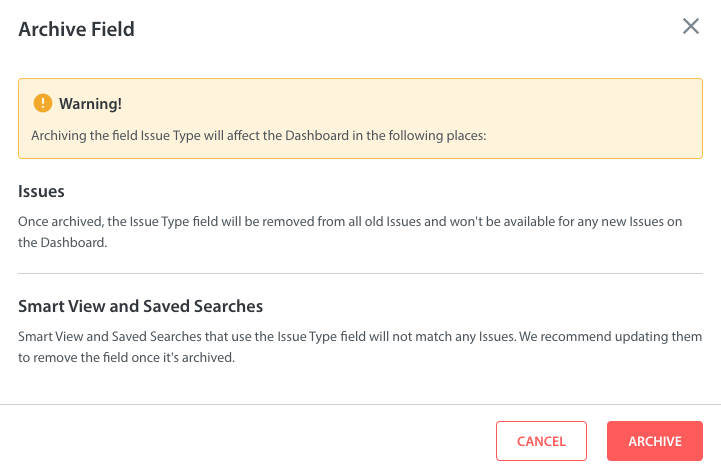
Click ‘Archive’ to complete this step. This field will now appear under the ‘Archived’ tab on the Custom Issue Fields page.
If you review any Smart Views or Automations associated with the Smart View, a pop-up will appear letting you know that the Custom Issue Field cannot be edited.

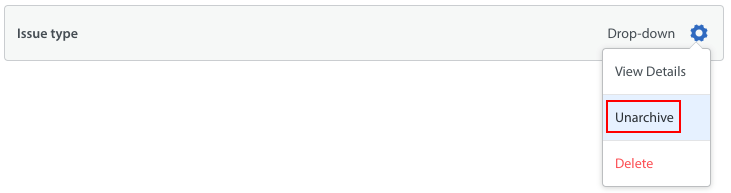
An archived field can be unarchived by selecting ‘unarchive’ in the drop-down next to the field on the Archived Custom Issue Fields page.
Please note: once a Custom Issue Field has been unarchived, it will automatically be placed at the bottom of the list of active Custom Issue Fields.
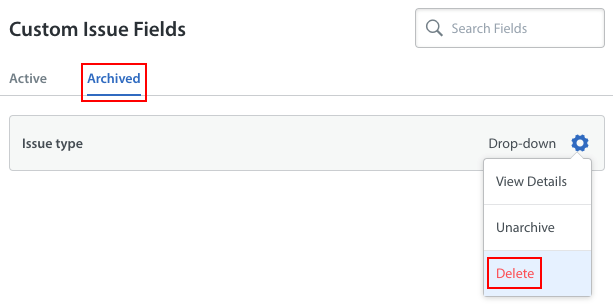
To delete a Custom Issue Field, navigate to that field on the ‘Archived’ tab, click the gear icon on the right side of that field, then select Delete.
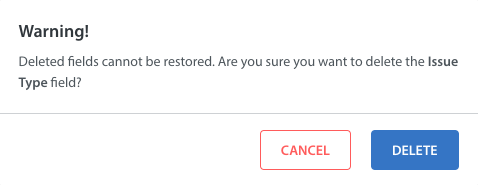
A pop-up will appear confirming that this field cannot be restored once deleted. Click ‘delete’ to confirm this action.
Once deleted, the Custom Issue Field will no longer appear anywhere in your Dashboard, including within Issues, Smart Views, Automations, Analytics, and Saved Searches.
3. Use Custom Issue Fields with Smart Views
To create or update a Smart View so that it filters for Issues by Custom Issue Field, when creating or updating the Smart View, click the ‘Add Filter’ button, then select the Custom Issue Field you would like it to filter by under the list of ‘Custom Fields’.
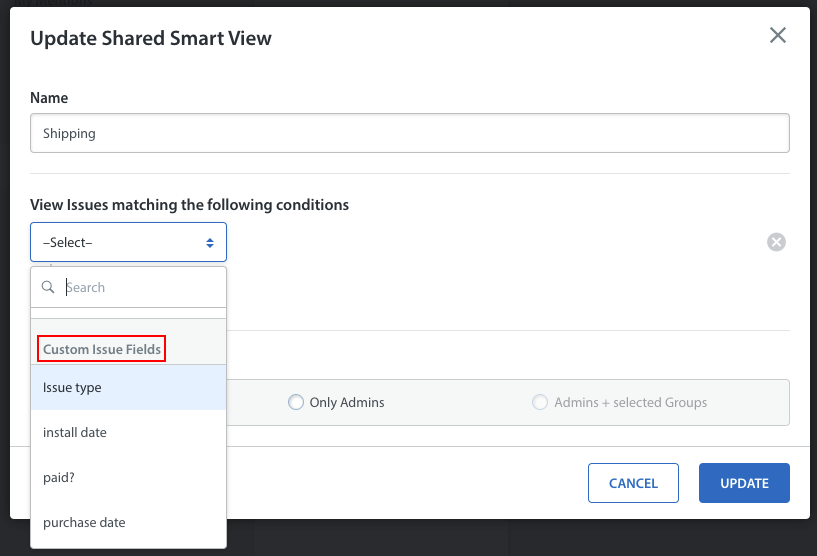
You’ll be prompted to select filters for your condition based on the field selected. For example, checkbox fields will provide a true/false filter, drop-down fields will have an is/is not filter, dates will have a ‘date is/is not’ filter, and more.
To update our Billing Smart View, we may select the ‘Purchase date’ Custom Issue Field, and have it filter for Issues where the purchase was made within the past 7 days.

To review the steps for creating a Smart View, see How do I create Smart Views?
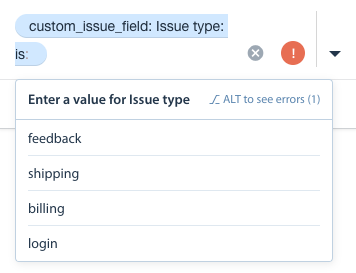
You can also conduct an Advanced Search for Issues by Custom Issue Field by using the ‘custom_issue_field’ option available in the Advanced Search bar.
You can use Bulk Actions on Issues brought up by an Advanced Search to move these Issues to a Smart View or reassign them to a specific Agent or Queue. To learn more about Bulk Actions, see What is a Bulk Action?
4. Add Custom Issue Fields Into Your Contact Form
Please note: you can add a text or drop-down Custom Issue Field to your contact form.
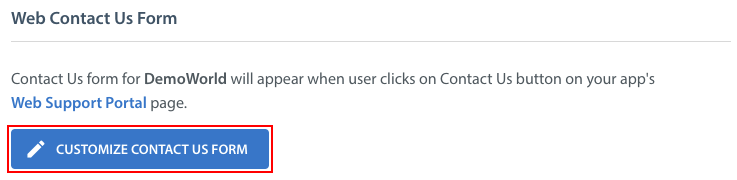
You can add Custom Issue Fields to your contact us form by navigating to Settings > App Settings > select your app. On the page that appears, scroll down to the ‘Web Contact Us Form’ section, then click the ‘Customize Contact Us Form’ button.
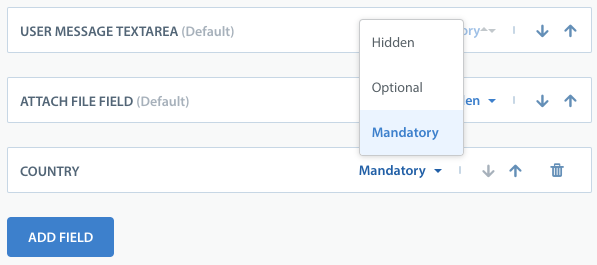
On the page that appears, you can add new fields by clicking the ‘Add Field’ button near the bottom. The active Custom Issue Fields will be listed in the drop-down that appears.
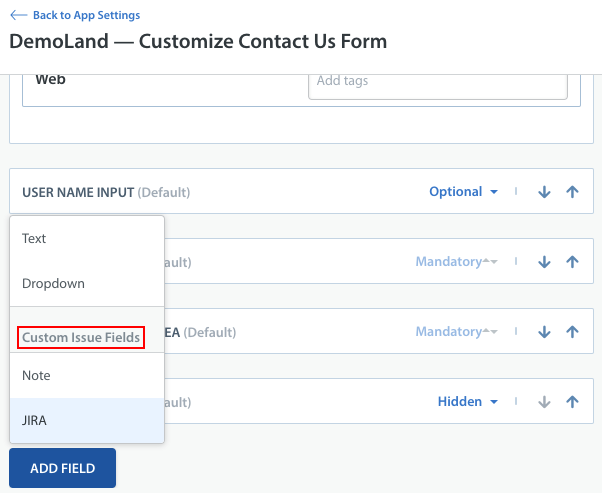
After you’ve selected the field, you’ll also be presented with options to indicate whether the field should be mandatory, optional, or hidden.
Once a Custom Issue Field is added to your contact us form, any value that is entered into that field via the contact form will now be pre-populated in the Issues view.
To review the full steps for updating your contact us form, please see How do I customize my Web Contact Us form?
Please note: If a Custom Issue Field is archived, it will no longer appear as an option on your contact form. If it is later unarchived, it will need to be manually re-added into your contact form.
5. Use Custom Issue Fields with Automations
You can add Custom Issue Fields as a condition or action in a new or existing Automation. As a condition, you can filter for an Automation to run on Issues based on the Custom Issue Field selections associated with that Issue. As an action, you can configure the Automation to update Custom Issue Fields as an outcome when the Automation runs.
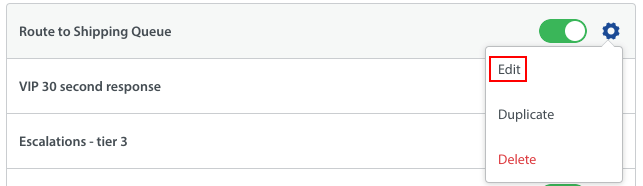
To update an existing Automation to include Custom Issue Fields, navigate to the Automations page, click the settings gear to the right of the Automation, then click ‘Edit’.
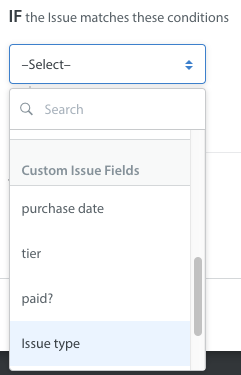
Click ‘+ And’ in the conditions section to add a new condition. All of the Custom Issue Fields active on your Dashboard will be listed in the ‘Custom Issue Fields’ section.
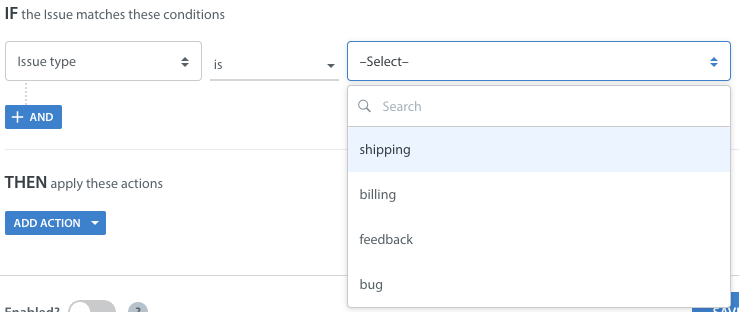
After you’ve selected a Custom Issue Field, you will be able to select a filter to indicate how this Custom Issue Field should be evaluated. In this example using a drop-down field, you’ll be allowed to select ‘is’ or ‘is not’, then select the specific field the Automation should check for.
Different filter options will be available based on the type of field selected. For example, for a checkbox field, you’ll be able to select ‘is true’ or ‘is false’. A date field will allow you to select before or after the date.
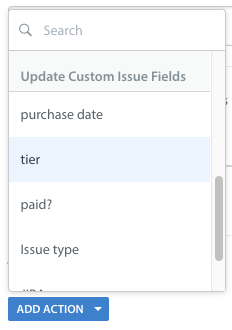
To add Custom Issue Field as a new action within an Automation, click the ‘Add Action’ button within the ‘Edit Automations’ page. All of the Custom Issue Fields active on your Dashboard will be listed in the ‘Custom Issue Fields’ section.
Just like for conditions, filter options will appear allowing you to indicate how the field should be updated, e.g. whether it should be updated or deleted.
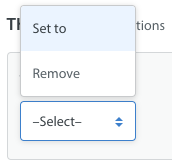
If you select the ‘Set to’ filter option, you’ll be prompted to enter what information should appear in the field or select the option it should be updated too if it is a drop-down field that is being updated.

Please note: when a Custom Issue Field is archived, it will no longer appear as a field within any Automations it was added to.
To review steps for creating an Automation, please see the following FAQs:
6. Use Custom Issue Fields with Power BI
If you already have Power BI for Helpshift enabled, you can map Custom Issue Fields to your Power BI content pack to visualize that data in your reports.
Before you can use Custom Issue Fields in Power BI, they must first be enabled for reporting in your Helpshift Dashboard. To learn how, see How do I enable Custom Issue Fields for reporting in Power BI?
Once you’ve enabled your Custom Issue Fields, read How do I make use of Custom Issue Fields in Power BI? To get the most out of this additional data in your Power BI dashboard.
To set up additional features and learn more about Helpshift best practices, please review our Knowledge Base.