
Reminder Automations can be set to run on specific types of Issues where you’d like to check in with the user. Sometimes it can take a while for a user to respond, but often they may forget and just need a reminder to reply back.
Reminder Automations send a custom follow-up message based on the platform, app, language, tags, and any other criteria you set when creating the Automation.
You’ll use a Time-Based Automation to create the Reminder Automation, so it’s helpful to be familiar with these prior to completing these steps. For a refresher, please review What are Time-Based Automations, and how do I set them up?
To create a Reminder Automation, proceed as follows:
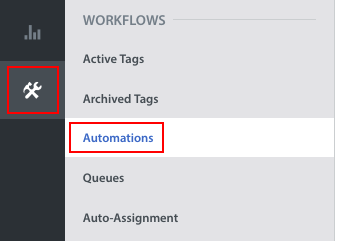
1. Navigate to Settings > Workflows > Automations
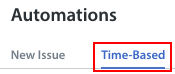
2. Select ‘Time-Based’ at the top of the page
3. Click the ‘+New Automation’ button to create a new Time-Based Automation

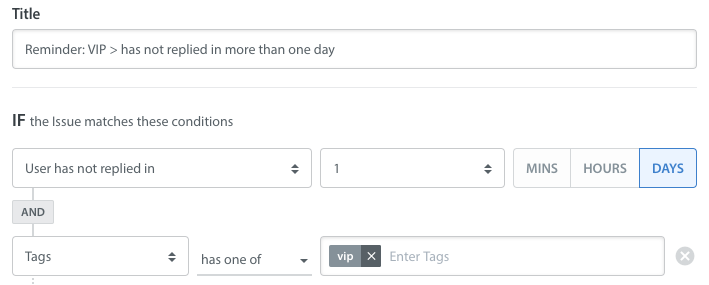
4. In the ‘Create Automation’ pop-up, select the time condition ‘User has not replied in’ and the time frame and conditions that the Automation should filter open Issues by.
As an example, if we want to set up a Reminder Automation that checks for a new response from a VIP user within one day, you would set the time condition to filter by one day and the tags for VIP.
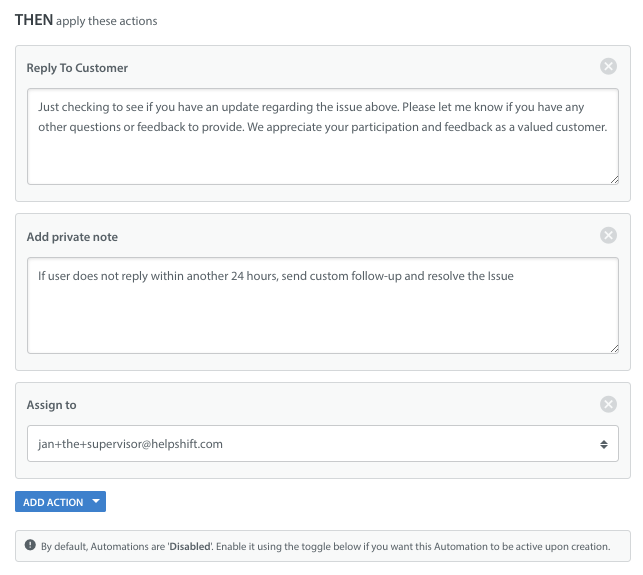
Set the action that should take place when the Automation detects an Issue that meets the criteria above. Per our example, we will send a reminder to the VIP, add a private note that custom follow-up should be sent if we don’t hear back from them after this reminder, and have the Issue assigned to a supervisor who will handle the custom outreach.
Please note the following when creating Reminder Automations:
Creating custom Reminder Automations for different apps, bug types, and tiers of support can provide a positive experience for your end users. For example, if you offer support in multiple languages, you can create different Auto Reminders for users of different languages. To dynamically use different Reminder Automations for bugs, apply the tag type used for that bug within one of the tags fields.
You can use Reminder Automations in conjunction with the Auto Resolve feature for general follow-ups. If your users don’t reply back in a timely manner, you can set up a Reminder Automation for them, then have your Auto Resolve function close it after a certain amount of time if you don’t hear back. To learn more, see How do I set up Auto Resolve Automations?
When using Reminder with Auto Resolve, you’ll want to make sure the ‘x days after’ values are not the same. If they are set the same, then this will cause a poor user experience, as they will see two immediate messages before their issue is closed. We recommend having at least a day or two difference between your “x days after” values for Reminder Automations and Auto Resolve Automations.
5. Once you’ve set up your Reminder Automation, click the ‘Save’ button in the bottom right. Saving the Automation only saves your selections and does not start the Automation – you’ll need to enable the Automation to get it up and running.

Saving without enabling allows you to review the Automation with your team first to prepare them for the impact the new Automation will have on their workflow.
Please note that with Time-Based Automations, the order matters – Time-Based Automations will run in order starting from top of the list to bottom, so if you have conflicting Time-Based Automations then you will run into trouble. To remedy this, you can use the change order button to place your Time-Based Automations in the right order.
When you’re ready to launch the Automation, switch the ‘Enabled?’ toggle to ON from the list of Automations or from within the ‘Edit Automation’ pop-up.
