
Custom Bots are an add-on feature that can be unlocked with an account upgrade. Please reach out to success@helpshift.com to learn more.
Custom Bots can be invoked at any point in a conversation to carry out a customizable series of as many as five different actions. They can do many of the same things that service agents can do, which frees up your support team to hand off issues to bots and go work on other things. You can also configure your workflow to have automations assign issues to bots when certain conditions are met, allowing you to use bots to conduct end-to-end Issue management.
For your in-app users, you must upgrade to SDK v7.1.0+ and have Conversational Issue Filing enabled to use Custom Bots with the SDK. Please review the FAQ, “What is Conversational Issue Filing, and how do I set it up?” to set this up if you haven’t done so yet.
For web chat users, no SDK upgrade is needed – as long as you have the web chat widget integrated, you can start using Custom Bots to support your web users. Please review our Web Chat guide to set up this widget if needed.
Please note: you will not be able to edit the Bot once you’ve published it, and if you and another Admin of your team attempt to edit a Custom Bot at the same time, those edits may not be saved. For these reasons, we recommend designing your ideal Custom Bot flow outside of the Dashboard before creating it to ensure a smooth implementation.
1. Create a Custom Bot
2. Add Steps
3. (Optional) Branch Steps
4. Make an API Request Step
5. Add AI-Powered FAQ(s) to Bot Conversations
6. Link Steps
7. Integrate Custom Bots into your Workflow
8. System Checks in Custom Bots
1. Create a Custom Bot
To set up a new Custom Bot, navigate to the Settings page.
Click on the ‘Bots’ tab under ‘Workflows’.

On the page that appears, double check that you’re on the Custom Bots tab in the top navigation bar, and then click New Bot.

In the pop-up that appears, you’ll be asked to provide a name and nickname for your Bot.
The name is how your team will identify your Bot, and must be unique – we recommend coming up with an intuitive name that will help your team understand what this Bot is for.
The nickname will be used if you allow the Bot’s name to be displayed to end users, similar to how Agent nicknames work. Bot nicknames do not have to be unique, meaning you can give the same nickname to multiple different Bots.
Click the ‘Create & Configure Bot’ button to set up your Bot steps.

2. Add Steps
Steps are the actions that a bot should take within a support conversation. You can set up multiple steps for each Bot, which will be linked to be carried out in a specific order. The steps available for you to configure differ based on the Bot being set up.
For Custom Bots, you can set up the following step types:
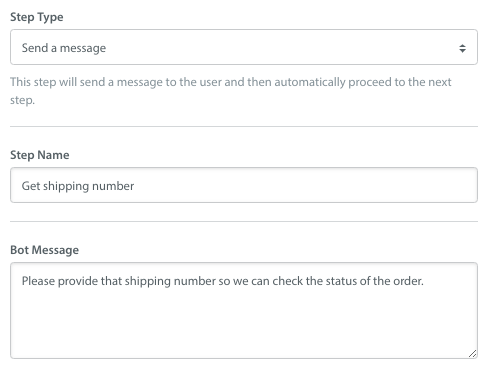
- Get information from user to prompt the user to provide additional information to help solve their inquiry. You can collect text, an email address, number, date, Yes/No response, or have the user select one of a list of options. All of these data types can be mapped to corresponding Custom Issue fIelds.
- Send a message to set expectations about the status of their Issue and when they should expect to hear back from your team.
Branch Based on Filters to add logic and define paths based on filters such as Intent, Language, Tags, and Custom Issue Fields. For example, if you want to assign issues with the Spanish language to a queue that consists of agents who are experts in Spanish, you can branch based on language and define it.
- Make an API Request to send and receive responses. After you create the API, you can use the Bot Builder to consume the APIs to send and receive responses.
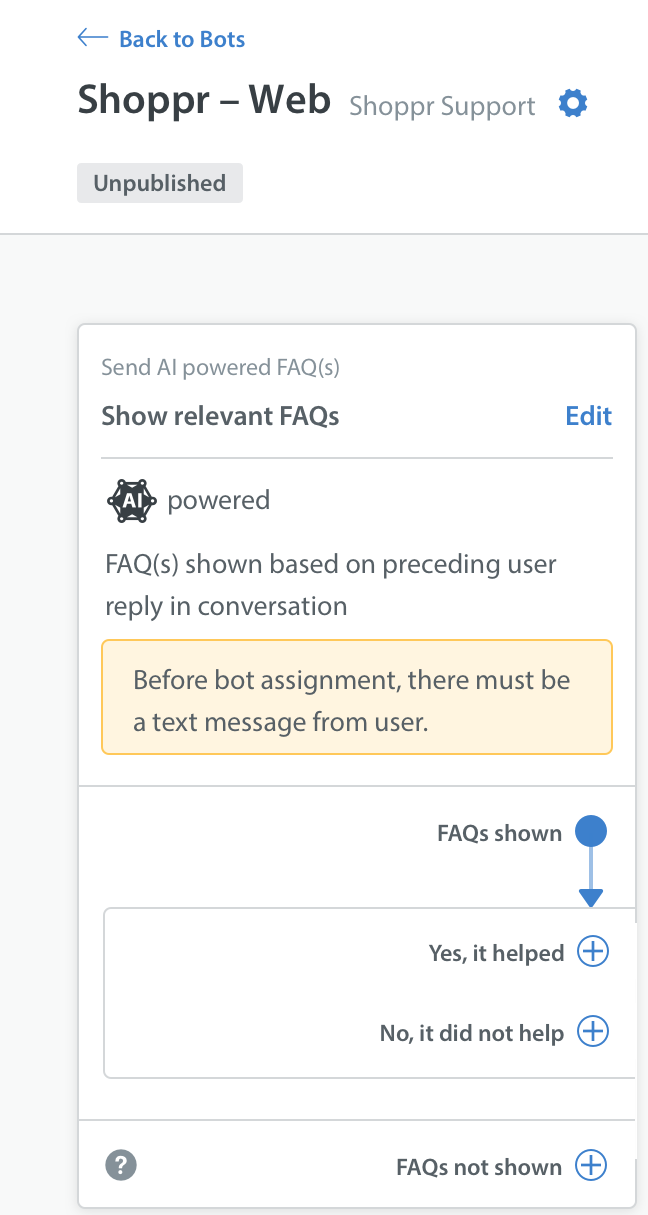
- Send AI Powered FAQ(s) anywhere in the Bot Conversational flow via Custom bots. Before you assign a bot, make sure there is a text message from a user. For more information about AI-powered FAQ(s), refer to Add AI Powered FAQ(s) to Bot Conversations.
- End conversation flow to have the Bot exit the conversation. You can add a Bot message in this step to let the user know what will happen next, and also have this Issue reassigned to another Bot, Queue or Agent, marked as Resolved or Rejected, or update Custom Issue Fields or tags.
Examples of how to configure each of these step types are provided below.
On the Bot page, click the ’add first step’ button to start adding steps for this Bot.

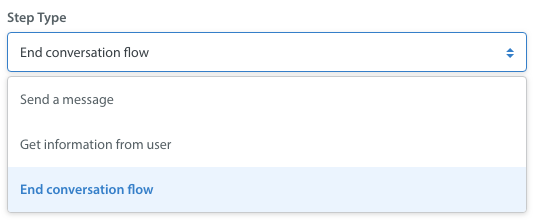
In the pop-up that appears, select the Step type. For the first step, you can choose every option except to exit the conversation.
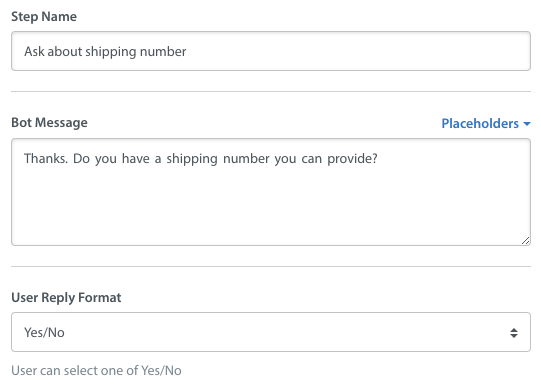
If you choose ‘Get information from user’, you will be able to add a message for the user to provide context on what information you need to gather.

Add a name for your step. This should be intuitive for your support team to understand when reviewing the Bot.
When getting information from the user, use the Bot Message field to provide context about the information you want to gather. For example, you can ask a question that the user will answer by making a selection.

You can allow your end-users to respond to questions in any of the following formats:
- Text
- Number
- Date
- List of Options
- Yes/No
In addition to choosing a response format, you can also control the User Input Style to determine how users provide their input:
Request a single input at a time from the user
Request multiple inputs in one go from the user (form style)

For both input styles, the User Reply Format can be customized based on the type of information needed.
Note: Format validation rules (optional) can be applied to ensure the correct format is followed.
For the single input option, format validation is applicable only for Text responses.
For the form style option (multiple inputs), format validation is available for Text and Multiline fields.

Format Validation Rules for User Reply allow you to specify criteria such as patterns, email formats, or numeric restrictions for text fields.
You can also map the user’s response to one of your drop-down Custom Issue Fields. If you need to first set up a drop-down Custom Issue Field to work with this Bot, review How do I create a new Custom Issue Field?
When setting up the list of options for the user, the ‘user reply options’ will appear differently based on whether you have enabled or disabled the ‘Map User’s Reply to a Drop-down Custom Issue Field’. If you’ve enabled it, you’ll be able to select a Custom Issue Field for the user’s reply to be mapped to.
Note: The Placeholders support all types of CIFs when you construct a message in the following Bot steps:
- Get Information from User
- Send a Message
- End Conversation Flow
If you select a drop-down Custom Issue Field, you’ll also be prompted to select up to 10 corresponding values associated with it to add as options for your user to select.

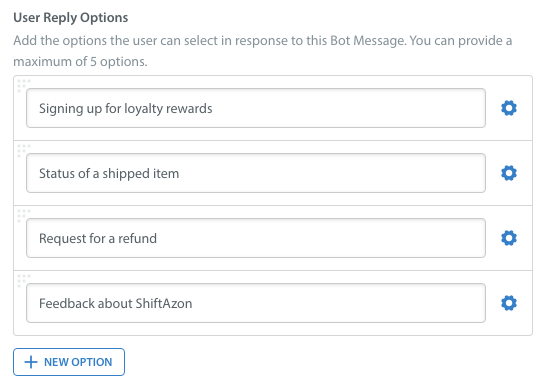
If this toggle is disabled, you’ll be able to add up to 10 reply options for the user to select when responding to the Bot.
You may also indicate whether or not you would like to allow users to skip this step by enabling the corresponding toggle.

If you want to set up bot steps with a timeout capability, Admins can implement timeouts by enabling the Configure Timeout Branch toggle in the "Get Information" step of custom bot workflows. This feature addresses the issue of users going offline or not responding in time by allowing for the creation of dedicated timeout branches within the bot workflow.
Rather than redirecting users to a generic workflow, as with Time-based automation, these branches retain user context, enabling the delivery of personalized journeys.

When you’ve added all the options needed for this step, click ‘Save’. You’ll be taken back to the conversation flow page where you can add additional steps. You can also create new steps as part of the process of linking steps, as detailed in the ‘link steps’ section.

3. (Optional) Branch Steps
You may want to have your Bot take different actions depending on the user’s response to a question.
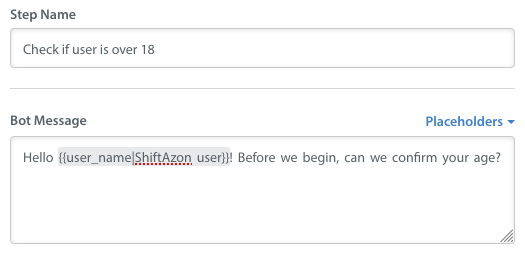
In this example, you may want to start your conversation by checking if your user is over 18. For this, we will first select ‘Get information from user’ to ask the question.

Since the branching option for the ‘Get information from User’ step (Branch Based on User Reply) is only available for questions answered in the date or number format, we will ask the user to select their age Set an intuitive step name, then use the Bot message to prompt the user to select their age.
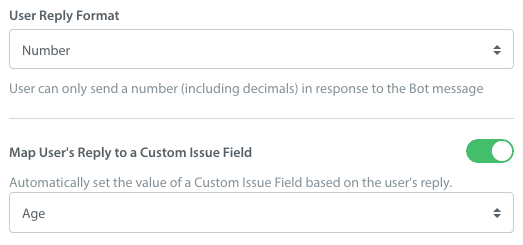
Set the user reply format to ‘number’, then enable Custom Issue Fields and select the corresponding Custom Issue Field for this step.
After you save the step, you’ll see a new icon which you can use to branch based on the content provided by the user.
![]()
Click this icon to open the ‘Branch Based On User Reply’ page. On that page, click the ‘Create First Rule’ button.
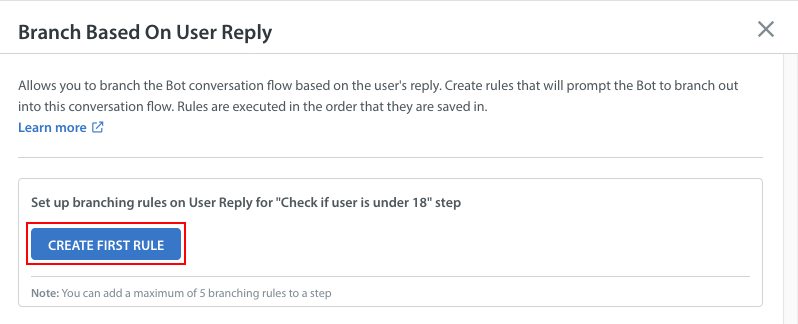
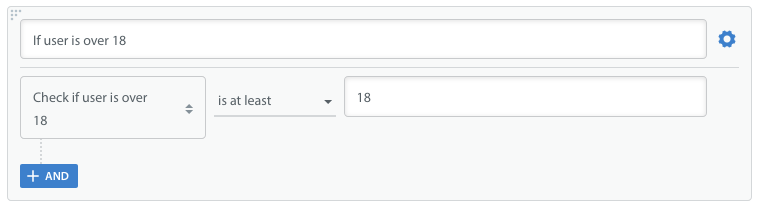
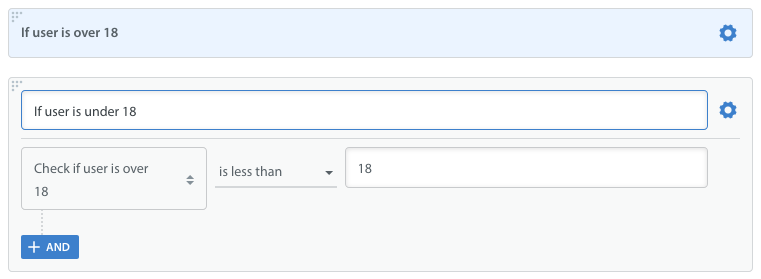
Enter an intuitive rule name, then use the condition drop-down and number field to indicate the logic of the rule name. For our example, we want to set up what happens when the user is over 18.
We also want to set up what happens when the user is under 18, so we will add a second rule for this scenario.
The ‘No Match’ option is useful for cases where none of the rules apply. Click ‘Save’ to see the new branching step on your Custom Bot page.
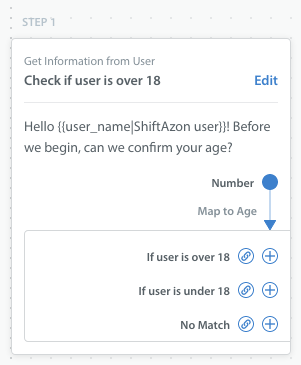
From here, you’ll be able to link steps to the conditional options using the link icon. Learn how to link steps in the next section.
4. Make an API Request Step
After creating the API, you can use the Bot Builder to consume the APIs to send and receive responses. Following are the new capabilities of Bot Builder:
- Make an API Request
- Use Responses in Bot Messages
- Use Responses to Branch
- Use Responses to create list of options
Note: For more information on setting up of the API Request, refer to Setup External APIs with Custom Bots.
To make an API request and to receive responses, you must complete the following steps.
In the Bot Builder, select the Make an API Request option.

Provide the Step name and select the API that you want to trigger from the available drop-down list.
Test the configured API to make sure it is working properly.
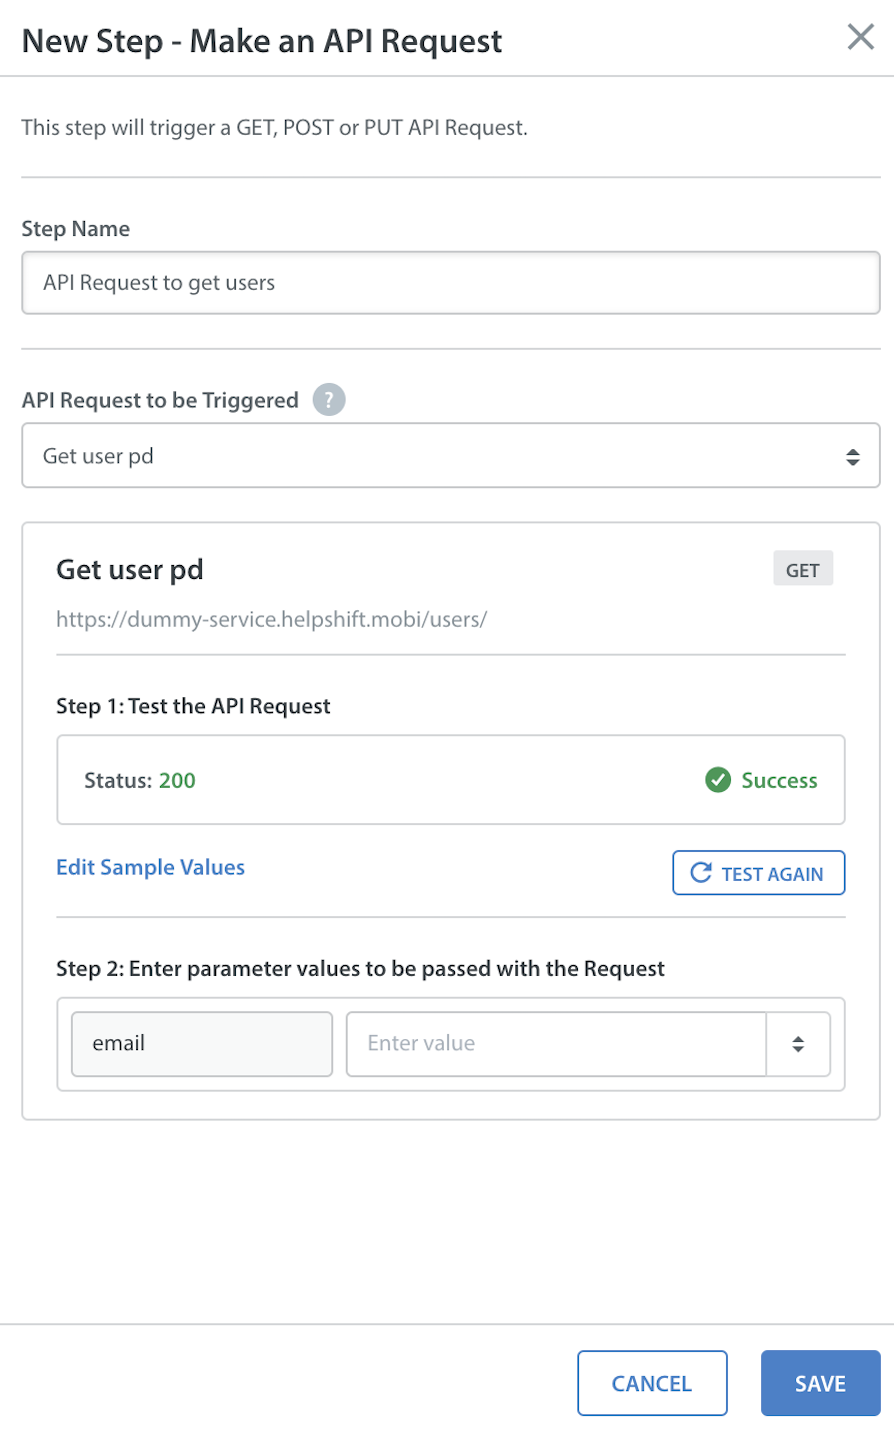
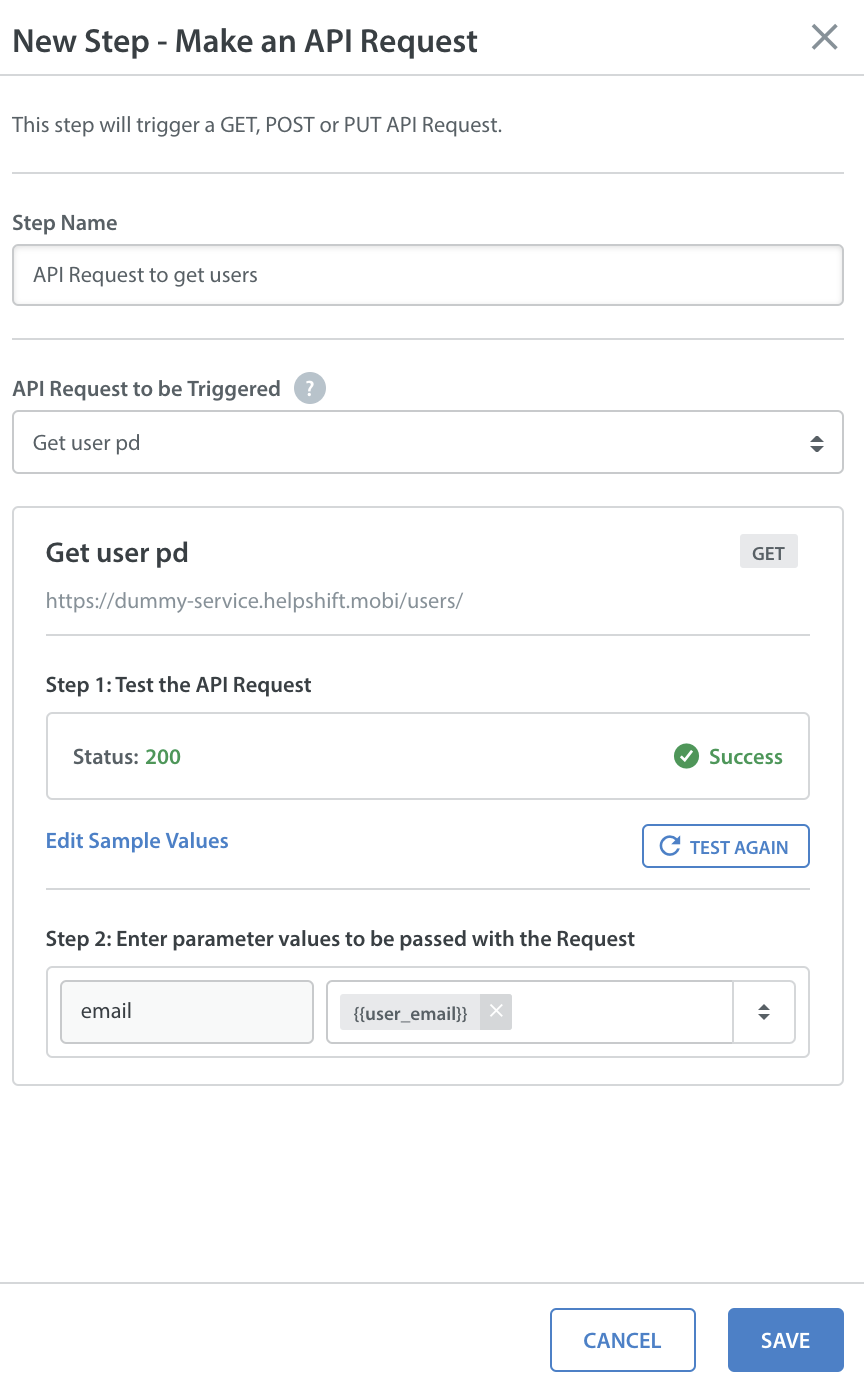
After the successful test execution, specify the Parameter values that you want to pass with the Request. You can select the value from the available Step Output drop-down list. You can also enter any manual values if required.

The following screen displays the parameter value with the Request.
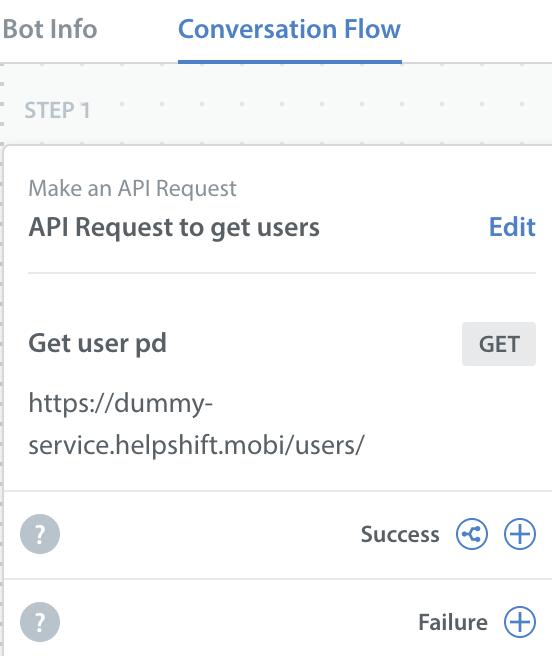
When an API Request step is created, it will contain Success and Failure branches.
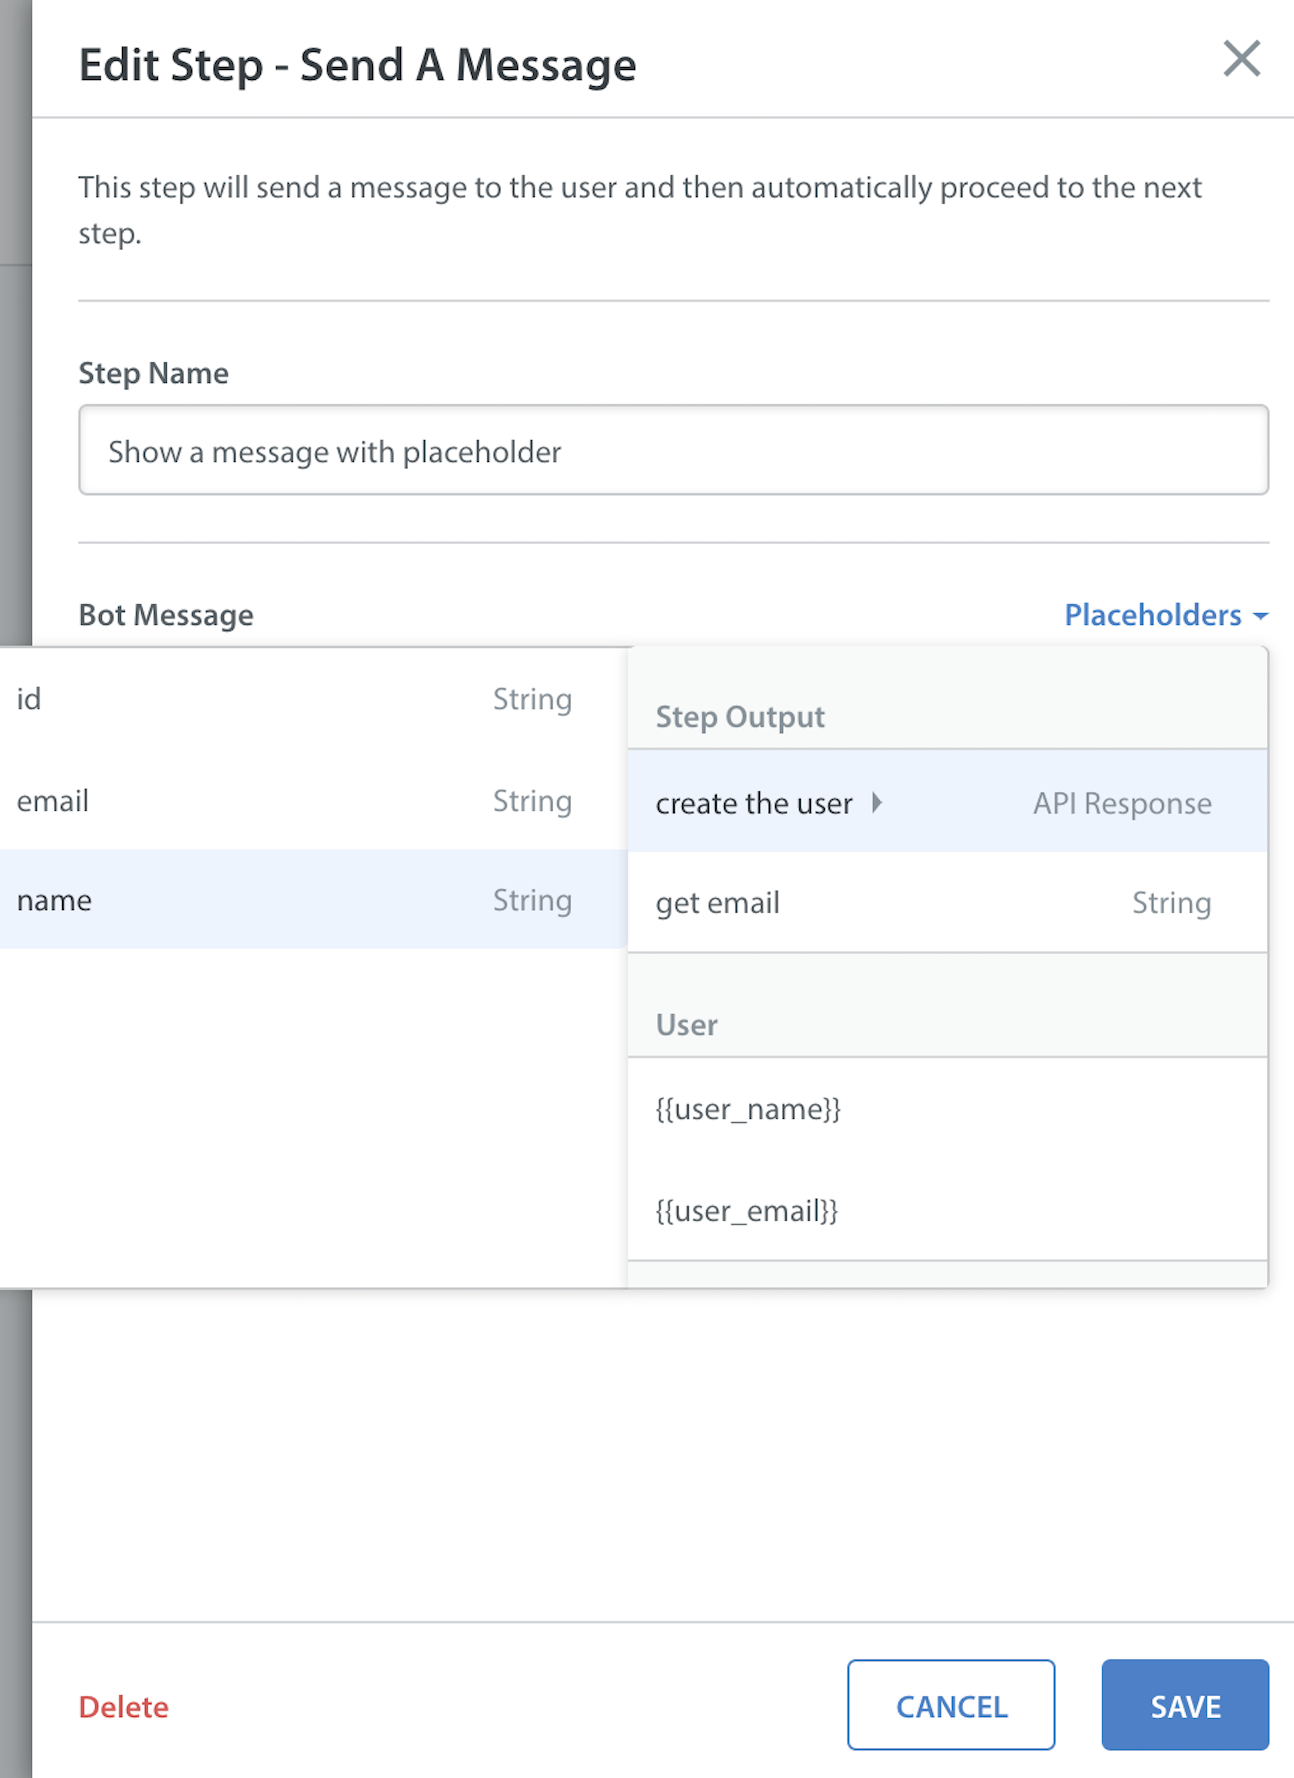
You can use the information from the API response and insert it using a Placeholder to display it to the customer.
For the Success branch in the Make an API Request step, you can define rules based on the information from the API response -this is supported for data types – number, boolean and date.
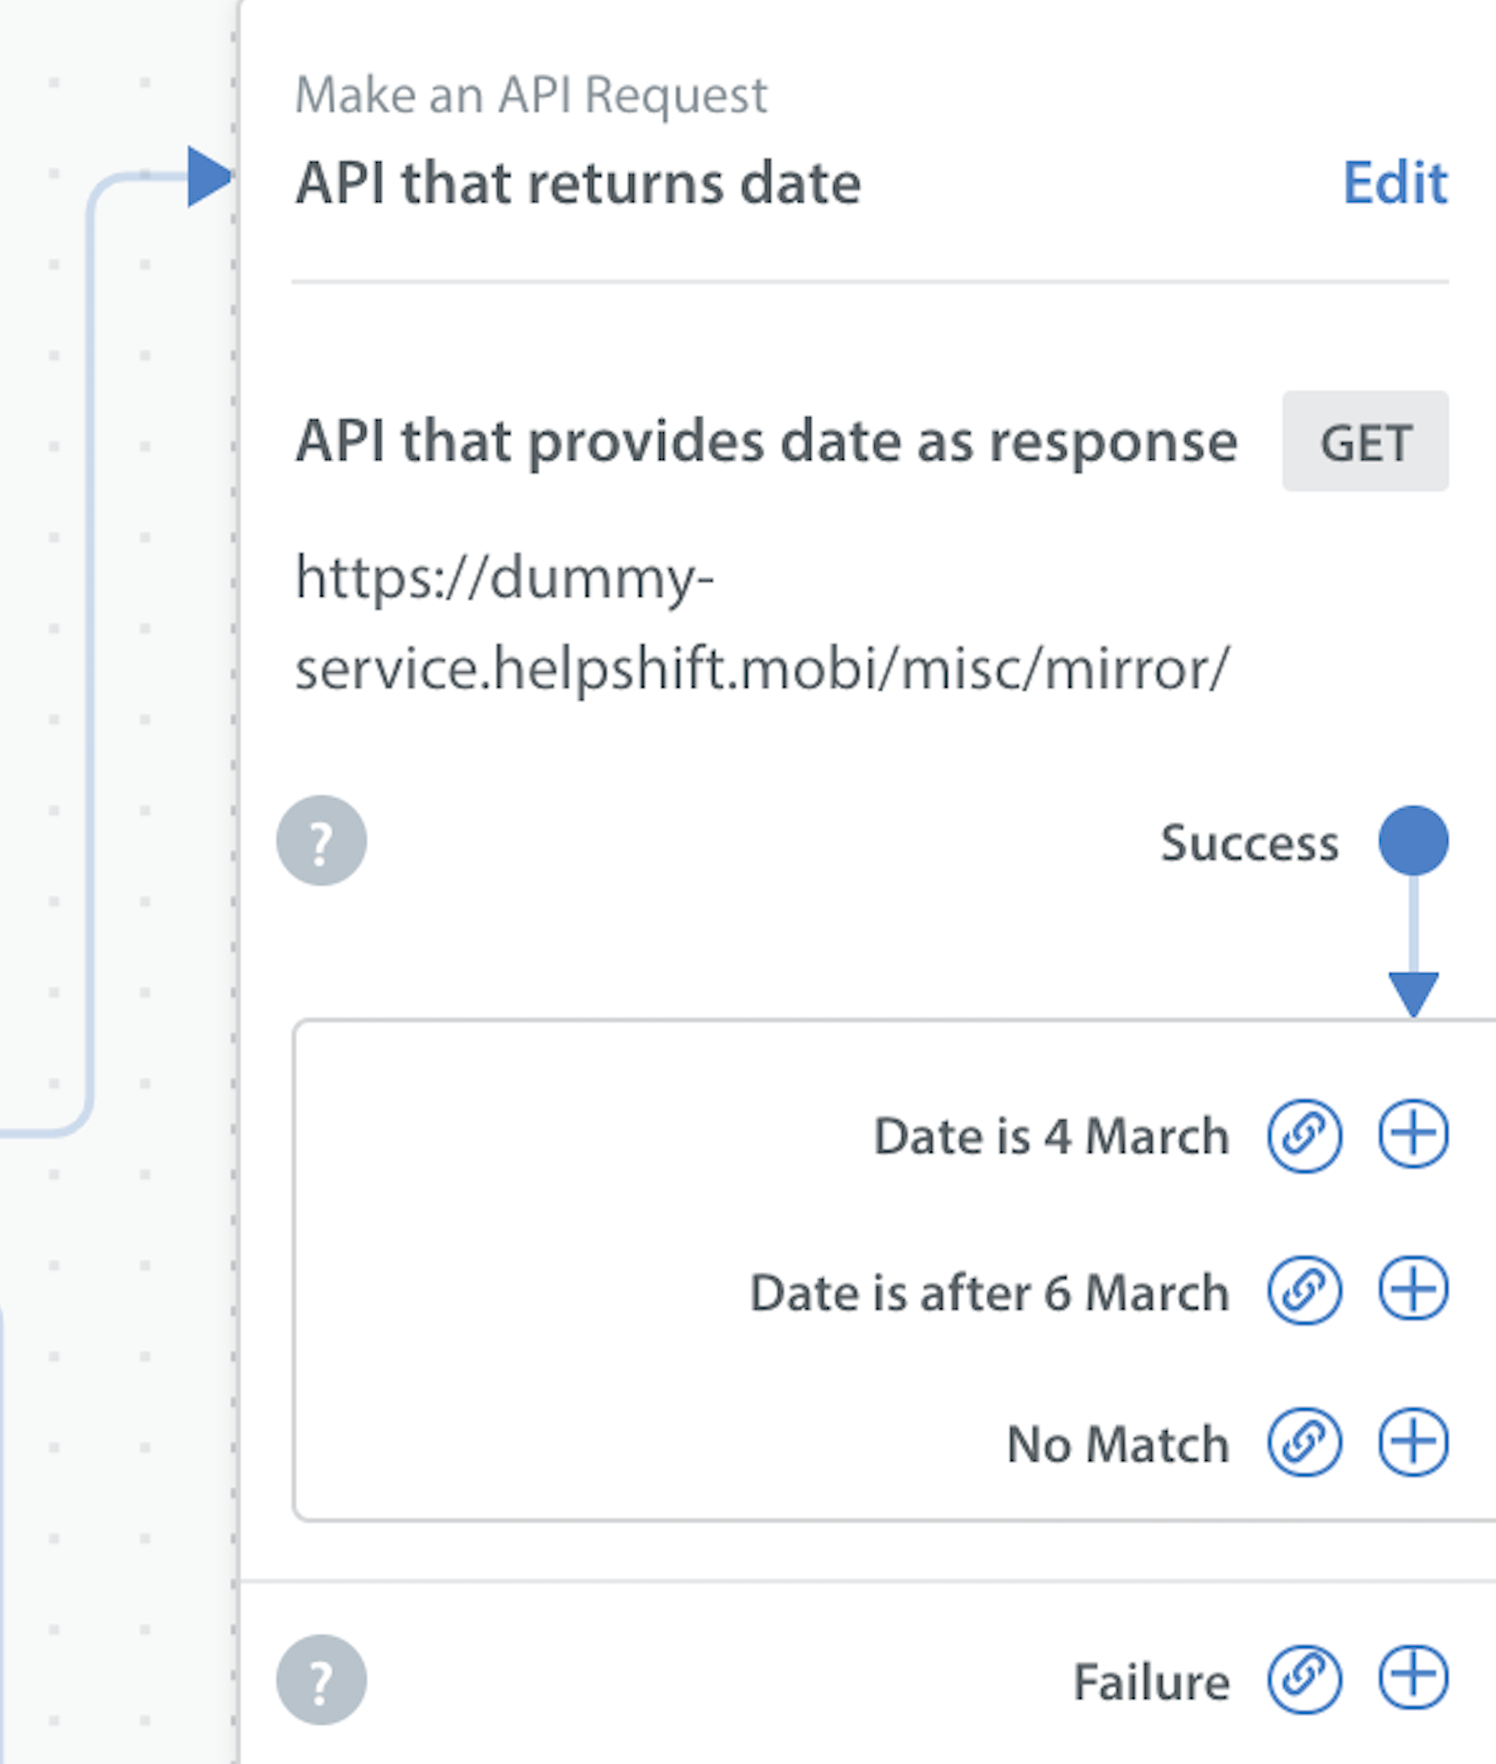
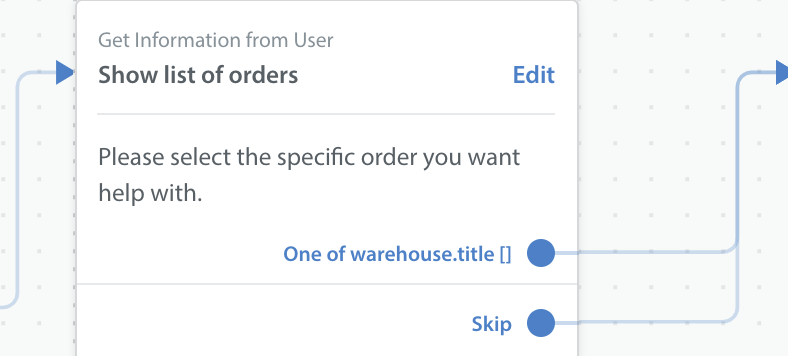
You can use the information from the API response and create a list of options for the user to select from. For example, a list of orders or payments can be displayed.
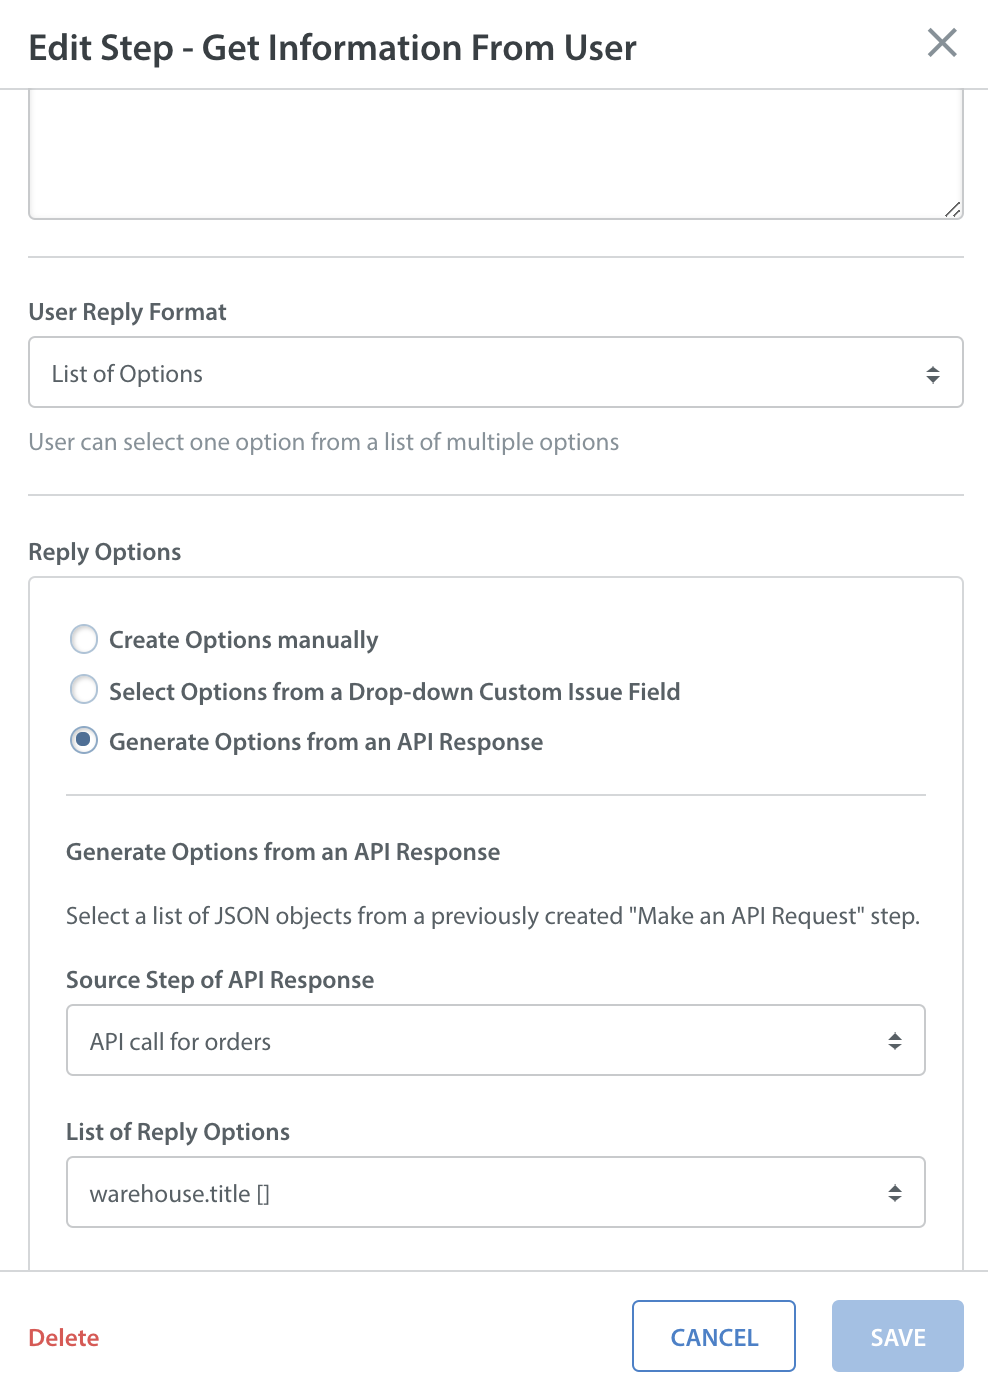
The following screen displays the information from the user.
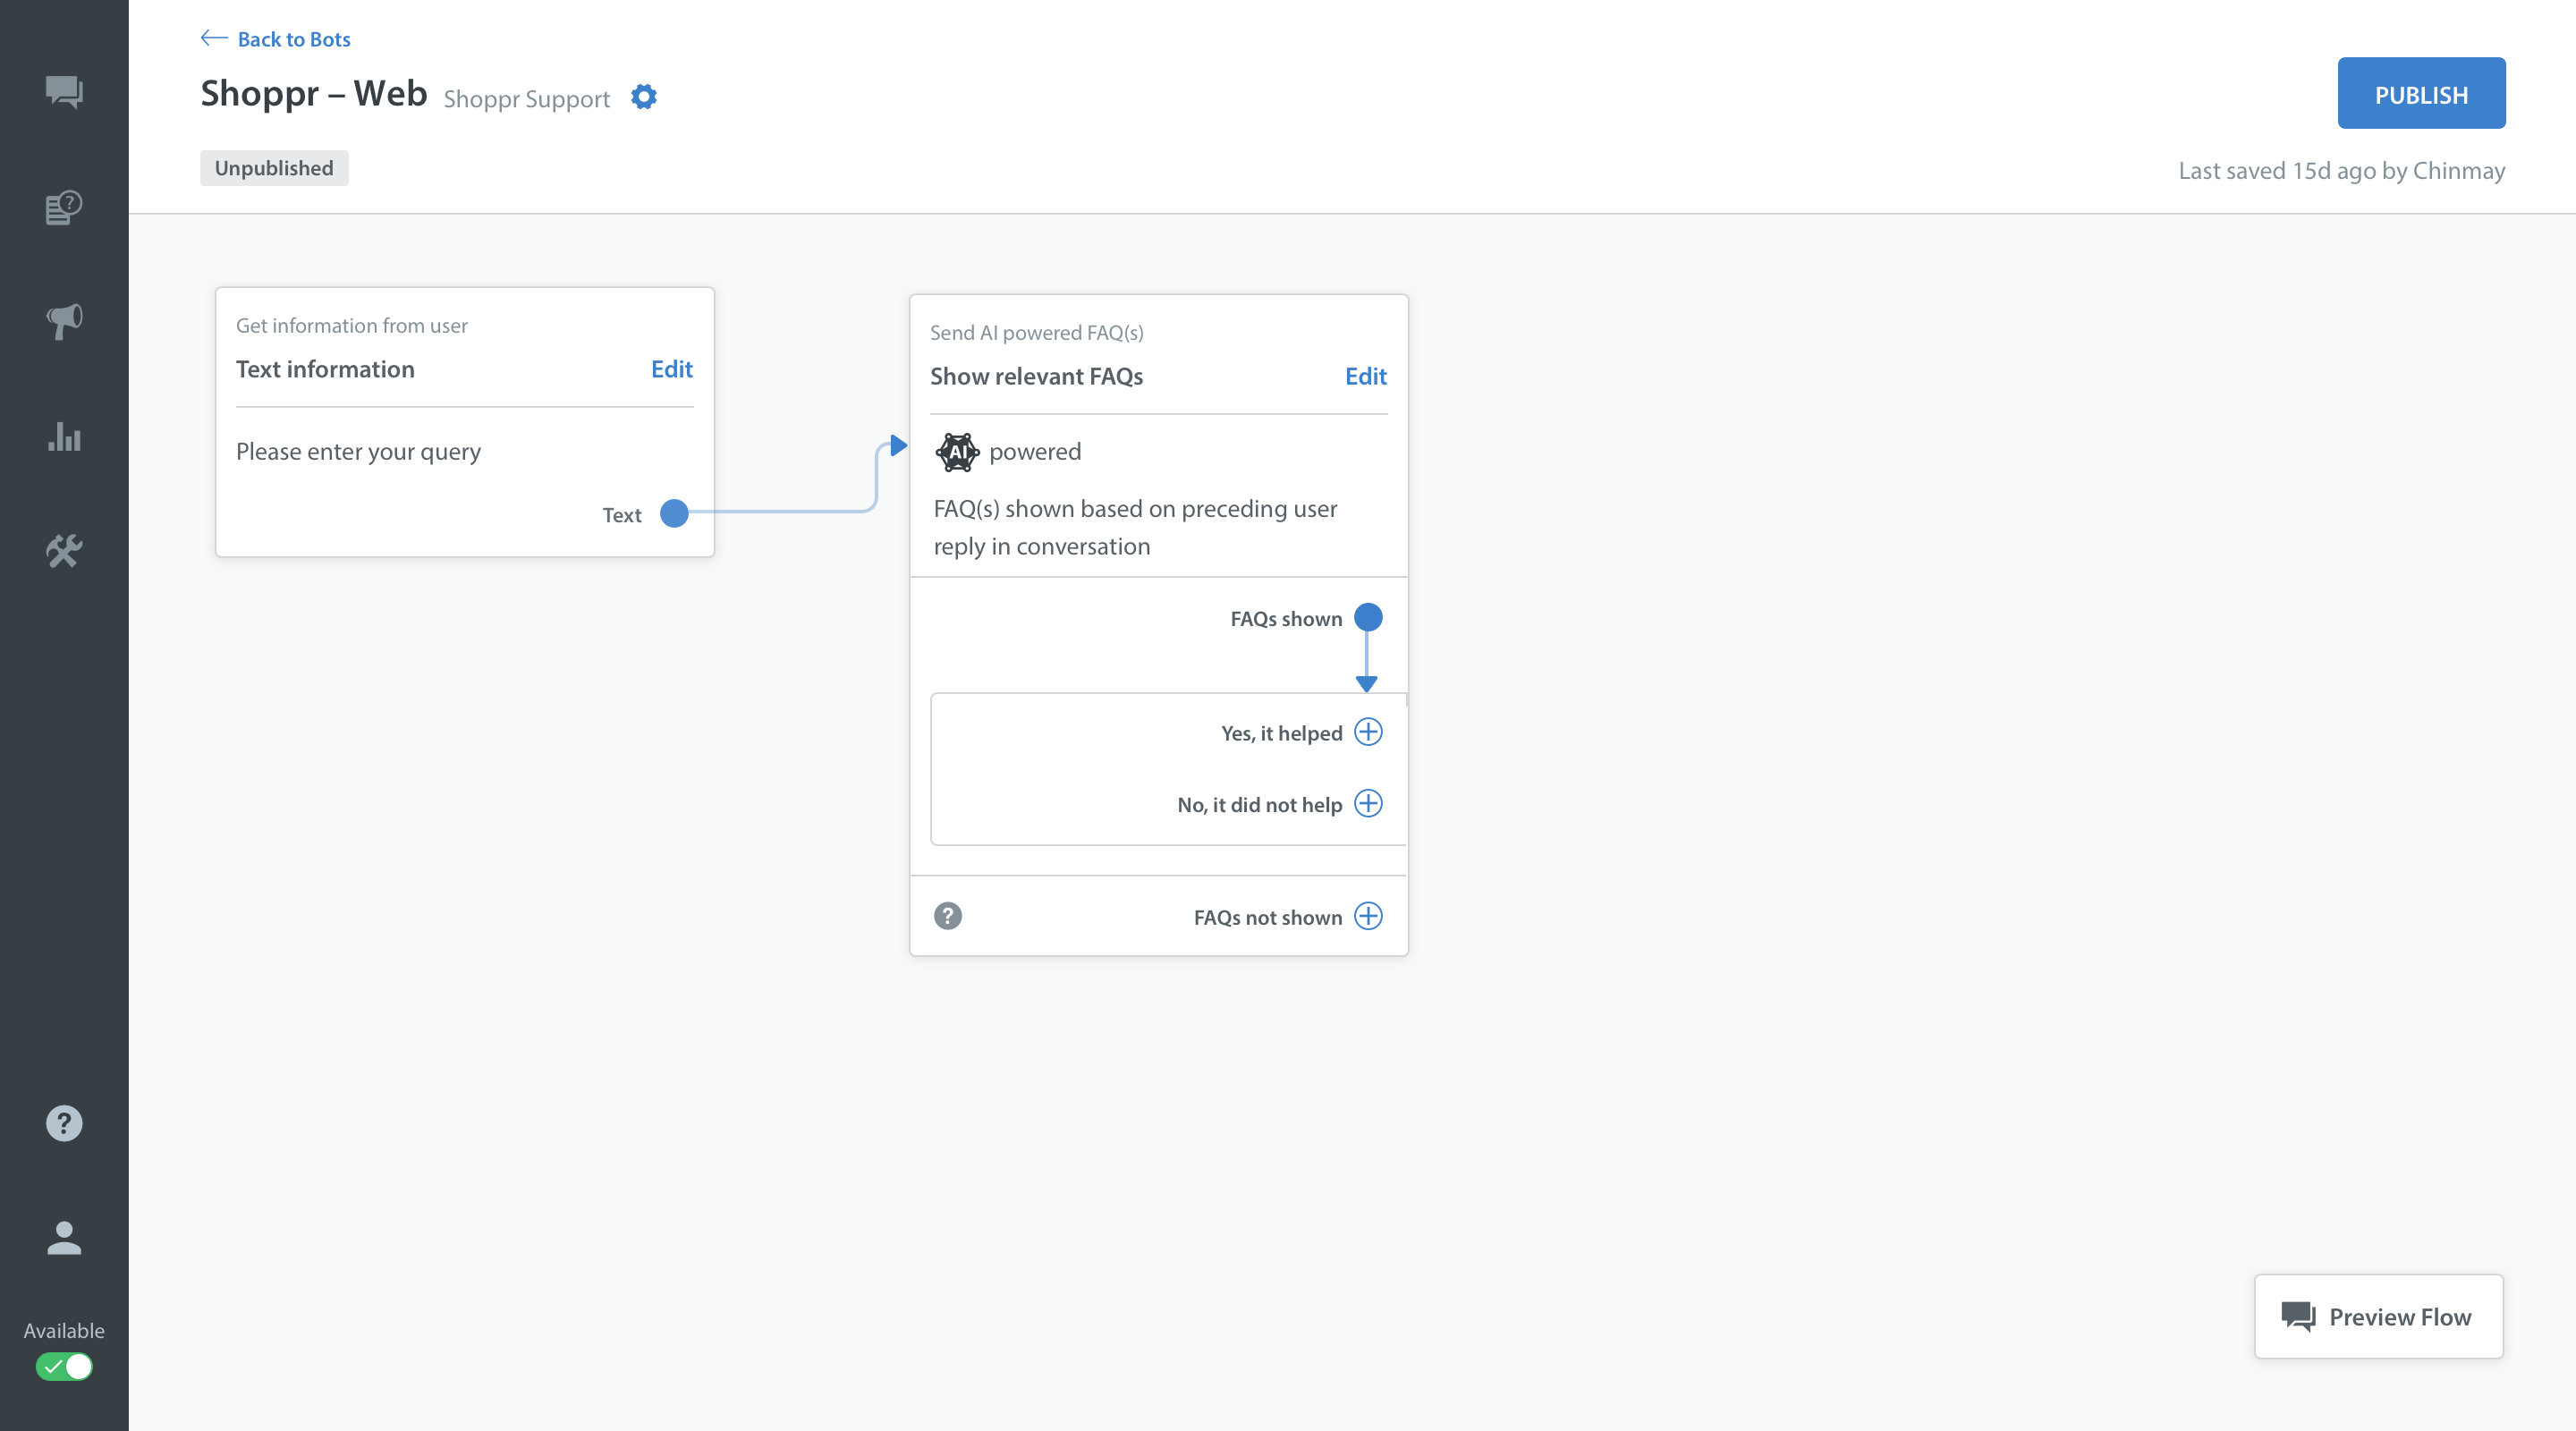
5. Add AI-Powered FAQ(s) to Bot Conversations
Helpshift Administrators can add AI-Powered FAQ(s) as a step in a Custom Bot workflow. For example, let us consider the Issue type is ‘Refund’ and you need to assign the Issue to the Refund Initiate Bot, to initiate the refund process. Helpshift administrator can include the following segments in the Custom bot workflow:
- For VIP users, do not show FAQs and assign the Issue to a special queue
- For others, show FAQs first and then assign to Bot /Agent
Here is the table that describes how you can add AI-Powered FAQ(s) anywhere in the Bot Conversational flow via custom bots for the refund process.

To set up the AI Powered FAQ step within a Custom Bot workflow:
- Click the + icon on the ‘Get Information from User’ step.
- Select the ‘Send AI Powered FAQ(s)’ option from the drop-down list.

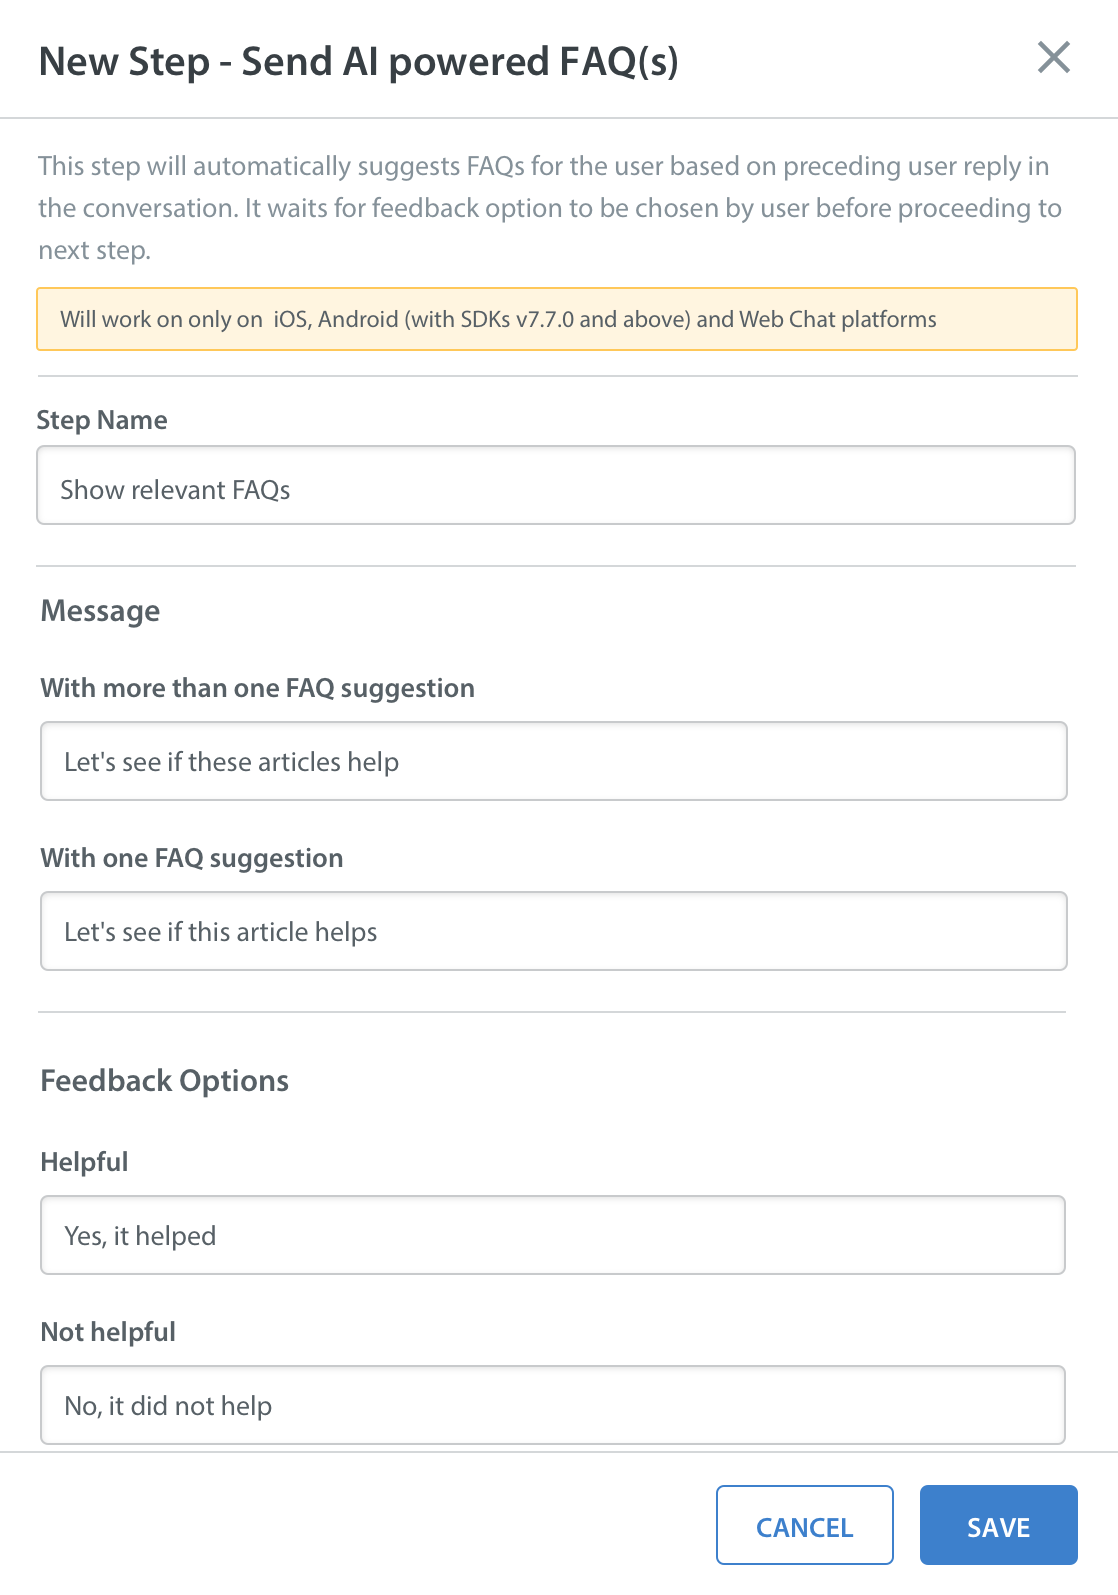
3. Once you click the ‘Send AI-Powered FAQs’ option, the ‘New Step – Send AI-Powered FAQ(s)’ modal appears. Enter the following details:
- Step Name
- A message with one or more than one FAQ suggestions
- Feedback Options with Helpful (positive) and Not helpful (negative) deflection scenarios
4. Click Save. The ‘Send AI-Powered FAQ(s)’ step opens up in the Bot Builder and displays the following options along with the + icon.
- FAQs shown – It includes helpful (Yes, it helped) and not helpful (No, it did not help) deflection scenarios.
- FAQs not shown – You can use this option to branch when no FAQs are displayed to the users. This could be due to mobile SDK versions being lower than the 7.7.0 or when FAQs do not match the user input.
Note: FAQs have to be available for the correct Language, Platform and App. Also, Administrators can add more steps by clicking the + icon.
5. If you select the ‘Send AI-Powered FAQ(s)’ as the first step, then it displays the following modal within the Send AI-Powered FAQ(s) step.
Note: This is important because a common scenario would be to use NIAs to assign to a Custom Bot with ‘Send AI-Powered FAQs as the first step’ and it will work on the first message sent by the user. This enables you to have FAQ deflection on any segment(s) of the Issue as desired and not on all issues as offered by QuickSearch Bot currently.
6. To Preview the workflow, click the ‘Preview Flow’ button and select the App, Language, and Platform to view the FAQs that will be displayed to the end-user.
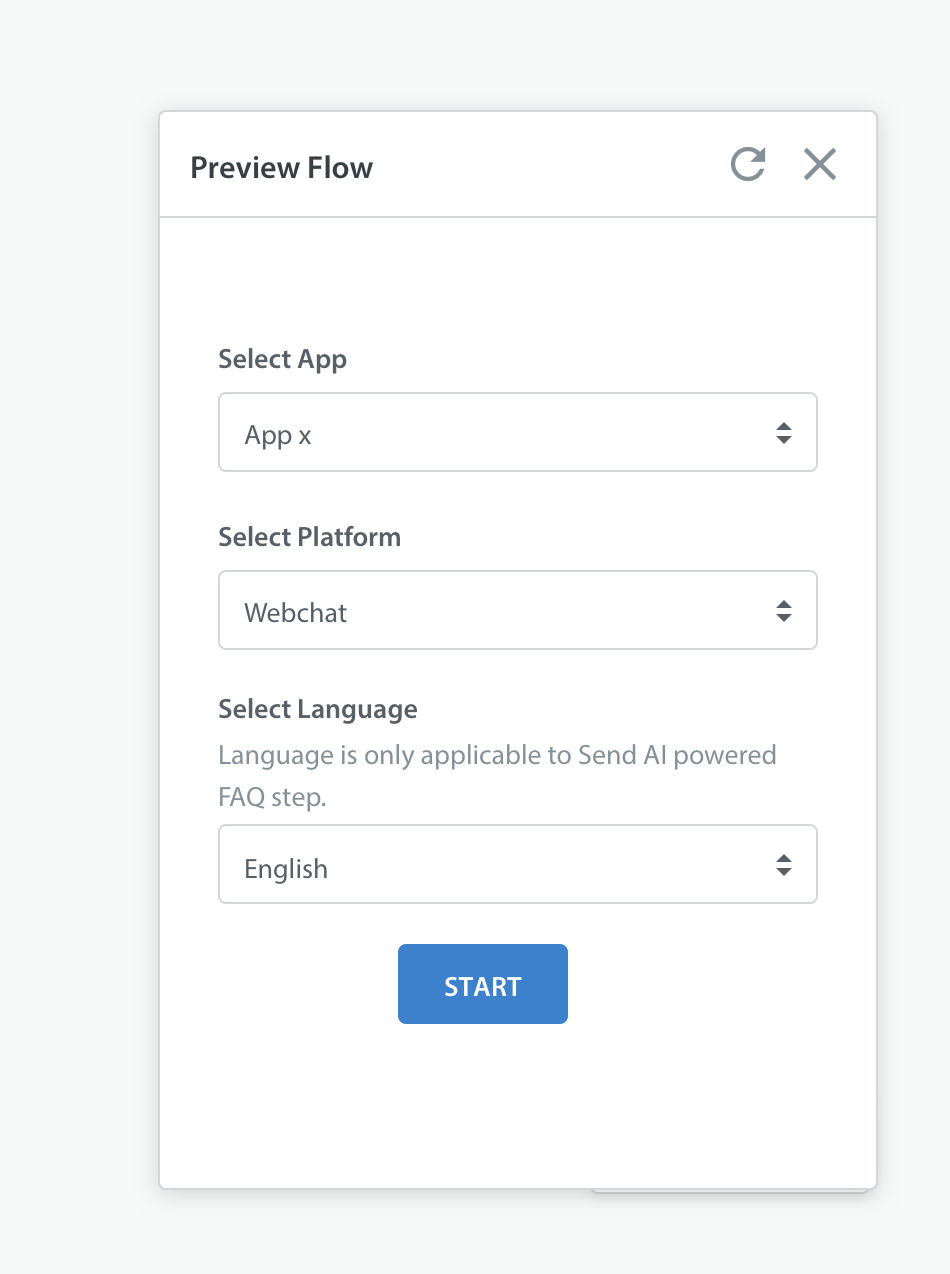
Note: If you use AI-Powered FAQ in the first step after you click the ‘Start’ button, you will need to enter a message to start the preview.
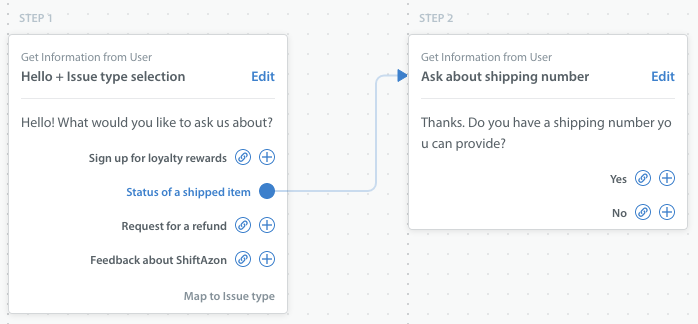
6. Link Steps
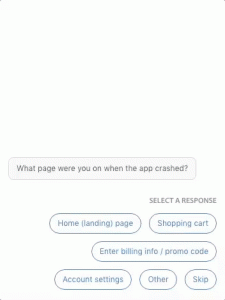
To create new steps to link together, click the link + icon to the right of each option to add the step that will take place after the user has selected that option. For example, if the user selected ‘Status of a shipped item’, you may want to ask if they have received a shipping number or not.

On the ‘Add step’ page that appears, you will now see an option to have the Bot end the conversation flow.
For this example, we will select ‘Get information from user’ again to ask whether or not the user has a shipping number (using the Yes/No reply format).
After you save this step, you’ll see it appear as automatically linked to your first step in the flow. This is because you created it using the ‘+’ sign next to that step option.
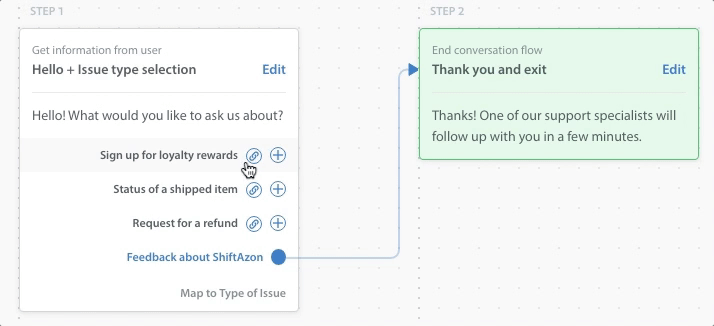
Once you have all the information you need, to move this Issue forward in your workflow, we need to have this Bot exit the conversation so that an Agent or another Bot can take over. To do this, add one more step using the ‘End conversation flow’ option to complete this process.
You’ll have the option to add a friendly note to your user to thank them for providing that information and let them know what will happen next.
Repeat this process to build out complete steps for each of your flows. You’ll need to create a complete flow for each option that ends with the Bot exiting the conversation.
While building out your flow, use the link ![]() icon to link one of the steps you’ve already created to take place after another. For example, you’ll want to use your ‘thank you and exit’ step to appropriately end each flow, so you can use the ‘link’ icon to to re-use this option and streamline the flow for your support team.
icon to link one of the steps you’ve already created to take place after another. For example, you’ll want to use your ‘thank you and exit’ step to appropriately end each flow, so you can use the ‘link’ icon to to re-use this option and streamline the flow for your support team.
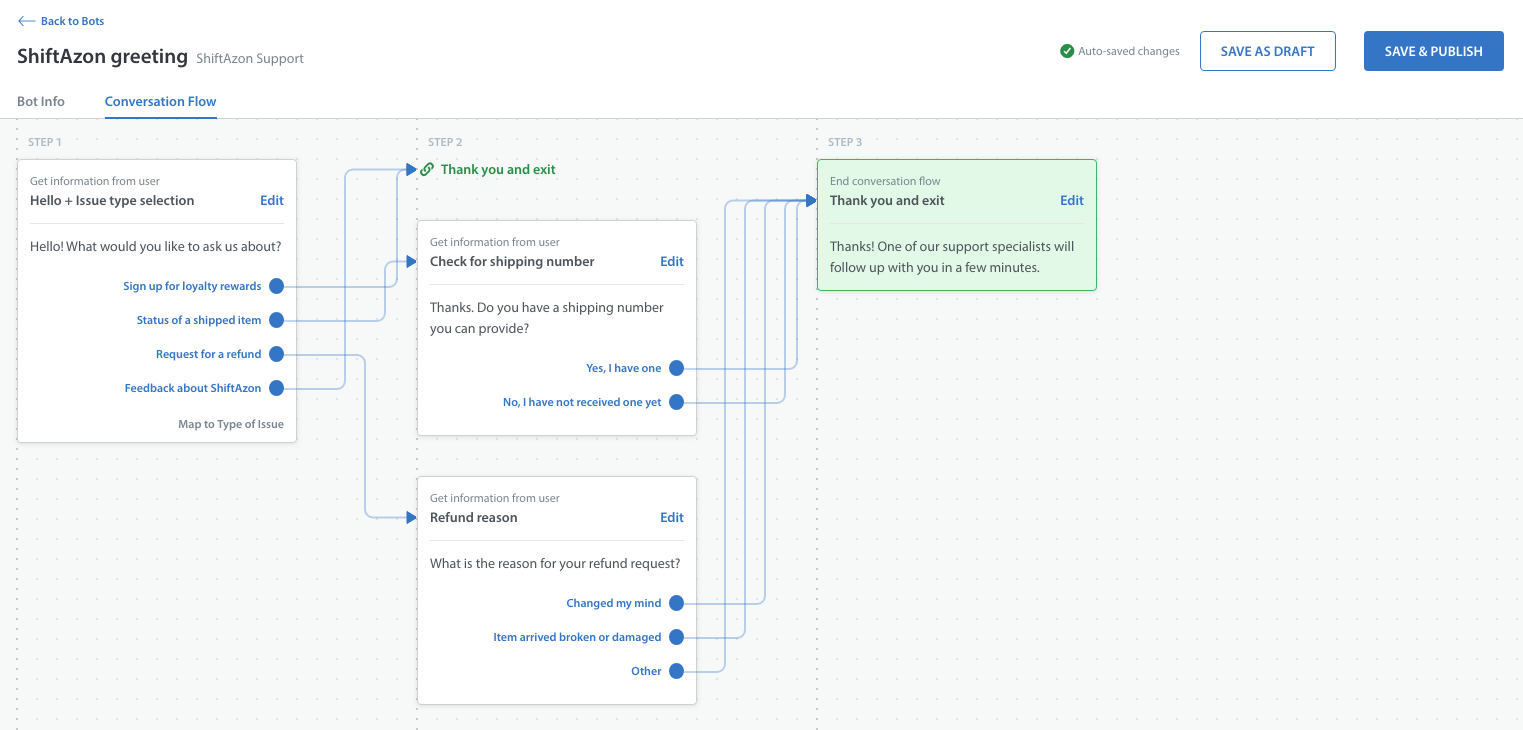
Here is what a single completed Bot flow with all steps linked in order from the beginning to the end of the Bot interaction with the user looks like.
If you want to provide an option for your users to go back to a previous step in the bot workflow:
- Click on the icon
- Select the step you want to loop back to in the dropdown. You can only loop back to ‘Get Information from User’ step in the bot workflow, and it will have aicon displayed next to it.
- Once you select the step for the loopback, the bot workflow will display the updates you made.
Looping of bots will be particularly useful when you want to give your users the option to change the selection they made or update their previous response.
- You can only loop back to a ‘Get information from user’ step.
- You can initiate the loopback from all bots steps type except the ‘End Conversation Flow’.
- You cannot edit a published bot to add looping. You will need to duplicate the published bot, make the necessary looping modifications, publish the bot, and update the ‘Automations’ and ‘Smart Views’ to link to the new bot you created.
Preview Bot Workflow
You can preview the bot workflow you set up using the ‘Preview Flow’ button at the bottom-right of the screen.
You can also save a draft at any time. When you’re ready to launch this Bot, click the ‘Save and Publish’ button in the top right corner.
7. Integrate Custom Bots into your Workflow
Once you’ve created your new Custom Bot, you can use Automations to have the Bot automatically assigned to work on open Issues that meet select criteria. To complete this process, see How do I assign Issues to a specific Agent, Queue, or Bot?
8. System Checks in Custom Bots
To prevent end-users from being caught in an infinite loop interaction with Bots, we have the following checks in place:
- There can be a maximum of 25 successive assignments to Custom Bots.
- The same step inside a Custom Bot can be repeated up to 10 times.
Any more than either of the above, will result in an interruption in the Bot interaction and move back the Issue to the Queue, it was in before the Bot assignment.