
Configuring Engagement Campaigns is a streamlined, 4-step process. The configuration process guides you through building your message, targeting the right users, and determining exactly when the campaign messages should be delivered.
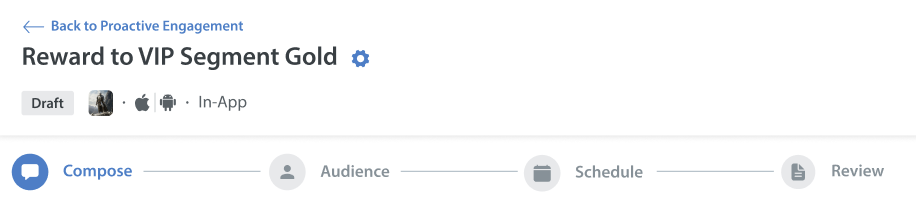
The configuration steps are divided into four distinct states, visually tracked by a progress bar at the top of your screen:
- Compose: Personalize the look, feel, and content of your message.
- Audience: Define which user segment will receive the message.
- Schedule: Choose when the message will be delivered.
- Review: Verify your configuration summary before setting the campaign message live.
Composing State
The Compose section is where you craft the actual message users will see upon delivery. Depending on your strategy, you can configure your content for either an In-App or Push message.
Note:
If you want to give access to your agents or specific team members access to Proactive Engagement, grant them the appropriate Custom Role permissions under Settings > Roles & Permissions.
If you want those same supervisors or agents to create the content of the messages sent within Proactive Engagement using text templates, you must separately grant them the Text Template feature permission.
In the Text Templates placeholder, the app-level standard user fields are supported. To learn more about how to use placeholders in Text Templates, refer to Text Template Guidelines.
Channel Types
- In-App Messages: Use this channel to capture the attention of users currently using the application.
- Push Messages: Use this channel to send a message directly to a user's device when they are not actively using your app.
In-App Message Setup
In-App messages are designed to grab the attention of users currently using the application.
To control when the message pops up to the user in the application, refer to Pausing InApp Notifications.
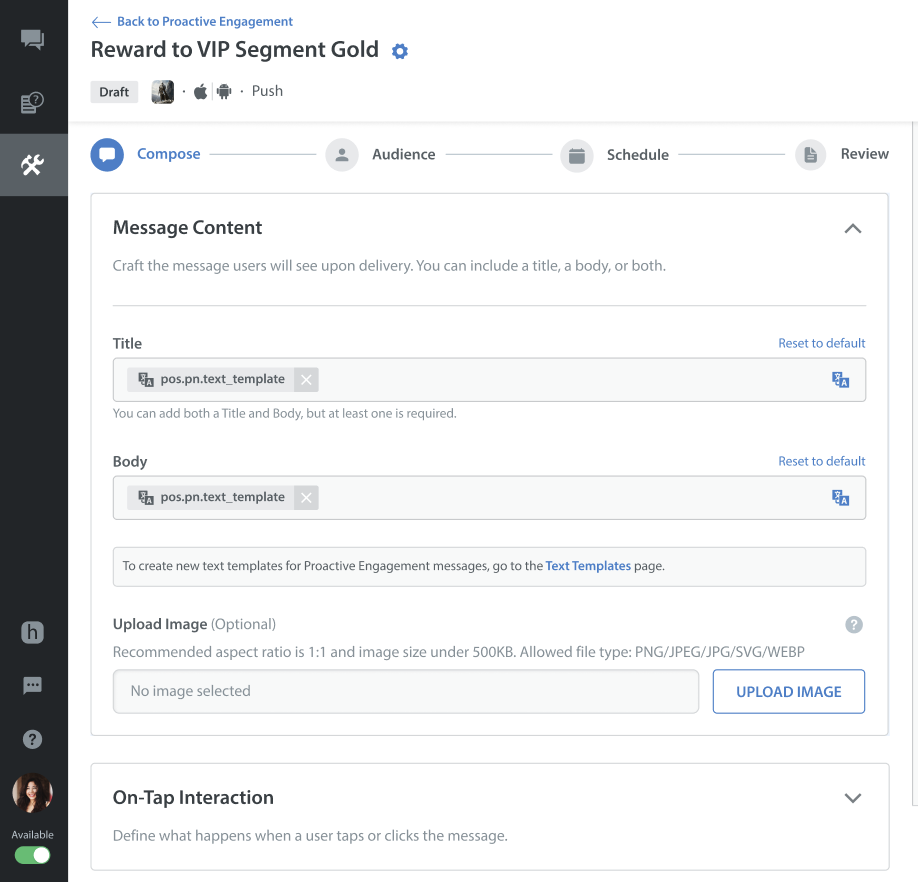
Message Content
Choose from four layout types: Modal, Card, Banner, or Image Only. You can then select your Title, Body, and upload an Image.
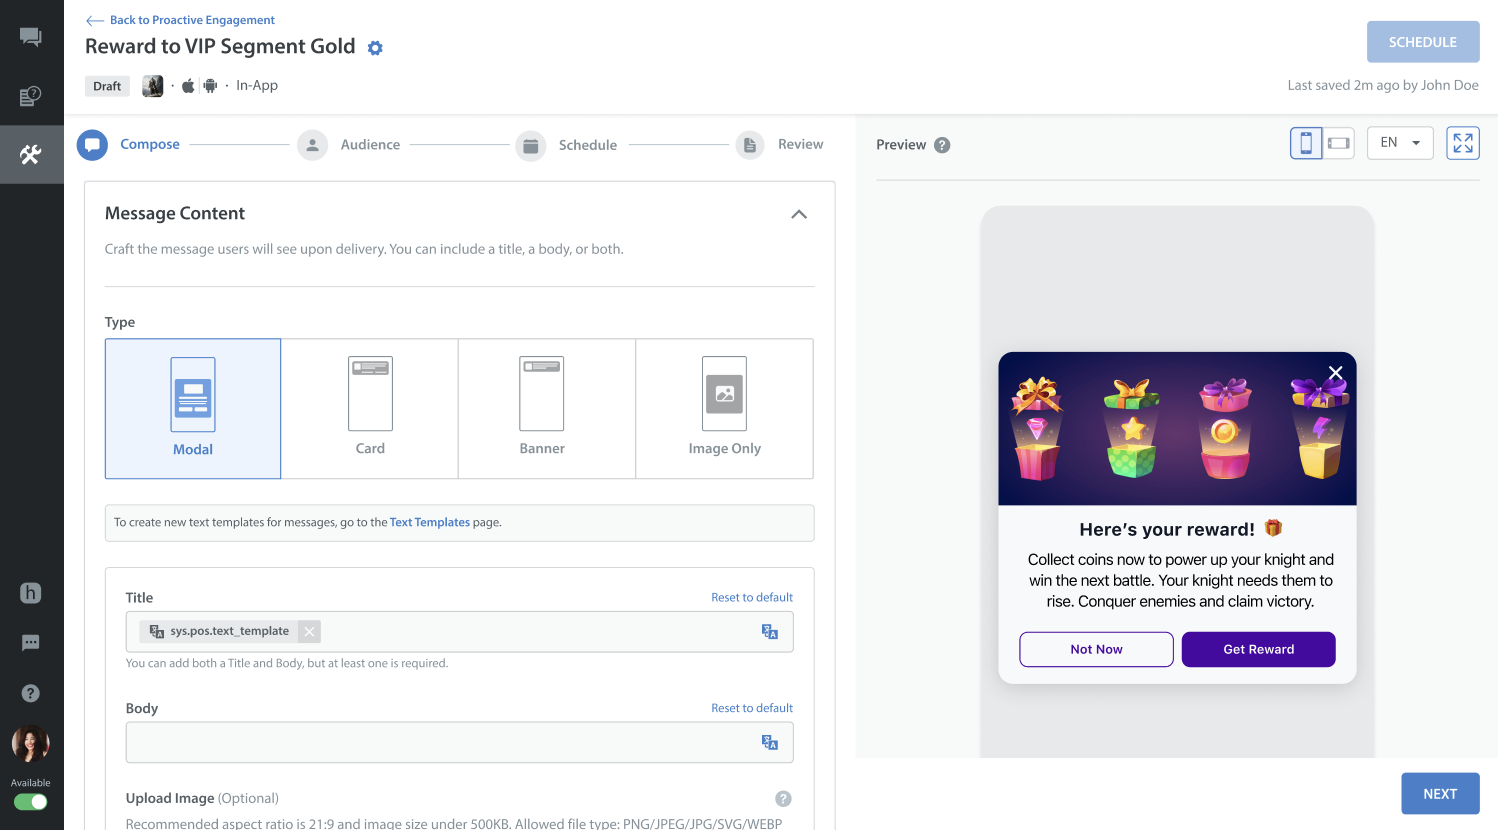
Tip: To increase engagement, you can pre-configure Text Templates for your Title and Body with dynamic placeholders (using standard app-level user properties) to personalize the communication and emojis to boost open rates.
| Layout Type | Best Used For | Key Features & Specifications |
| Modal | Sending longer, detailed information (typically 4-5 sentences) that requires the user's full attention. |
|
| Card | Delivering brief updates (around 2-3 sentences) as a lower-friction nudge. |
|
| Banner | Simple announcements (around 1 -2 sentences) based on your preferences. |
|
| Image Only | Strong visual message (custom art) without accompanying body text. |
|
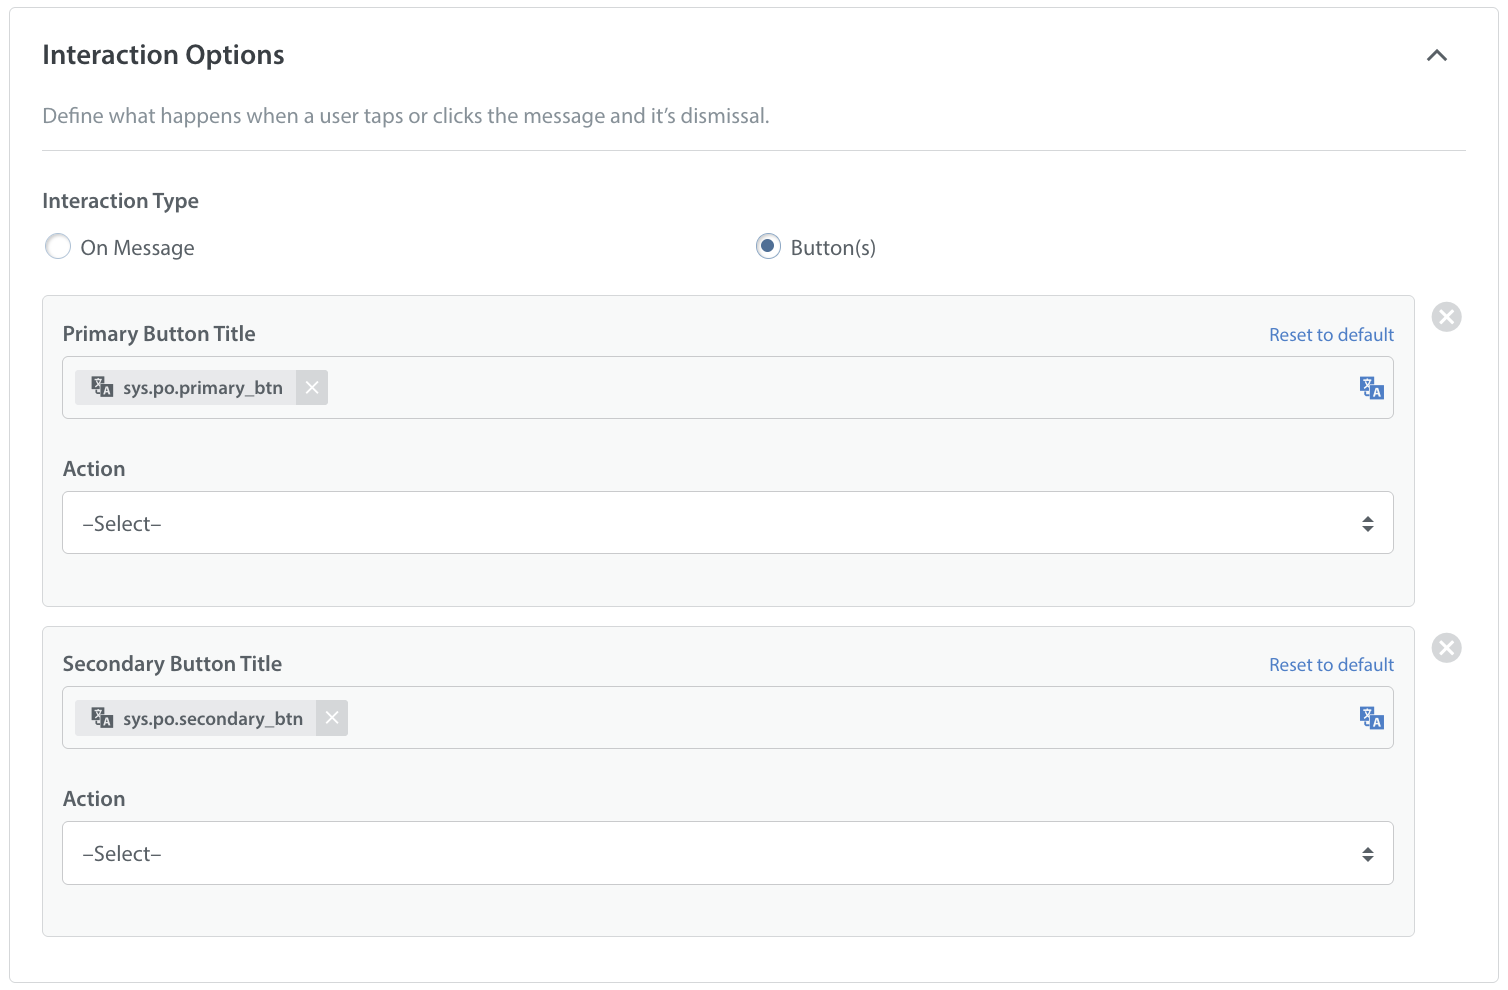
Interaction Options
Define what happens when a user taps or clicks your message. You can configure the interaction type and the subsequent action, such as launching an Applink or Weblink in a mobile browser (e.g., a Webshop), opening a specific FAQ, dismissing the message, or starting a support chat.
You can trigger the interaction in one of two ways:
- On Message: The action is triggered immediately when the user taps or clicks anywhere in the message body.
- Outbound Greeting Message (Optional): If you set the action to Start Chat, you can write a custom greeting message that automatically welcomes the player when they open the chat window. This field supports multi-language translations and can be reset to the default at any time.
- Issue Creation: Control when a support ticket is officially registered in your dashboard:
- Create issue only after user sends first message: The chat window opens, but a ticket is not created until the player actively sends a message.
- Create issue immediately when chat opens: A support issue is generated automatically the moment the chat window opens. If you select this, you must choose one of the following issue creation methods:
- Select Intent: You can select a pre-defined Smart Intent to automatically categorize the conversation and route the player directly into an automated bot workflow.
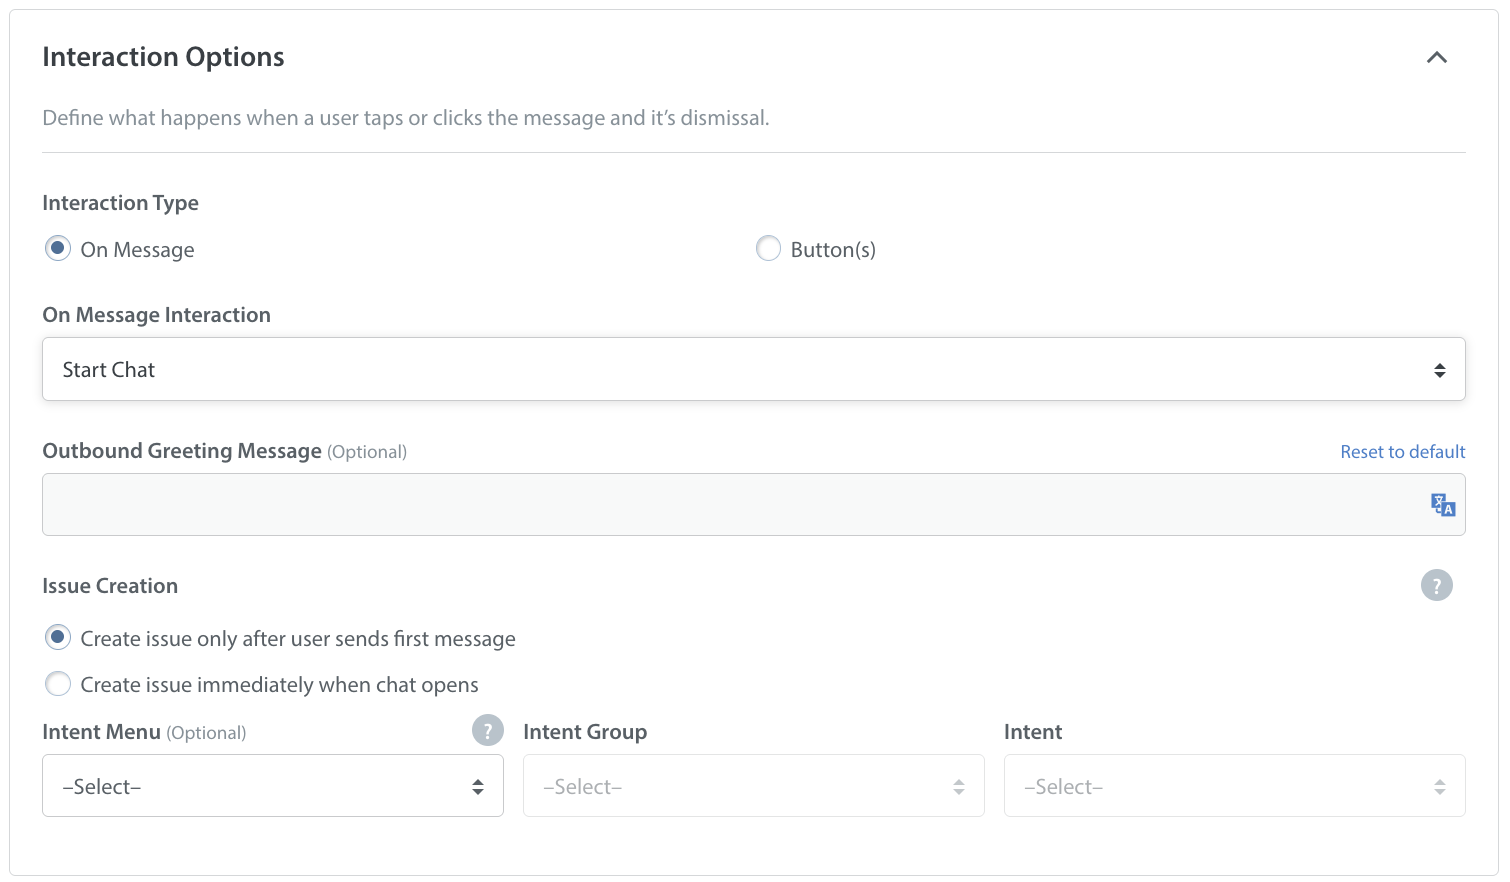
- Select Intent: You can select a pre-defined Smart Intent to automatically categorize the conversation and route the player directly into an automated bot workflow.
- Button(s): The action is triggered only when the user taps or clicks a specific, customized action button, such as Primary Button and Secondary Buttons.
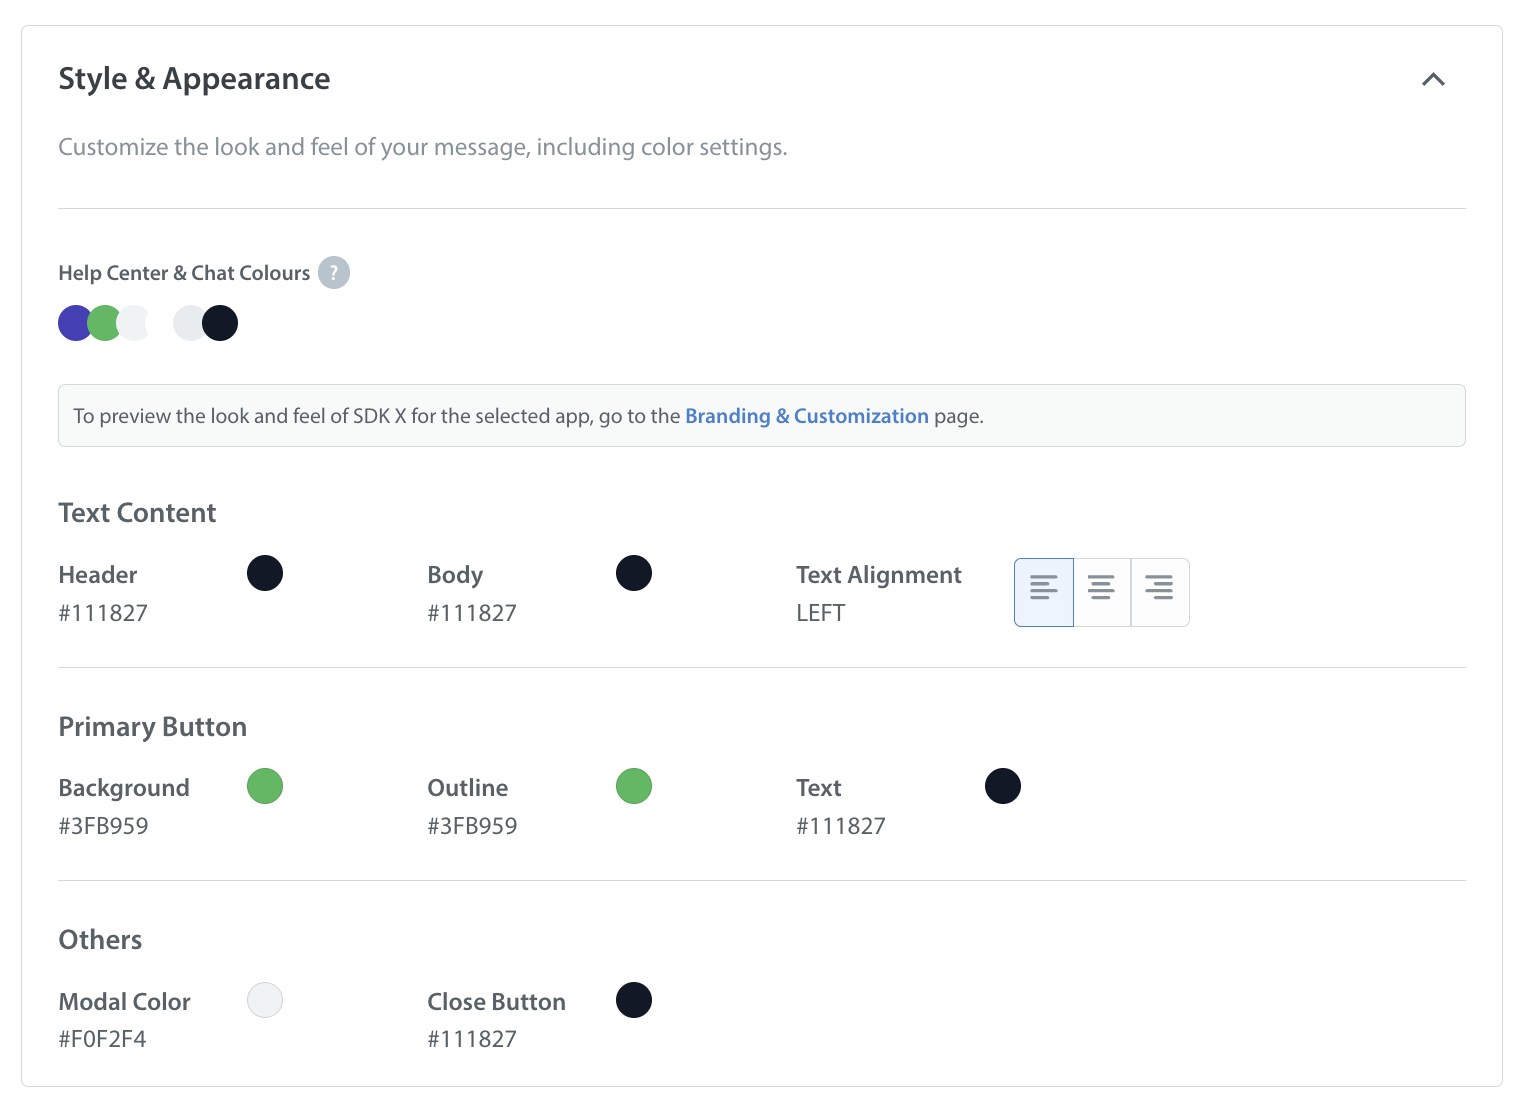
Style and Appearance
Your campaign messages inherit your app's default branding and customization by default. However, you can further tailor the layout's color settings and text styling to ensure a seamless in-app experience:
- Text Content: Adjust the colors of your Header and Body text, and choose your Text Alignment (Left, Center, or Right).
- Buttons (Primary and Secondary): Tailor the Background, Outline, and Text colors to make your call to action stand out.
- Additional Elements: Customize the overall Modal Color and the Close Button color to match your design theme.
Additional Data (Optional)
You can append additional context to your In-App messages. This includes adding Tags or Custom Issue Fields (CIFs) that you may use to trigger automation-based actions, such as routing Bots or specific workflows, as soon as a user taps the message to start a chat.

Push Message Setup (Android and iOS)
Push messages are designed to re-engage users and pull them back into the app when they are offline or inactive. However, there are times when a user cannot be reached.
Note: If your message did not reach your intended audience, it is likely due to one of the following reasons:
- User Actions: The user has uninstalled the app, manually turned off push messages for your app, or their push token has expired.
- Authentication: The user is not currently logged in on the device. (Users must be logged in to receive targeted push messages.
- SDK Version: The player is not on SDK v10.5 or higher.
- Configuration Errors: Push certificates have not been uploaded in App Settings, or a wrong, invalid, or missing push token (FCM/APNS) was synced.
- Audience Targeting: No users match your selected audience criteria.
Tip: If User Properties are not fully integrated yet, try filtering your audience using Issue Properties instead.
Message Content
Create your message by defining a Title (header), Body, and an optional Image. You can also utilize Text Templates with placeholders and emojis here to personalize your Push headers and body.
Note: Uploaded images must be under 500 KB, match the recommended aspect ratio, and use a supported format (PNG, JPEG, JPG, or WEBP).Interaction OptionsDecide what happens when a user engages with your message. You can configure actions to Start Chat with a support Agent or Bot, or Open a URL/Applink to redirect the user to a specific in-game page (such as a rewards lobby).
- On-Message Interaction (iOS & Android): Define the action triggered when the user taps the message body. This interaction is supported across both iOS and Android.
- Outbound Greeting Message (Optional): If you set the action to Start Chat, you can write a custom greeting message that automatically welcomes the player when they open the chat window. This field supports multi-language translations and can be reset to the default at any time.
- Issue Creation: Control when a support ticket is officially registered in your dashboard:
- Create issue only after user sends first message: The chat window opens, but a ticket is not created until the player actively sends a message.
- Create issue immediately when chat opens: A support issue is generated automatically the moment the chat window opens. You can select a pre-defined Smart Intent to automatically categorize the conversation and route the player directly into an automated bot workflow.
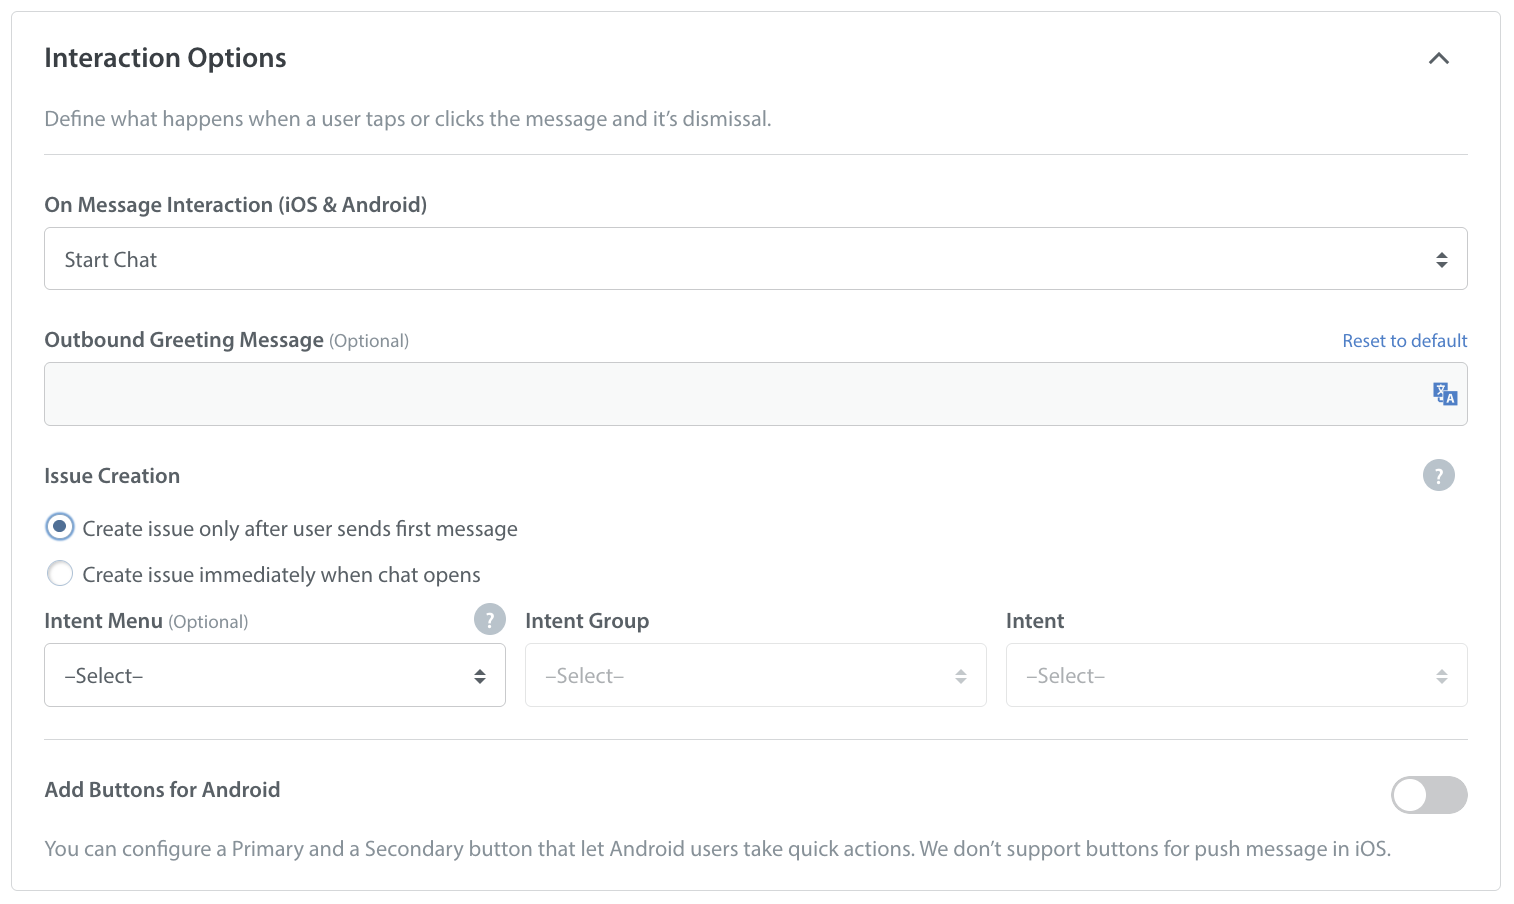
- Add Buttons (Android Only): Toggle this option on to provide Android users with quick, actionable button shortcuts.
- Primary Button Title (Android): Customize the text for your main action button (inherits the default system translation key sys.po.primary_btn). You can assign a specific Action (such as Start Chat or Open URL) to trigger when tapped. This title supports full translation and localization.
- Secondary Button Title (Android): Configure an optional second button to display alongside your primary button (inherits the default system translation key sys.po.secondary_btn). You can assign a separate Action for this button. This title also supports full translation and localization.
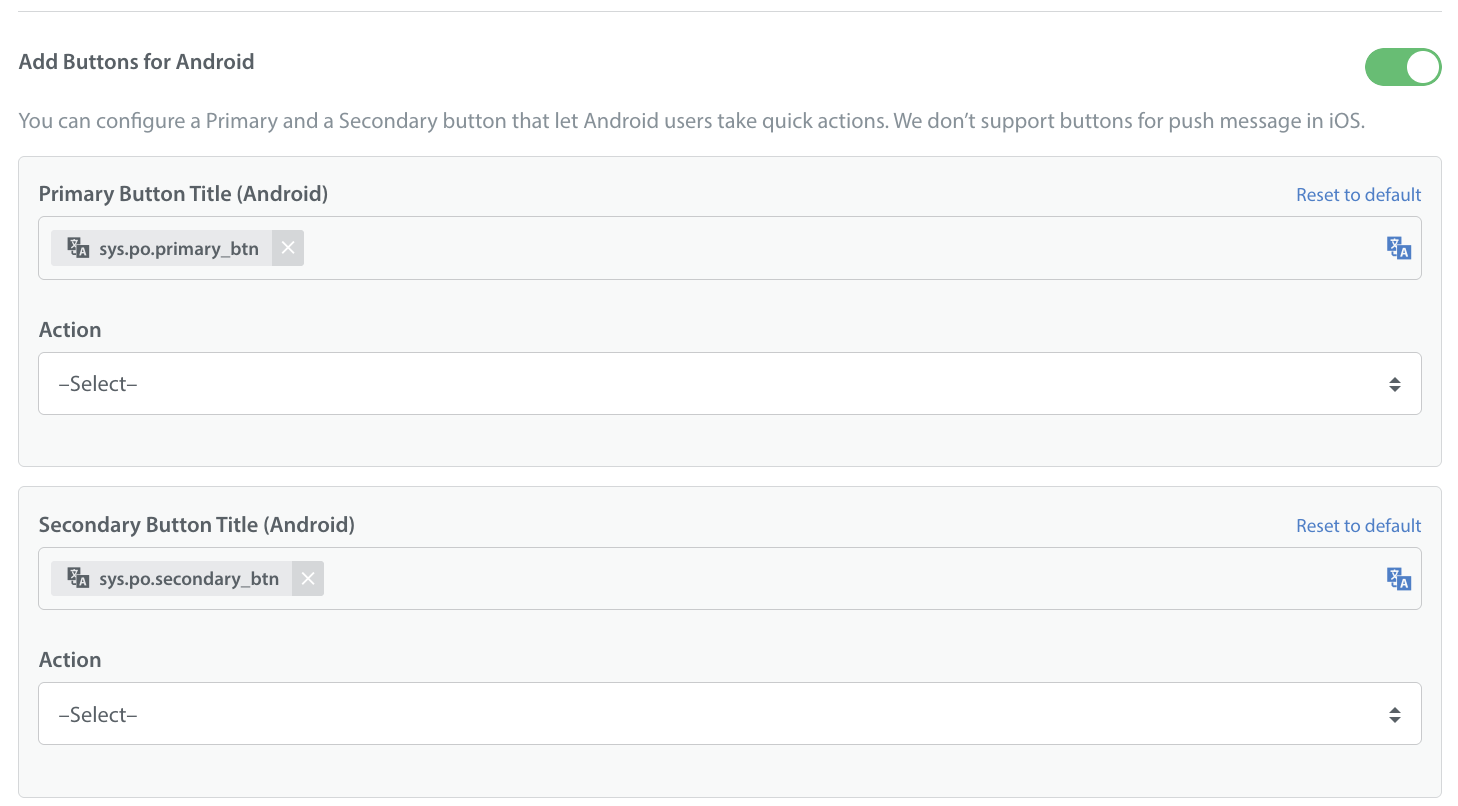
Note: Interactive buttons are not supported for push messages on iOS.
Additional Data (Optional)
Similar to In-App messages, you can append additional context to your Push messages. This includes adding Tags or Custom Issue Fields (CIFs) that you may use to trigger automation-based actions, such as routing Bots or specific workflows, as soon as a user taps the message to start a chat.

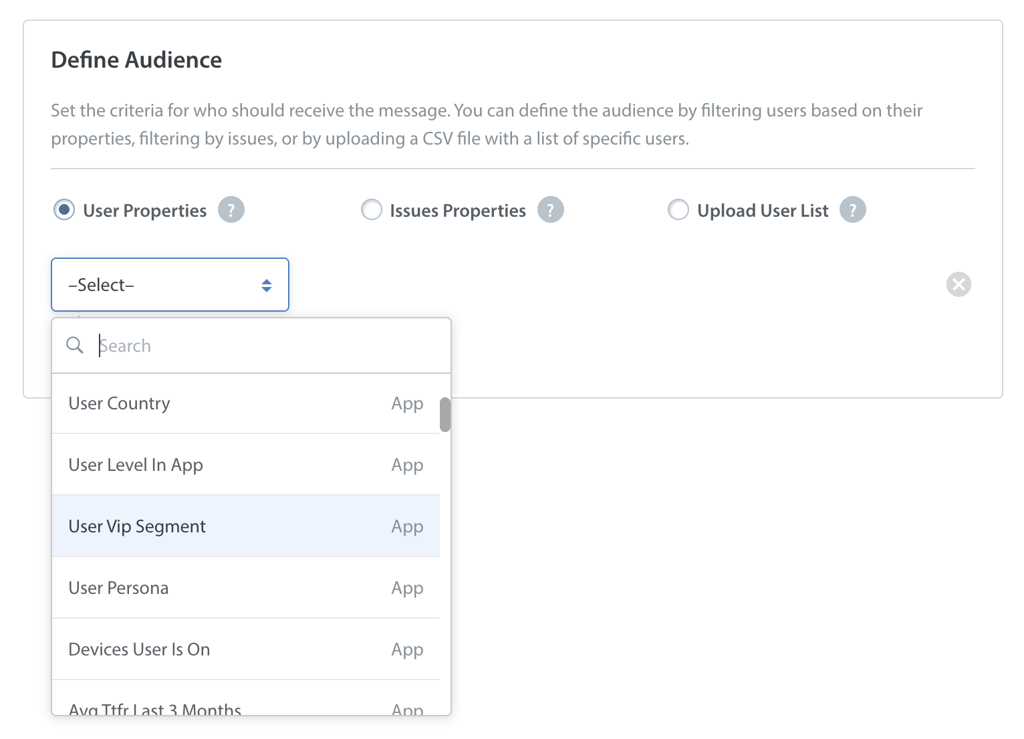
Defining Audience
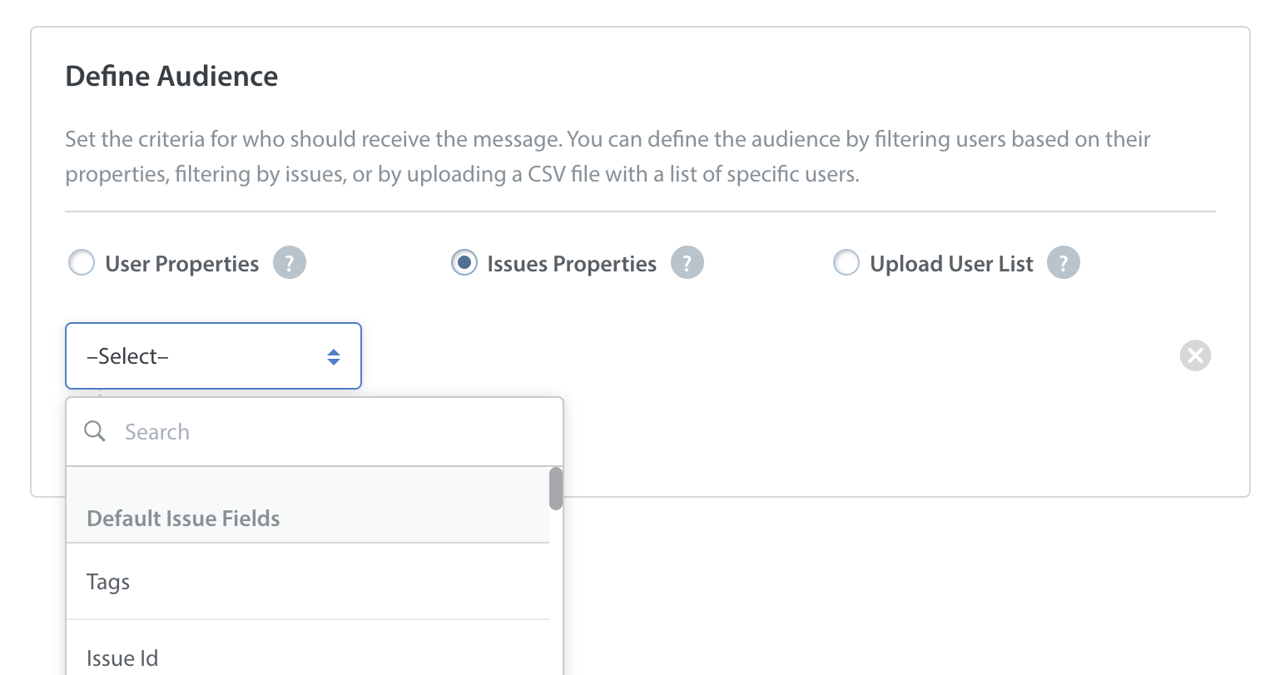
The Audience tab allows you to select the segment of audience who would receive your message. You can define your audience segment by selecting one of three filtering methods:
- User Properties: Filter your audience using real-time attributes sent from your User Hub integration. This allows you to target all users in your game based on real-time data such as User VIP Segment, User App Spend (USD), Last 90D Spend, behavioral or other engagement properties.
- Issues Properties: Reach out to specific users based on their previous support ticket history. Use the dropdown menu to filter your audience by Default Issue Fields, Tags, Issue ID, Title, or Creation Date.
- Upload User List (CSV): Select a CSV file containing specific User IDs to create a custom audience for your engagement campaign. Please note that only existing Helpshift User IDs will be processed.
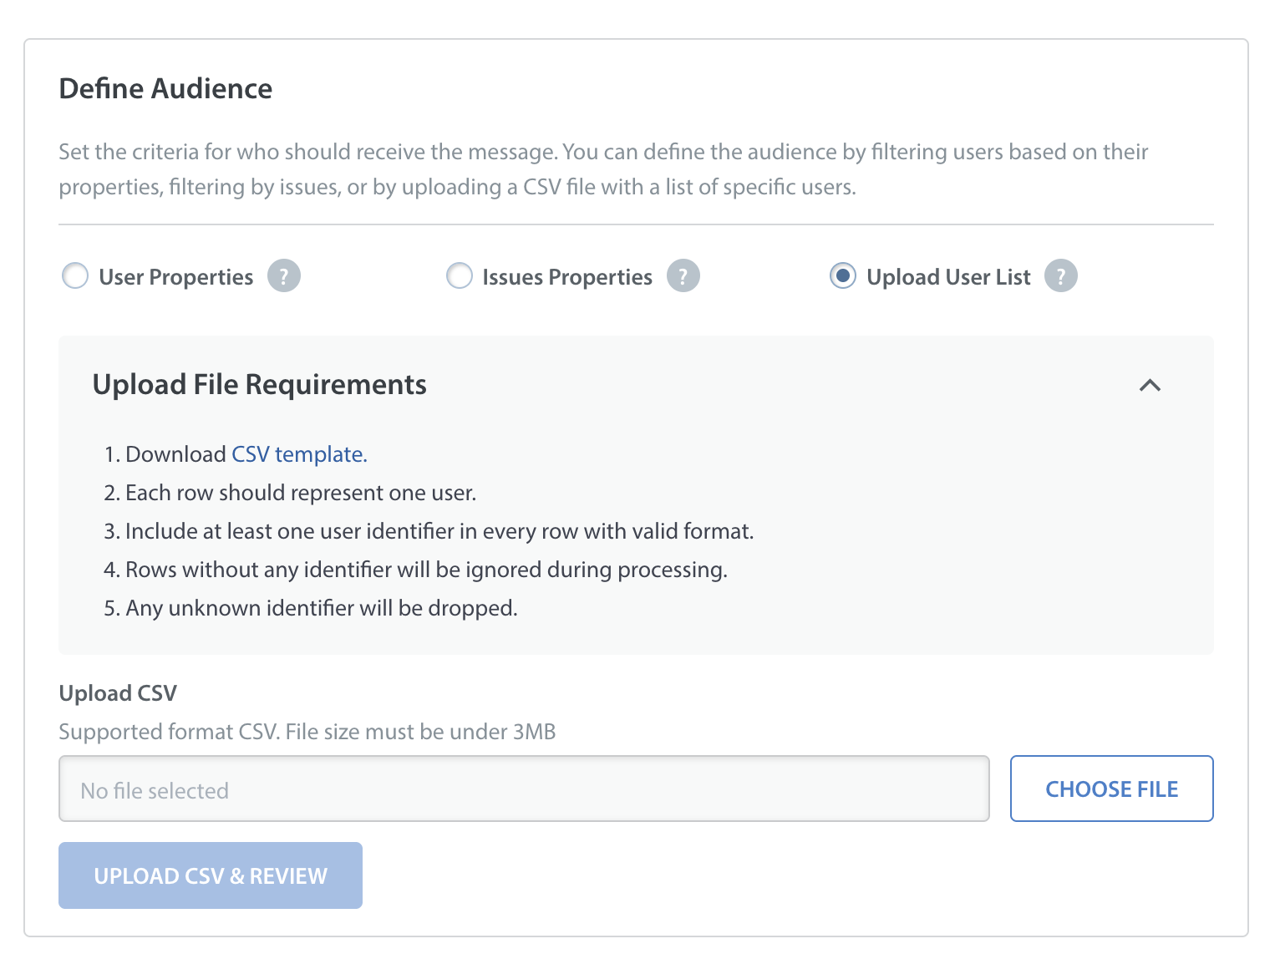
To ensure a successful import, your file must meet the following requirements:- Format: Only one user per row. Unknown identifiers will not be considered.
- Data: Must include at least one valid user identifier.
- File Size: Maximum size is 3MB.
Note: If you switch to another filtering option (e.g., from User Properties to Issues Properties), a confirmation pop-up will appear, and any previously applied properties will be removed.
Estimated Reach
Based on your selected audience criteria, the Estimated Reach indicator displays the number of eligible users who will receive the message.
If a user qualifies for multiple In-App campaigns sent at the same time, they will only be shown the most recently delivered campaign message.

Scheduling Messages
Control the exact timing of your campaign message delivery. The scheduling tab gives you two options:
- Send Now (Check and send immediately after published): The system checks the audience criteria and sends the messages as soon as you click Schedule.
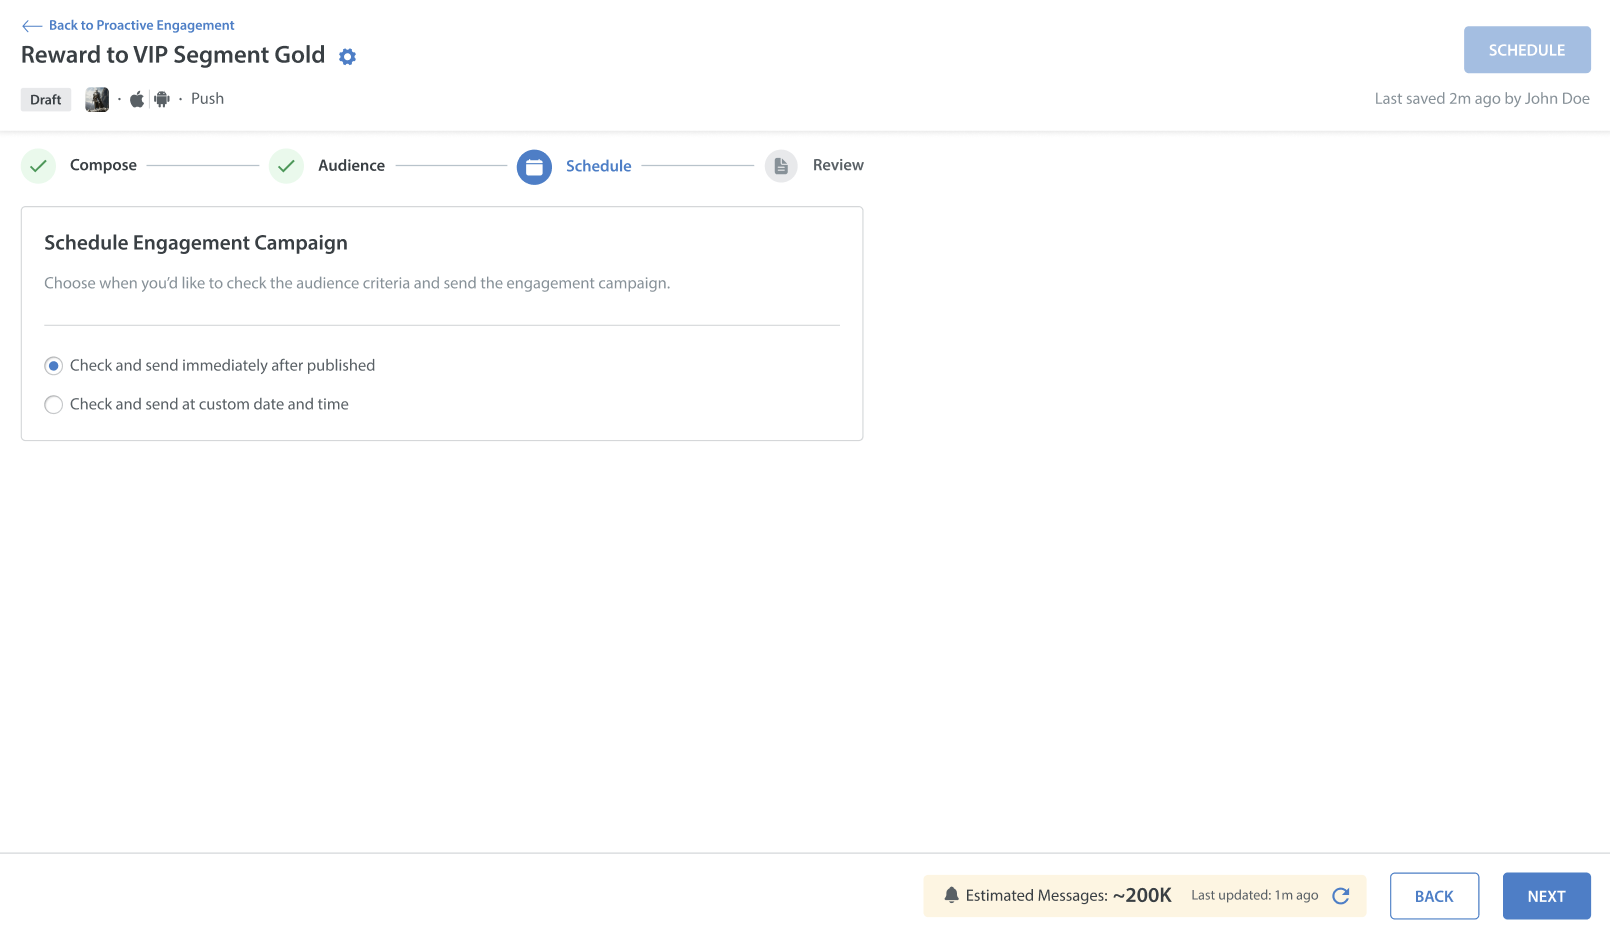
- Future Scheduling (Check and send at custom date and time): Queue the campaign message for a future date. Use the Timezone Picker to ensure the message is delivered at the appropriate time for your audience's local timezone.
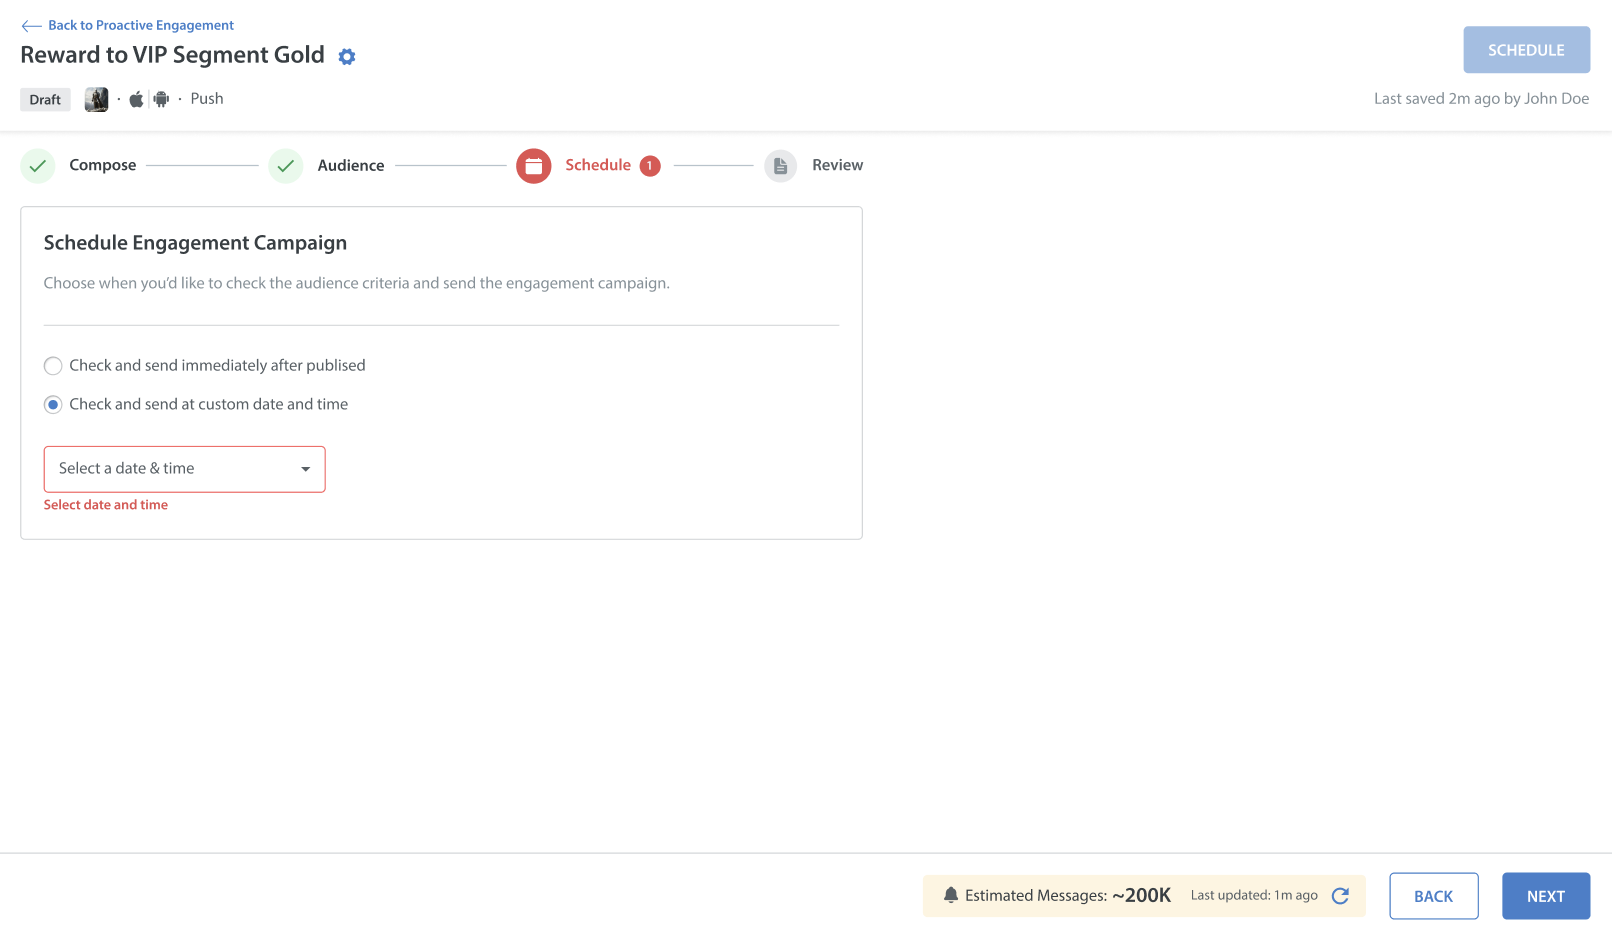
Estimated Messages
You can view the Estimated Messages indicator at the bottom of the Schedule screen. This metric provides an approximate count of the number of messages that will be sent to your target audience.
This estimate is calculated based on active devices, SDK v10.5 adoption, and user push message configurations.

Note: By default, In-App messages have an expiration limit of 48 hours from the time of delivery. If a user is offline and does not open the app within those 2 days, the message expires. Tapping an expired message will not trigger any action.
Reviewing Summary
The final step is the Review screen, which provides a complete summary of your Compose, Audience, and Schedule configurations, along with a device preview of how the message will appear to the end user.
Once you are ready to schedule the engagement campaign, click SCHEDULE.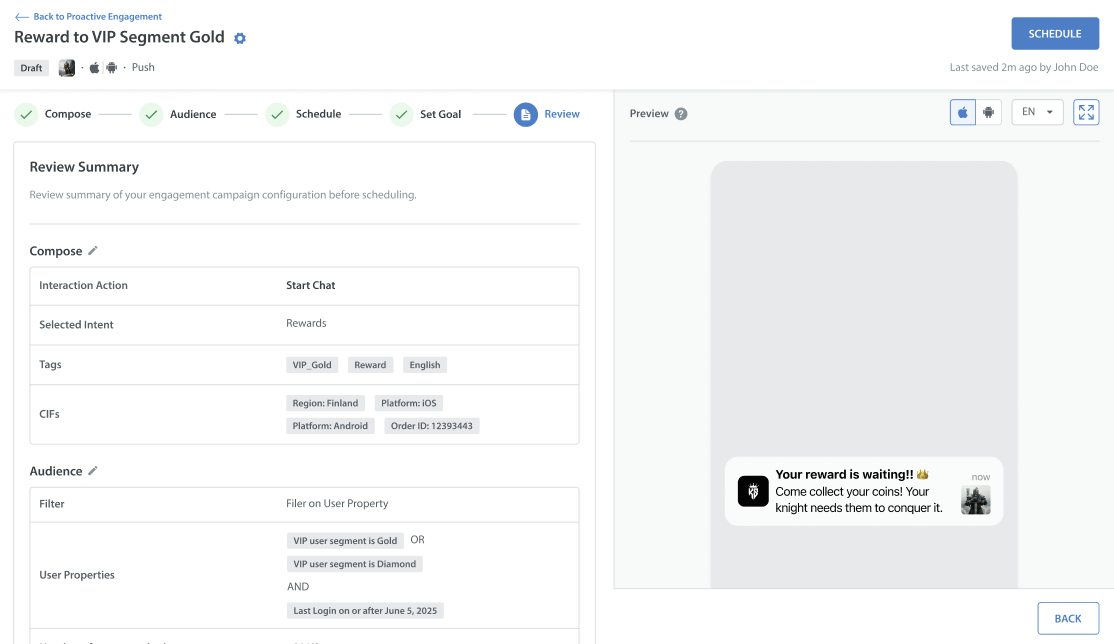
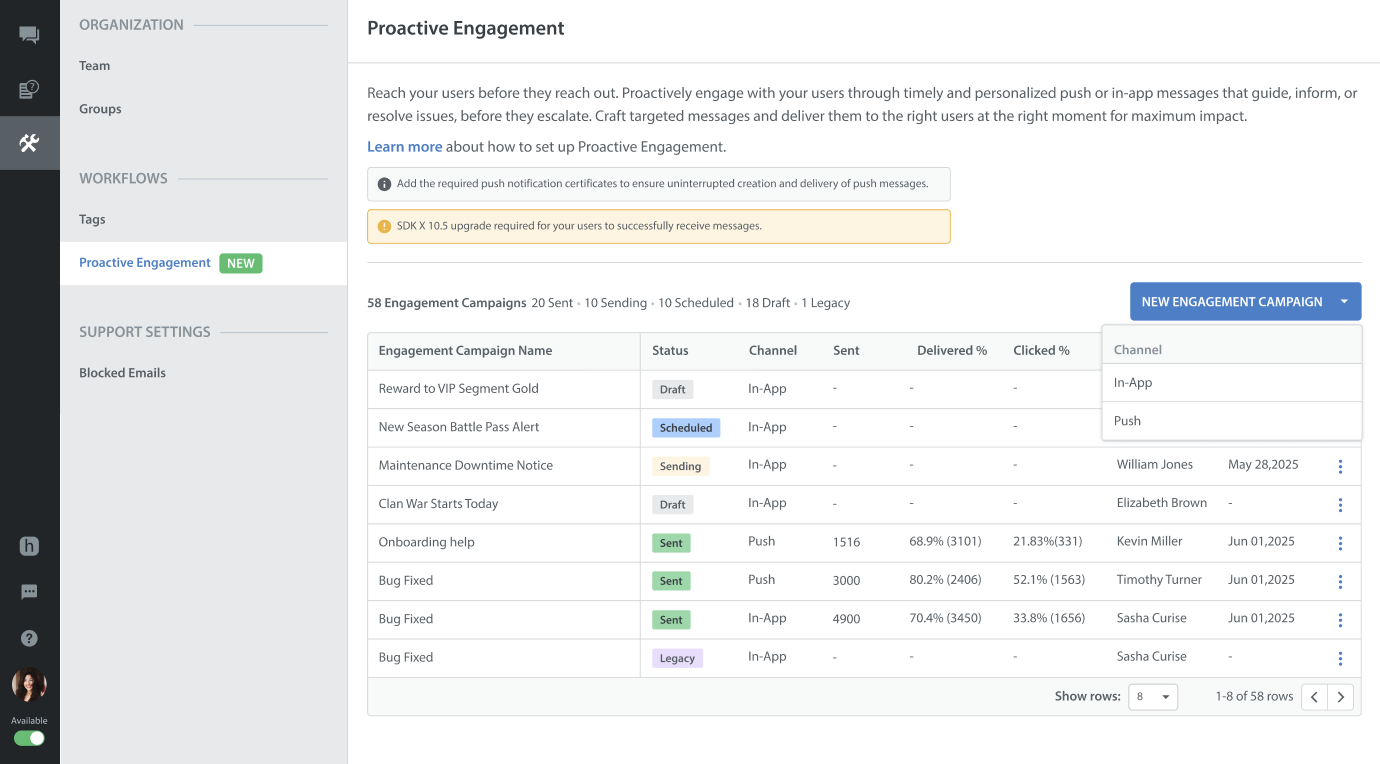
Reviewing Scheduled vs. Sent Engagement Campaigns
After scheduling the engagement campaigns, you will be redirected back to the main Proactive Engagement Page.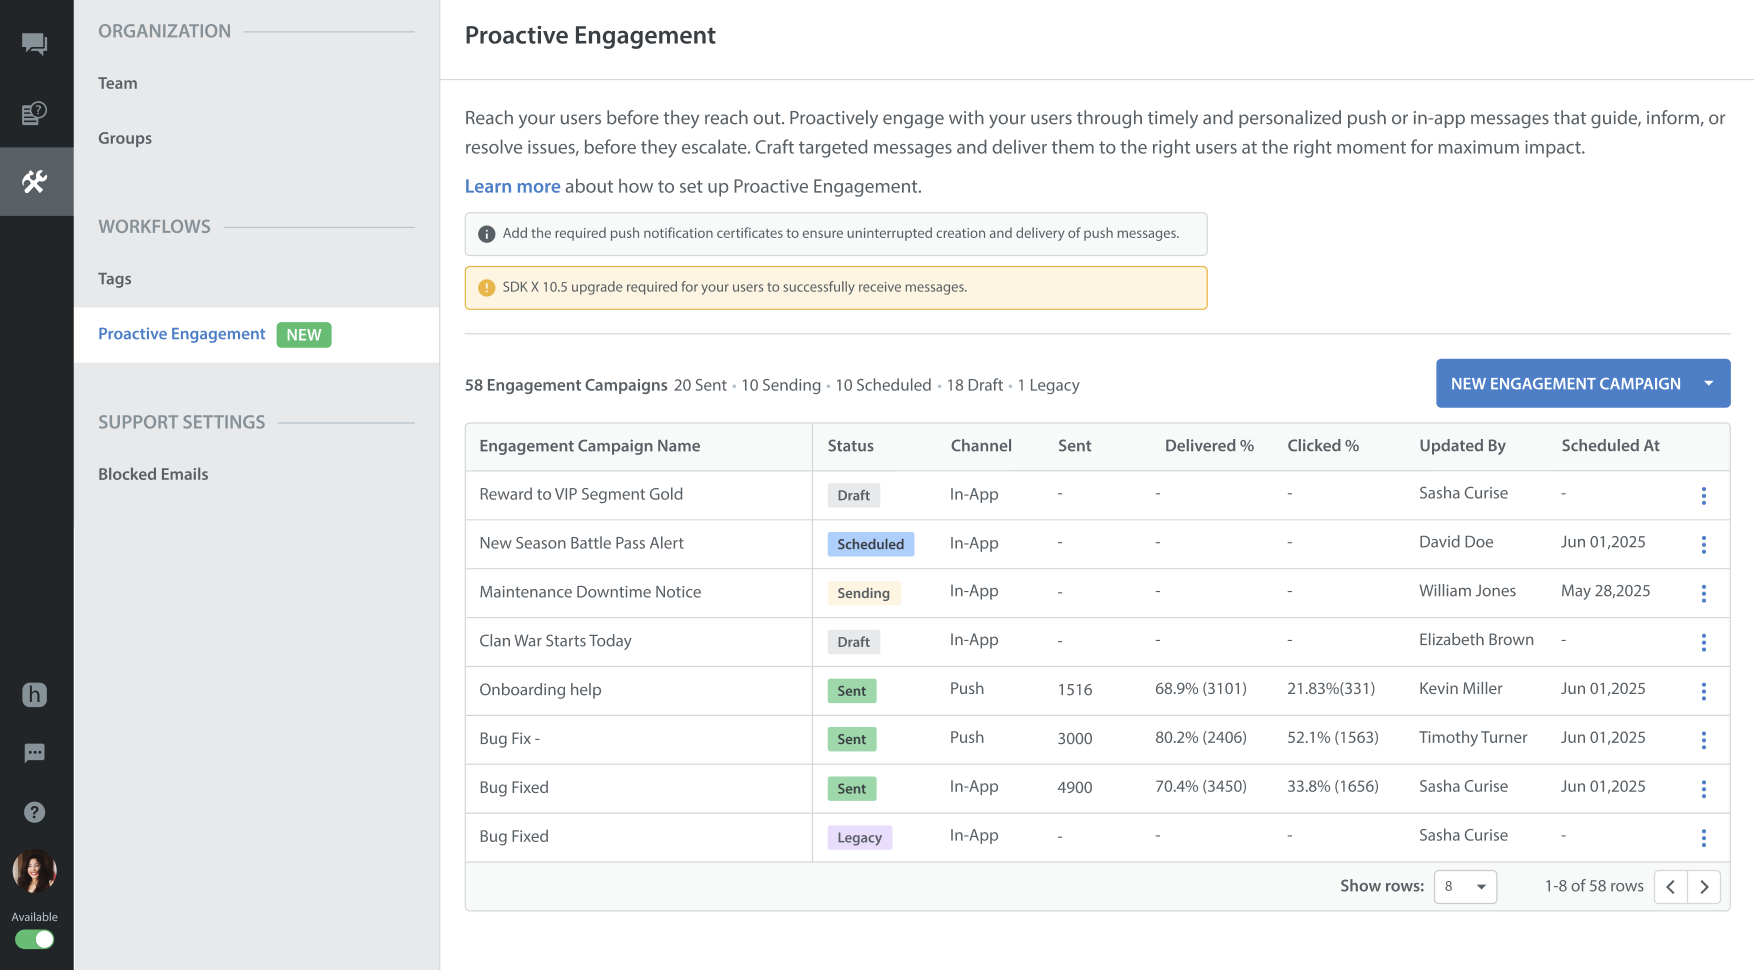
From the Proactive Engagement dashboard, you can track the status of all your engagement camapigns:
- Scheduled: Finalized engagement campaigns queued for delivery at a custom date and time.
- Sent: Engagement Campaigns that have successfully completed their delivery run. You can review delivery and engagement metrics directly from the list, including Total Sent Messages, Delivered %, and Clicked %.
Note: You can refer to your Billing page to track the number of messages sent and the count of Outbound tickets of Engagement Campaigns.