
This FAQ is for developers who are currently in the process of setting up User Identity Verification for their support team. If you have not started this process yet, please review What is User Identity Verification, and how do I set it up? first.
User Identity Verification in Helpshift works by using a server-side generated HMAC (hash-based message authentication code) that uses SHA256 on either the user’s User ID, email, or a combination of the user ID and email. When an end user requests to login, in addition to providing their unique identifier (their user ID and/or email), the system should be set up so that they will automatically provide the HMAC digest as well.
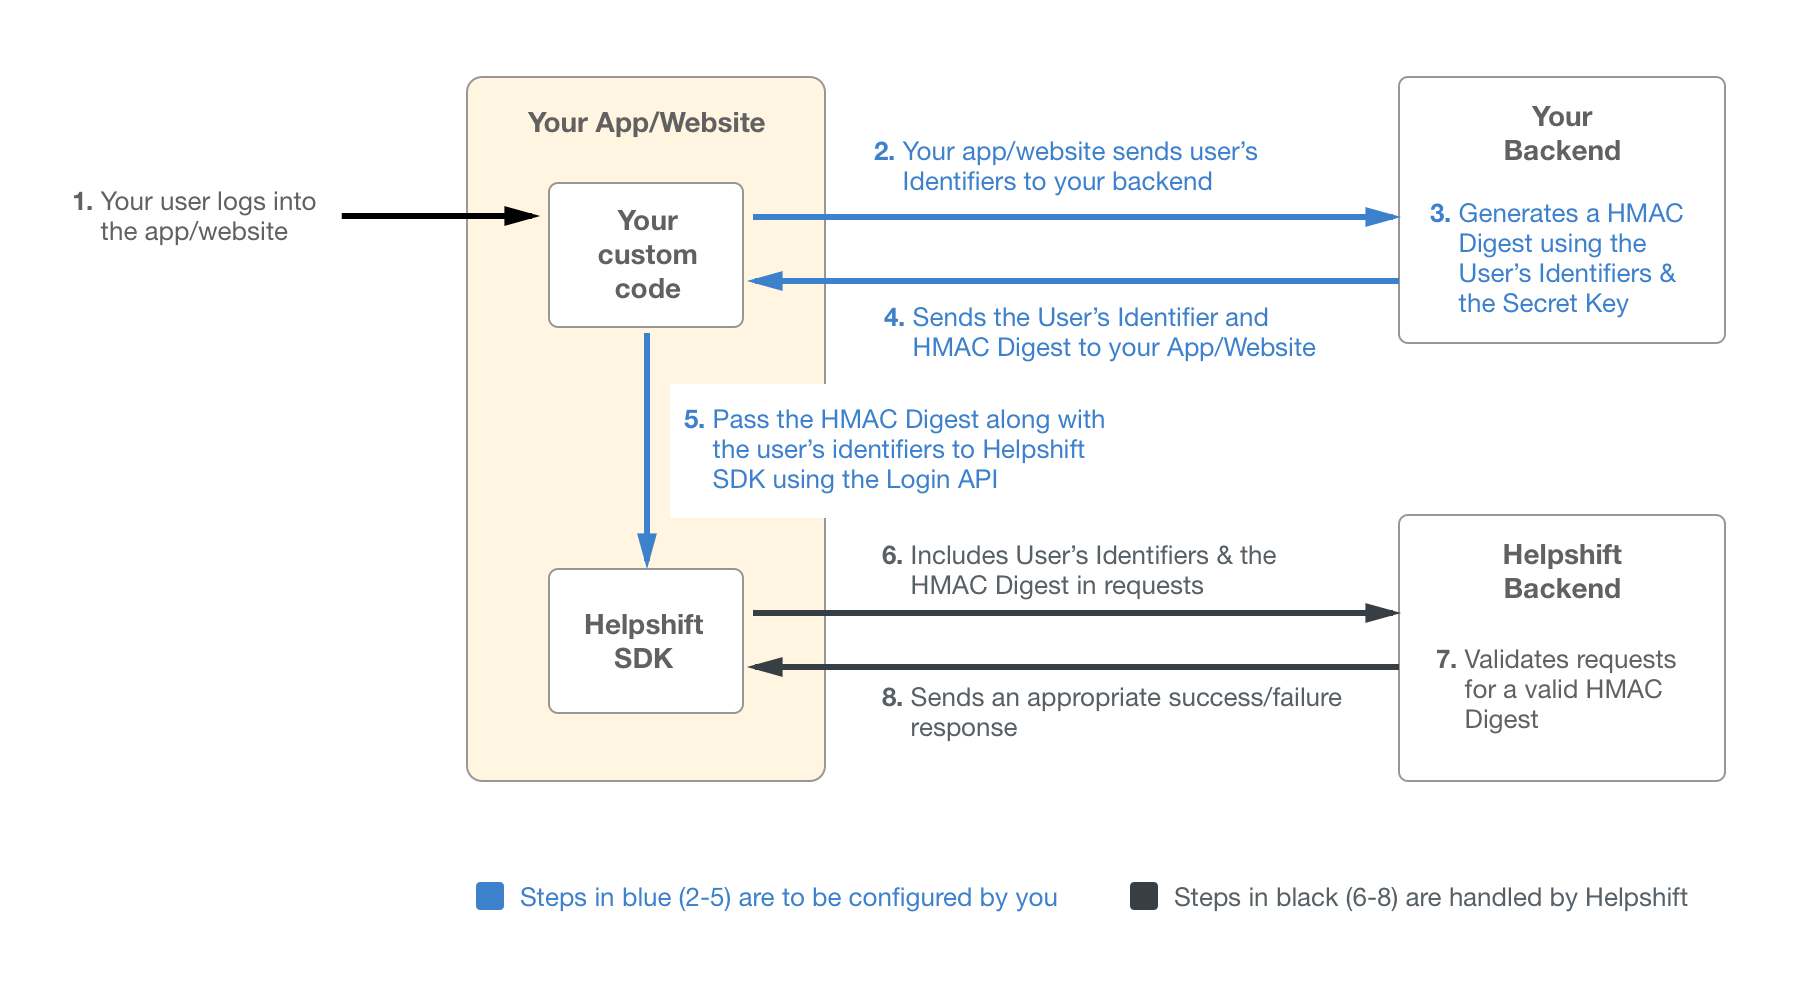
That HMAC digest is generated using a secret key available in your Helpshift Dashboard. Since only Helpshift and your Admins/Developers have access to the secret key, our system is able to verify that the login request is coming from the end user, and not from a malicious 3rd party.
Note: Enabling this feature will prevent users who are on SDK v7.0.1 or higher (with Identity Verification not configured) from being able to file Issues. We strongly encourage you to set up a test version of your app as well as a test app in the Helpshift Dashboard, then complete the steps below. This will provide the opportunity to troubleshoot if any problems arise.
To learn more about how this impacts end users, please see the What does it look like to my end users? section of our FAQ What is User Identity Verification, and how do I set it up?
Step 1: Retrieve Your Secret Key
- As a Helpshift Admin, you can access your secret key by navigating to the settings page.

- On this page, scroll down to App Settings, then select the app you’d like to configure User Identity Verification for.
The secret key (as generated by your Admin using the steps detailed in What is User Identity Verification, and how do I set it up?) will be available on this page.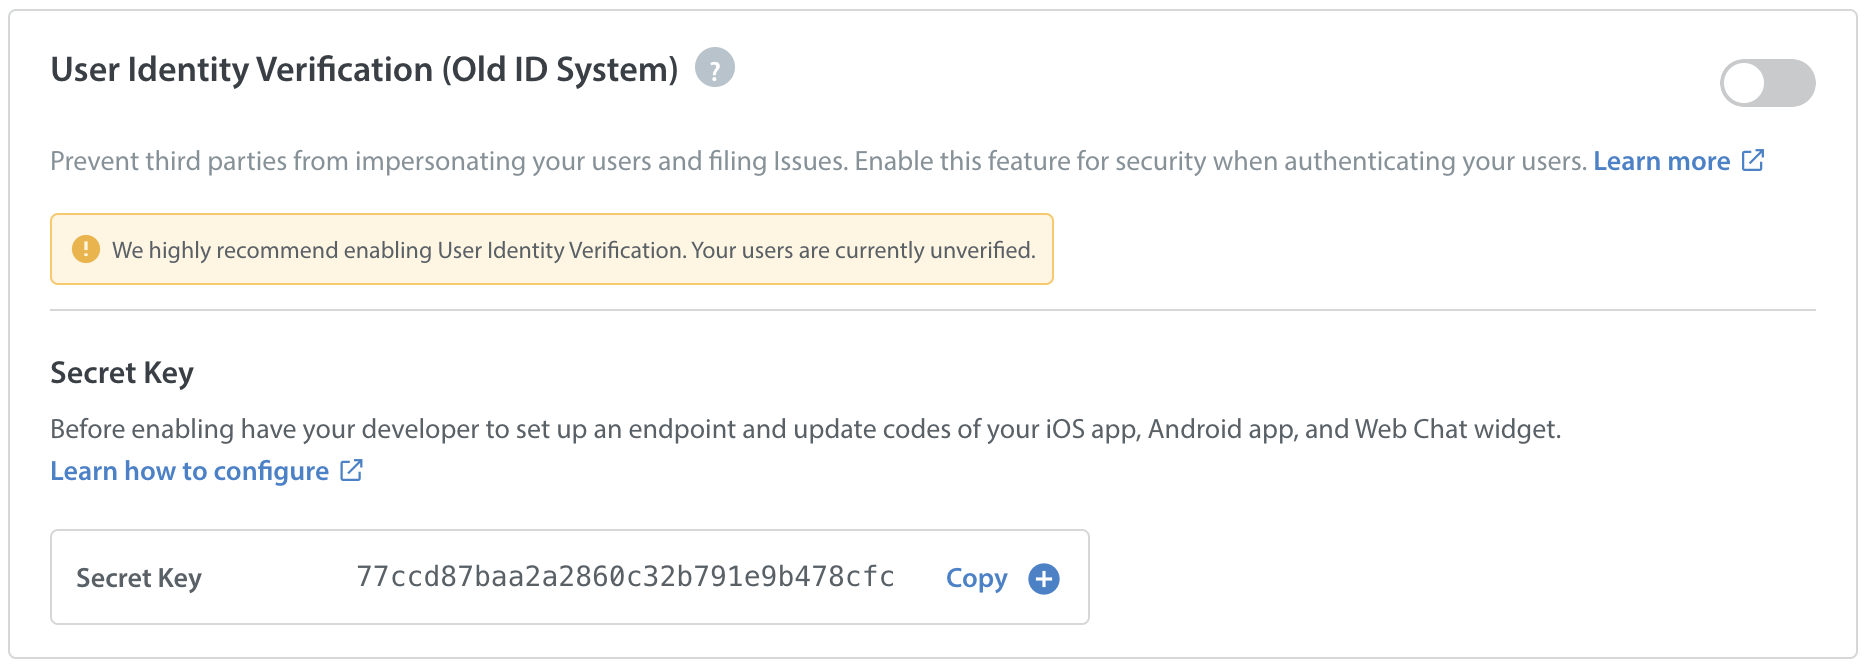
- Click the ‘copy’ button to copy this secret key for use in your endpoint.
For security reasons, this secret key should not be placed anywhere where an end user or 3rd party can access it.
Step 2: Configure Endpoint
Now that you have the secret key, you should use it in your endpoint to pass the HMAC digest to your iOS app, Android app, or Web Chat widget. This HMAC generation can be done as part of the normal login process, or implemented as a separate backend service. The secret key should not be present on the user’s device to prevent disclosure.
Some notes about generating the HMAC digest:
- The digest is generated using HMAC using SHA256.
- If only the user’s user ID is available when generating the digest, then the HMAC must be generated over the user ID.
- If only the user’s email is available when generating the digest, then the HMAC must be generated over the email.
- If both the user ID and email are available, then the HMAC must be generated over the string obtained by concatenating the user ID and email into a single string.
If you encounter any errors when testing Identity Verification, review the following troubleshooting tips:
- Double check that you are using the correct secret key from the App Settings page on the Helpshift Dashboard, and not something like the API key or the app ID. Using any other value will result in the generation of an invalid HMAC digest.
- The HMAC must be generated over the same user ID and/or email that are passed to the Helpshift SDK in the login call.
- Ensure that you are generating a HMAC digest on the User ID, email, or a combination of both based on the identifiers you are providing.
- If the EnableFullPrivacy flag is set to True, the HMAC digest for those users should be generated on the User ID only. Email should be ignored, since it’s a personally identifiable information.
You can reference the following code samples when configuring your endpoint:
Python 3
def hmac_using_stdlib(uid, email, secret):
message = ”
if uid is not None:
message = uid
if email is not None:
message = ‘%s%s’ % (message, email)
print(message)
messagebytes = bytes(message, ‘utf-8’)
secretbytes = bytes(secret, ‘utf-8’)
uat = hmac.new(secretbytes, messagebytes, hashlib.sha256)
return base64.b64encode(uat.digest()).decode(‘ascii’)
node.js
var crypto = require(‘crypto’);
function hmac(uid, email, secret) {
var message = ”;
if (uid !== null) {
message = message + uid;
}
if (email !== null) {
message = message + email;
}
var hash = crypto.createHmac(‘sha256’, secret).update(message);
return hash.digest(‘base64’);
}
Java
import javax.crypto.Mac;
import javax.crypto.spec.SecretKeySpec;
import javax.xml.bind.DatatypeConverter;
public class IdentityVerificationHelper {
public String sign(String uid, String email, String secretKey) {
StringBuilder sb = new StringBuilder();
if (uid != null)
sb.append(uid);
if (email != null)
sb.append(email);
final String message = sb.toString();
try {
Mac hmacsha256 = Mac.getInstance(“HmacSHA256”);
hmacsha256.init(new SecretKeySpec(secretKey.getBytes(), “HmacSHA256”));
byte[] hash = hmacsha256.doFinal(message.getBytes());
return DatatypeConverter.printBase64Binary(hash);
} catch (Exception e) {
// handle exception
e.printStackTrace();
return null;
}
}
}
Step 3: Configure Your iOS App / Android App / Web Chat Widget
Once you’ve configured the endpoint to generate a HMAC digest, you’ll need to configure Identity Verification in your iOS, Android, and Web Chat code. To complete this step, see our developer documentation on Identity Verification for iOS, Android, and Web Chat.
Now you are ready to enable User Identity Verification. As stated above, use a test version of your app with a test Helpshift app to test this feature before enabling it in the live version of your app. Enabling Identity Verification on your live app will prevent users who are not on the latest version of your app (with Identity Verification configured) from being able to file Issues.
For steps to test your implementation, see How do I test that I have User Identity Verification set up correctly?