API stands for application programming interface. Put simply, an API makes it possible for different apps to talk to one another. API keys allow for the actual interaction and exchange of information to occur between multiple apps without having to provide personal information, such as passwords. As an admin, you can safely manage these keys through the Helpshift Dashboard.
You need Helpshift’s API to do the following:
- Custom flagging or feedback mechanisms in your app, like designing a one-way feedback modal
- Creating an Issue natively from a social media app like Facebook
- Passing Helpshift Issue information to internal tools like JIRA
This guide is designed to help you manage your own API keys, including finding, generating, sharing, and deleting them. For more detailed steps and best practices, please see our Knowledge Base.
1. Finding your API Keys
2. Generating and Distributing a New Key
3. Adding a New Partner
4. Understanding Different Permissions
5. Deleting an API Key
6. What If I Accidentally Delete an API Key?
1. Finding your API Keys
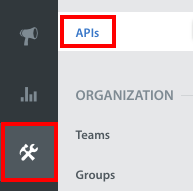
As a Helpshift Admin, you can manage your organizations API Keys by navigating to Settings > APIs (at the top).
On this page you can manage your rate limit, partners webhooks and API keys.
You will see the API keys that are available under the ‘Rest APIs’ header.
You can have multiple unique keys and control the access type which will allow you to manage access by multiple partners to your domain including the ability to explicitly restrict access when needed.
In addition each key will be hidden from viewing until you select the “VIEW API KEY” button, at which time Helpshift will explicitly log who is on this page and viewed this specific API key. This will provide additional protection and help monitor the admins who have access to the API keys.
2. Generating and Distributing a New Key
To add a new key to the existing ‘Read & Write’ key, click the gear icon on the right hand side of the key. This will bring up an ‘Add Key’ option.
Please note:
- Adding a new key won’t automatically deactivate or delete the old key. You’ll have to delete the old key. Steps to delete a key are provided below.
- At any given point of time, there can only be two keys per row. This means, once you added a new default key, You can no longer add the 3rd key. You’ll have to delete the old key in order to add a subsequent key.
3. Adding a New Partner
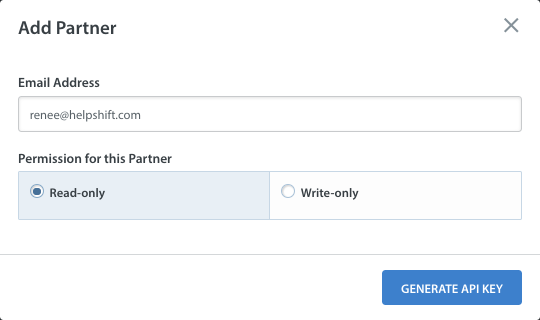
You can add new partners by clicking the ‘Add partner’ button under the Rest APIs text.
A pop-up will appear where you can enter in the partner’s email address and select permission levels for the API Key.
The idea of adding new partners is to give only those permissions (Read or Write) that are required for specific users or teams.
Example: Your Analytics team may only need ‘Read’ permissions. Similarly, if content management team needs both Read & Write access, you can give them that. The advantage is that if the keys related to one particular partner are compromised, you can delete only those partners keys without impacting everyone in the organization.
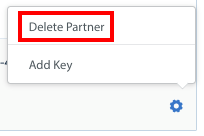
Adding or deleting the new key for partners works the same way as for default keys. However, unlike default keys, you can delete a partner, which in turn deletes and deactivates all associated keys.
4. Understanding Different Permissions
The different permissions are as follows:
- Read-only: With this access, you’ll only be able to view data but not edit the contents
- Write-only: This access will allow your partner to modify Helpshift API endpoints (such as issue details)
- Default Key: Read and write – this is the only key with both permissions
5. Deleting an API Key
If you believe an API key has been compromised, or you no longer use the Helpshift integration that was accessing your account through a particular API key, you can disable that partner directly from the Settings page by clicking the gear icon next to the key, and then clicking ‘Delete Partner’ or ‘Delete Key’.
6. What If I Accidentally Delete an API Key?
Our Support team has your back in the event that an API key is accidentally deleted. Reach out to us on support@helpshift.com with details on what information needs to be recovered. We will respond within 24 hours with next steps.
Please keep in mind that you can also view activity around API distribution and deletion in the ‘History’ section. Click the ‘View History’ button on the API Settings page to access this information.
A pop-up will appear where you can review the API history for each key.
To set up additional features and learn more about Helpshift best practices, please review our Knowledge Base.


