With Custom Issue Fields, you can categorize and route Issues based on specific classifications automatically applied by the SDK when the Issue is created. This enables you to use all of the data available to you about your users from our SDK, including metadata and Custom Data, to automatically assign the Issue to the right Agent or Queue and provide the information they need to quickly resolve the Issue.
With Webhooks, you can integrate external services to provide even more helpful information in the form of Custom Issue Fields, such as in the following examples:
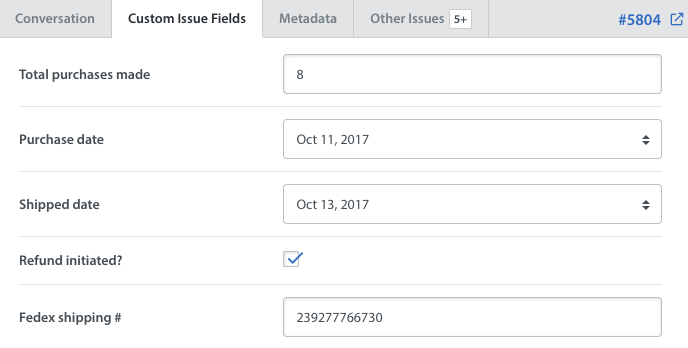
- A shipping number from a courier delivery service can be provided as a single-line text for Agents to check the shipping status
- The status of a refund being processed by an external payment provider can be added as a ‘refund initiated?’ yes/no checkbox
- Marketing data, such as whether a user has been nominated to participate in A/B testing or provide user feedback, can be provided
- For games, metrics tracked in external applications such as ‘total time played’ can be added
Implementation of Webhooks for Custom Issue Fields requires collaboration between your development and support teams. For this reason, we have divided this guide into two parts for each team.
For more detailed steps and best practices, please see our Knowledge Base.
1. For Support Admins: What are Webhooks?
2. For Developers: Set Up Webhooks For Custom Issue Fields
3. Use Webhook Data within Automations
4. Webhook Data in Power BI
1. For Support Admins: What are Webhooks?
In layman’s terms, a Webhook is a way of modifying the behavior of a webpage so that it routes data from that webpage to another place. This is useful for presenting and organizing that data in different places.
In Helpshift, Webhooks are used in a variety of ways to integrate data from third party services into your Dashboard. As an example, you may currently be using a third party billing platform to manage payments.
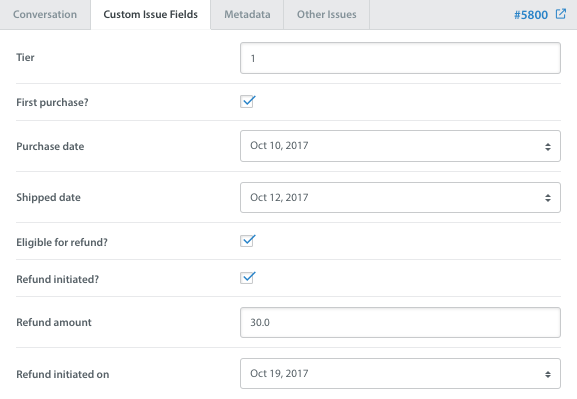
You may wish to import this valuable data from your billing platform to the Helpshift Dashboard as Custom Issue Fields to make it easier to manage Issues. Those Custom Issue Fields could include whether or not a refund has been initiated, the status or amount of a refund, the date it was initiated, the transaction ID, and so on.
Your corresponding Custom Issue Fields could look like this:
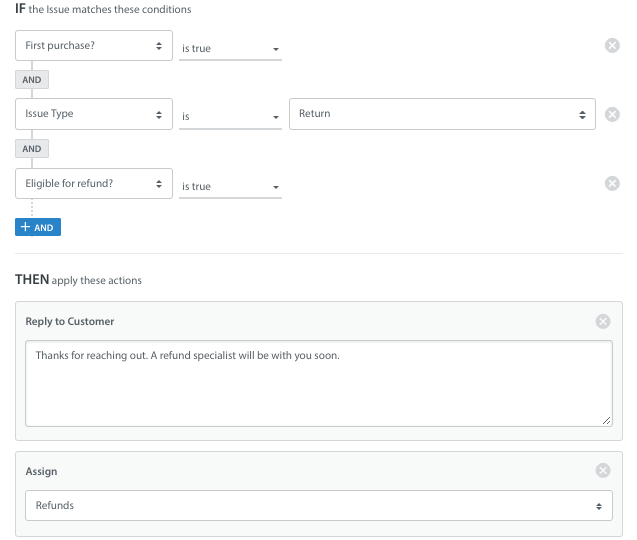
Once you’ve configured your Custom Issue Fields using Webhooks, you can use these Custom Issue Fields within Automations to filter Issues for Smart Views, or assign them to Agents or Queues based on your workflows setup.
Webhooks can also be used to enable notifications via text, email, or a communication app (like Slack) whenever a Helpshift event occurs. To learn more about these use cases, please see What are Helpshift Webhooks, and how do I set them up?
2. For Developers: Set Up Webhooks For Custom Issue Fields
To use a Webhook, you’ll need to set up a “callback” Universal Resource Indicator (URI). In addition, the service offering the webhook will make a HTTP request to the URl when the event is triggered. Once triggered, this will allow your code to signal a response. In essence, all that is required is the ability to listen for HTTP request callbacks to the URI.
Please note: the Webhook will also be triggered when a Custom Issue Field is modified. This means that you can automatically start your workflow by simply updating a Custom Issue Field.
From the Helpshift Dashboard, you can define your own HTTP callback to trigger an action or notification through a Helpshift event. For each Webhook, you will need to configure corresponding listeners and subscribe it to events. The Webhook listener will look out for your defined URL for incoming HTTPS POST notification messages.
You can set up your first Webhook directly from within the Dashboard. To do so, please review the steps in What are Helpshift Webhooks, and how do I set them up?
3. Use Webhook Data within Automations
Once you have Webhooks set up, you can use Automations to attach the external data pulled in by the Webhook to new Issues as Custom Issue Fields.
For detailed steps on how to use Custom Issue Fields with Automations, please see the 'Use Custom Issue Fields with Automations' section of the Custom Issue Fields guide.
4. Webhook Data in Power BI
If you already have Power BI for Helpshift enabled, you can map Custom Issue Fields to your Power BI content pack to visualize that data. Custom Issue Fields updated via Webhook external data will appear in your Power BI Support Analytics report in the exact same places that normal Custom Issue Fields do.
Steps to enable Custom Issue Fields for reporting in Power BI can be found in our FAQ How do I enable Custom Issue Fields for reporting in Power BI?
To set up additional features and learn more about Helpshift best practices, please review our Knowledge Base.


