
Prior to reviewing this guide, you and the Support Manager of your organization should have already reviewed the first section of the Getting Started page to plan how you will configure end user data in your Helpshift SDK implementation.
The Helpshift SDK allows your support team to provide in-app help in the form of searchable, native FAQs and direct, two-way messaging to end users. A successful developer-side implementation of Helpshift includes the following:
- showFAQs:withOptions enabled: This API bundles all capabilities of the SDK, and is the easiest way to enable support in your app.
- enableContactUs option configured: This option allows the end user to directly contact the support team from within the app.
- Push and in-app notification badging enabled: Notifications are essential to bring your end user back into the app and existing support conversation.
- Metadata and Custom Data configured and passed through on end user Issues: metadata and Custom Data are essential for your support team to get the most value out of the SDK. Without attaching metadata to conversations (Issues) your support team will be unable to sort incoming messages. Metadata includes things like lifetime value, install date, app session count, username, and more.
- Enable and attach HS-Tags or Custom Issue Fields to Custom Data: HS-Tags and Custom Issue Fields can be associated with metadata on the SDK side. Attaching tags to metadata will allow incoming Issues to be automatically sorted into predefined categories. For example: If lifetime value = $25, then you as the developer can attach a “paid” tag to that Issue.
We recommend reviewing our FAQ What functions does Helpshift recommend testing during the integration QA process?
For more detailed steps and best practices, please see our Knowledge Base.
1. The Basics
2. Push & In-App Notifications
3. Tracking & Segmenting Users
4. Test Your Implementation
5. Developer Resources
1. The Basics
Downloading the SDK
Download the latest Helpshift SDK at https://developers.helpshift.com Helpshift supports iOS, Android, Unity, Xamarin, and Cocos2d-x. Helpshift can be managed with Maven, CocoaPods, and Gradle.
Getting Started Guide
Follow the Getting Started integration guide for your platform(s) to add the Helpshift SDK to your app. You can find the correct guide by going to https://developers.helpshift.com/ and clicking the ‘Getting Started’ icon next to the platform type you wish to implement the SDK for.
The API keys for the integration can be found as follows:
1. Navigate to your domain at yourdomain.helpshift.com/login/
2. Click on the Settings tab to open the Settings page
3. Click on the SDKs (For Developers) section at the top
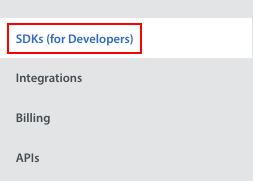
On this page you’ll see the API keys listed beneath each platform.

Note: If you do not have a login for Helpshift, or if you are not an Admin and cannot access the API keys, you will need to have a Helpshift Admin invite you to create an account. Please direct your Admin to the following FAQ: How do I invite my team members as Agents, Admins, & Supervisors?
If your company does not yet have a domain, please contact our Sales team via sales@helpshift.com and they will get back to you within 24 hours during normal business hours (M-F, 9am-5pm PST).
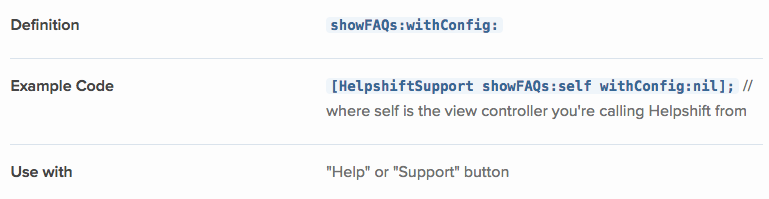
showFAQs API
If you haven’t already, hook up the showFAQs API call (iOS only) to the “button” within your app where you would like the FAQs to be displayed modally.
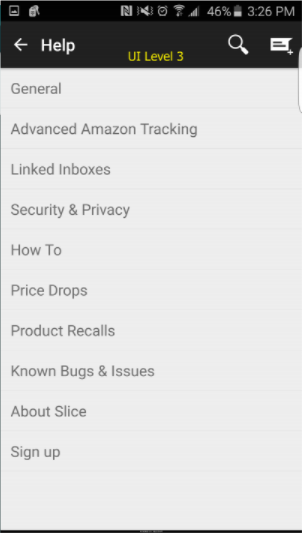
Best Practice: Don’t “bury” help too deep within your app. Make your FAQs stand out and easy to find. In the example below, Helpshift can be called from the second “level” of the UI.

enableContactUs
Set the enableContactUs option (iOS, Android) value to @”ALWAYS”

iOS

Android
Best Practice: If you want to deflect Issues and encourage your users to self serve, set the enableContactUs option value to @”AFTER_VIEWING_FAQS” instead of “ALWAYS”. This is an especially useful configuration for mobile game developers.
2. Push & In-App Notifications
Uploading Push Certificates
You can configure push notifications via the Dashboard by uploading your .p12 or GCM certificate. Steps to do so are as follows:
1. From within the Helpshift Dashboard, click on the Settings tab to open the Settings page
2. Scroll down to the ‘App Settings’ section in the left navigation bar, then select the name of the app you’d like to upload the certificate for
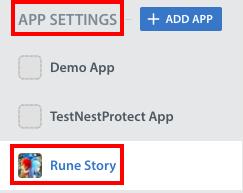
3. On the page that appears, scroll down to the Push Notifications area, then click the ‘Re-Upload a Certificate’ button.
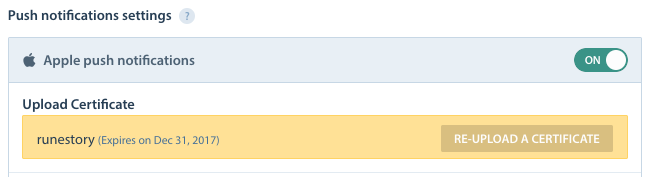
A pop-up will appear where you can upload the certificate and enter the certificate password. Provide this info and click ‘Save’.
If you have any trouble implementing push notifications, please see our troubleshooting tips for iOS and Android.
Push certificates expire. To ensure there are no issues caused by this expiration, we recommend adding calendar reminders for yourself to update these certificates.
Configuring Push within the SDK
In addition to uploading your certificates, you will also need to configure the SDK to handle notifications.
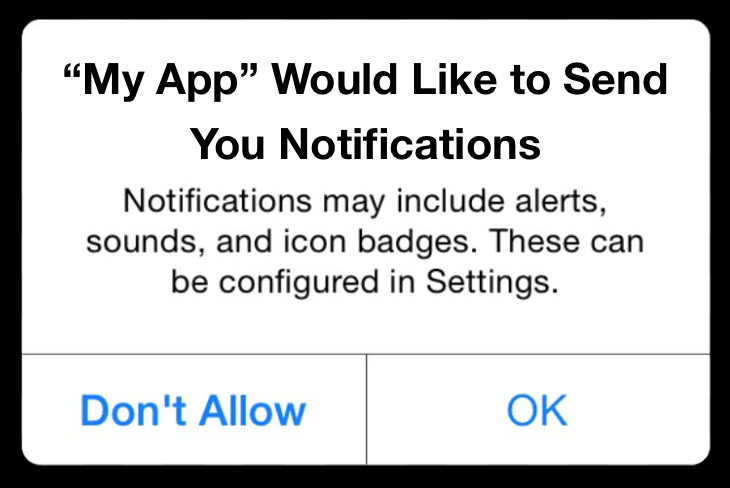
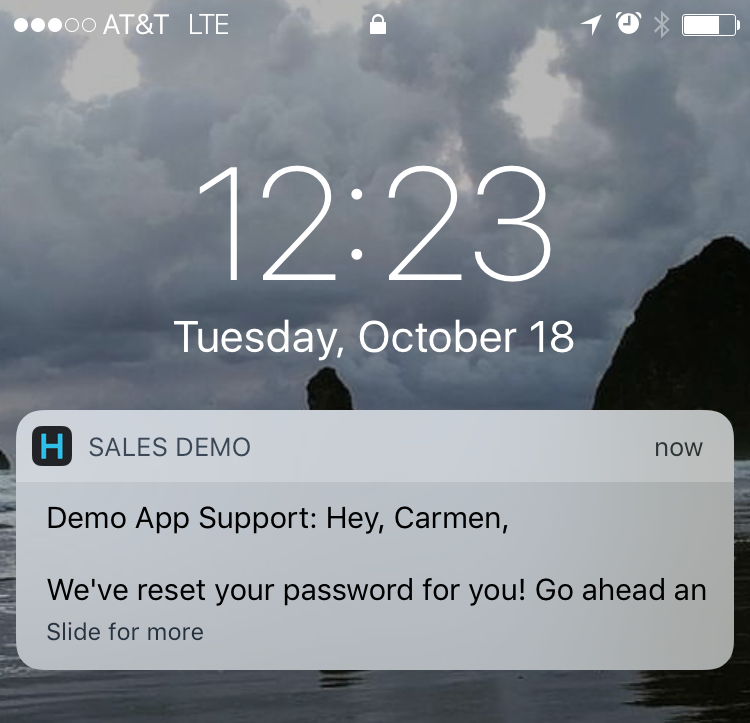
Enabling Notification Badging
Enable notification badges (iOS only) Badging is essential for end users who do not have push enabled. Badging will notify an end user of a support Agent reply in the event of a missed push notification.
3. Tracking & Segmenting Users
If you haven’t done so already, please review the FAQ What’s the difference between Metadata, Custom Issue Fields, and tags? to familiarize yourself with each of these terms as they are used in Helpshift.
Preparation
Attaching metadata to incoming Issues is essential for your support team to be able to sort and prioritize Issues.
There are three parts to Custom Data.
- The client-side data (what it is that you want to attach to the Issue)
- SDK-side HS-Tag (a developer configured tag associated with some data, ie: “paid”)
- Dashboard side tag (the corresponding, identical tag that is hosted in the Dashboard)
*Developer configured tags must be replicated within the Helpshift CRM in order to function properly.
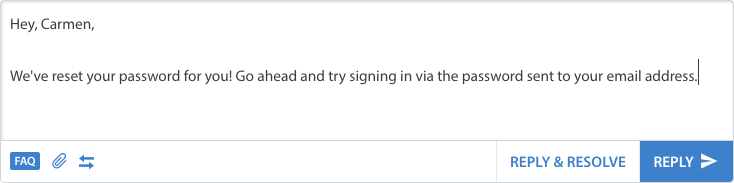
The most basic example of a metadata and tag combination is below.
A user has made an in-app purchase. Because this is a paying user, I can associate a “paid” tag with the incoming Issue.
This allows the Issue to be automatically sorted into a ‘paid’ Issue queue, where my support team can prioritize this end user’s problem first.
In the same example, I can get more detailed information about this user. This user is paid, and I have associated a “paid” tag with their Issue. I also know that this user has a lifetime value of $5. Because this user has spent less than $25, I will designate this user with a “tier_1” tag, in addition to a “paid” tag. If the same user ever spends more than $25, I can elect to apply a “tier_2” tag, and so on.
A tiered tagging system that relates to lifetime value not only allows me to prioritize paid users, it also allows me to prioritize my highest paying users first.
Custom Data can be simple, (e.g.: true/false , yes/no) or, you can stack tags associated with Custom Data to sort Issues into highly specified queues.
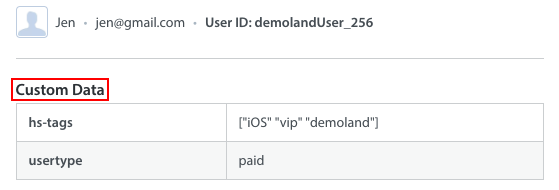
In the Dashboard, this data can be found by clicking on the ‘Metadata’ tab in the Issue details pane.
Prior to configuring metadata and HS-Tags, it is highly recommended that you discuss Issue segmentation and tracking with your Support Manager first. Any data collected on the client side can be passed through and attached to incoming Issues – think about what information will be most useful for your support team before proceeding.
If you are doing an initial test only, it is recommended that you at minimum pass through lifetime value as metadata, and an associated “paid” hs-tag.
Attaching Metadata to Conversations
Prior to this step, you should have a conversation with the Support and Product Manager to plan what HS-Tags, Custom Issue Fields, and metadata will be used in the Dashboard.
Once you’ve agreed on the tags and Custom Issue Fields you’d like to implement in your SDK, you can add them by reviewing our developer documentation on tracking for iOS and Android.
For Custom Issue Fields that will be integral for your workflows, we suggest passing through your metadata directly as fields themselves. Once you’ve chosen your Custom Issue Fields that control workflows in your Dashboard, direct your developer to our developer documentation on Custom Issue Fields for iOS and Android.
4. Test Your Implementation
Create FAQs
In order to properly test Helpshift, you’ll first need to create a few mock FAQs in the Dashboard. To create new FAQs, proceed as follows:
1. From within the Helpshift Dashboard, click on the FAQs tab to open the FAQs page
2. Click the ‘New FAQ’ button on the top left

3. On the pop-up that appears, enter the FAQ title (question) and answer
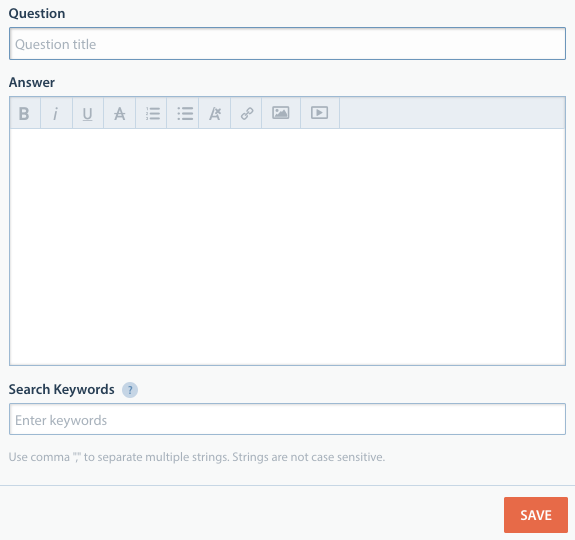
4. Click the ‘Save’ button to save your new FAQ – you may need to toggle the Default Language to ‘On’ to make it visible within your app.
FAQs are updated in real time, so your newly created FAQs should appear immediately in your test app.
Submit a Test Issue
Now that you’ve set up FAQs, test Helpshift in your app. You should see:
- FAQs displayed upon tapping appropriate button inside the app
- FAQ sections and individual FAQs displayed appropriately as set up via yourdomain.helpshift.com
- FAQs + “Contact Us”, if enabled. The “Contact Us” option should be present on either the initial FAQ screen, or only after viewing a FAQ, depending on your specific configuration.
Next, submit a test Issue. The Issue should show up immediately in your Helpshift Dashboard as a “New Issue”.

Select the test Issue and respond to the Issue as an Agent. You’ll want to do this several times, and check for push notifications. Upon tapping a push notification, you should be brought directly back into the conversation with the Agent.
Test Push Notifications
Test push notifications in the following ways;
- App Closed, on home screen of device.
- App Open, but not using Helpshift. (ie: Not inside the conversation view)
Test notification badging in the following ways;
- Ignore push, check app icon on homescreen. Badge should appear on App Icon.
- Ignore push, check settings button from inside the app. Badge should appear on whatever button you’ve attached Helpshift to. Note: there may be several levels of badging, depending on how deep you’ve buried Helpshift within your app.
This is all that is needed for the initial implementation of Helpshift. For advanced configuration options, please see below.
5. Developer Resources
For implementation assistance and technical questions, please reach out via our contact page. We’re here to help!
Release Notes
Additional SDK Configurations
| Localization | iOS | Android | Unity | Xamarin | Cocos2d-x |
|---|---|---|---|---|---|
| Reviews & Feedback | iOS | Android | Unity | Xamarin | Cocos2d-x |
| Skinning & Customization | iOS | Android | Unity* | Xamarin* | Cocos2d-x* |
| String Customization | iOS | Android | Unity* | Xamarin* | Cocos2d-x* |
| Deep Linking | iOS | Android | Unity | Xamarin | Cocos2d-x** |
*Android and iOS documentation can be utilized for implementation in Unity, Xamarin and Cocos2d-x.
**This functionality is not yet available for this platform.
FAQs & Knowledge Base
To set up additional features and learn more about Helpshift best practices, please review our Knowledge Base.